Quarter 3 Updates
First off, we'd like to thank every Envision Cloud user that offered suggestions and helped to inspire these updates! Hearing your experiences with Envision Cloud allows us to continually improve the software in a customer-centered way.
We're very excited to present Envision Cloud's Quarter 3 Updates!
This quarter you'll notice major updates to Company Settings, Purchase Order Receiving, Online Booking, and more! Further, our enhancements to Envision Cloud work to improve the usability for employees, simplify membership management, allow for employee pricing, and so much more! Paws users, we've got some updates made specifically with pet grooming salons in mind! For example, you can now view Pet Information During Appointment Booking, add UMR For Paws, select from Additional Pet Sizes, and more!
Be sure to keep reading to learn about how your Envision Cloud has been revamped and enhanced this quarter!
Appointment Schedule
🤩Edit Client Details From Appointment
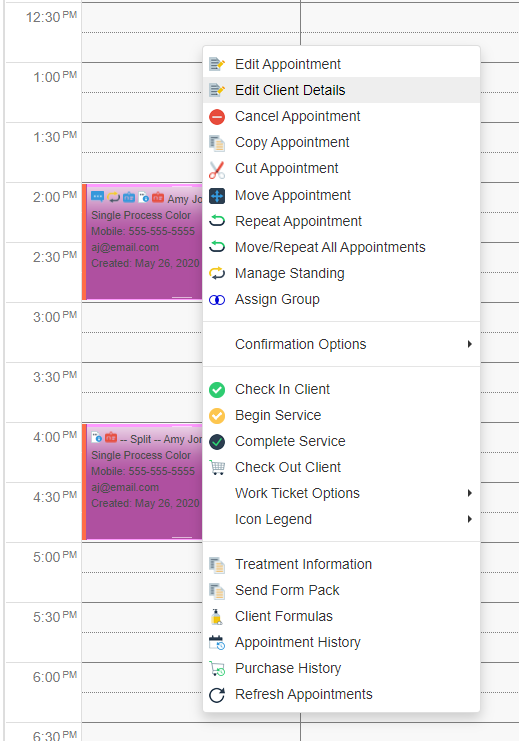
A client record can be edited by right-clicking on an existing appointment. This allows your business to easily update a client's record from the Appointment Schedule. This option will only appear if the security profile of the user is allowed access to editing clients.
- Schedule > Appointments > Right-click an appointment > Edit Client Details
🤩Client Information Visible During Appointment Booking
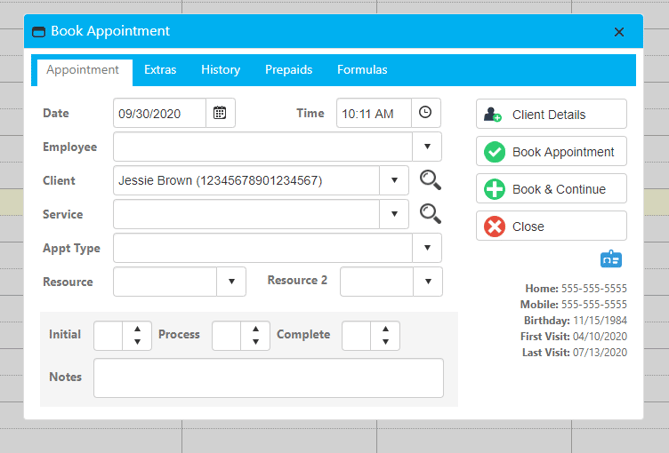
When a client is being booked for an appointment, their information will appear in the appointment booking window. The information will include the client's home phone, cell phone, birthday, last visit, and first visit. This information can be used to better serve clients while scheduling them!
- Schedule > Appointments > Add New Appointment or double-click free space on calendar > Select a client
🤩Appointment Booking Screen Tabs
The tabs on the Appointment Booking screen have moved up to the top. This just streamlines the design of the screen and makes all the various options aligned, meaning the history, prepaids, and formulas options are alongside the extras and appointment tabs.
- Schedule > Appointments > Book a New Appointment or double-click on a blank spot on the calendar
🤩Audit Tab for Existing Appointments
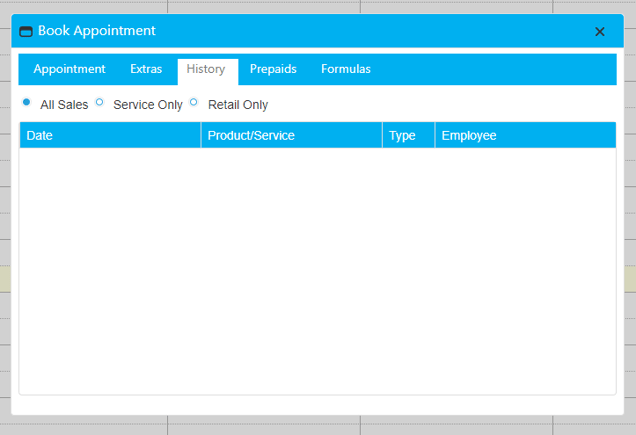
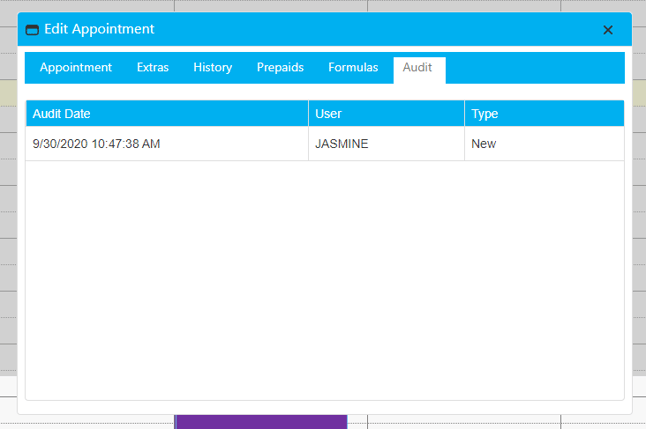
After an appointment has been created, the Audit tab will appear at the top of the Edit Appointment window. When selected this screen will display who created or made changes to the appointment, when they were made, and the type of audit. This tab can make it easier to track changes that happen to appointments.
- Schedule > Appointments > Double-click existing appointment > Audit
🤩Formulas Tab While Adding and Editing Appointments
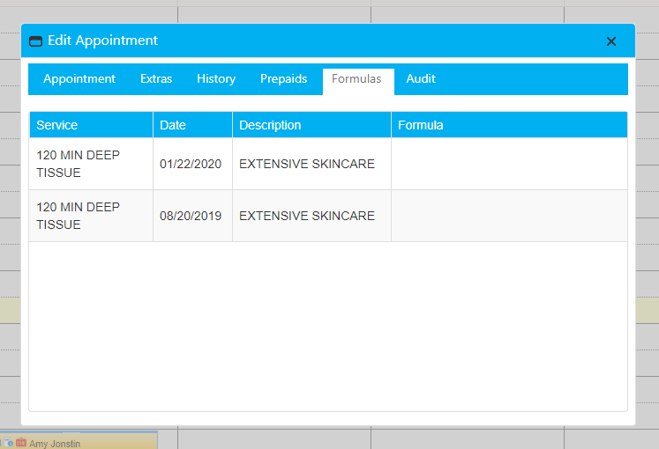
When creating or editing an appointment, the formulas tab is now a tab option. This tab will show you the formulas for the client that you have selected for the appointment. This feature can make locating formulas easier and help staff to be aware of what tools will be necessary for the appointment during scheduling.
- Schedule > Appointments > Add a New Appointment or double-click on an existing appointment > Formulas
🤩Schedule Holidays
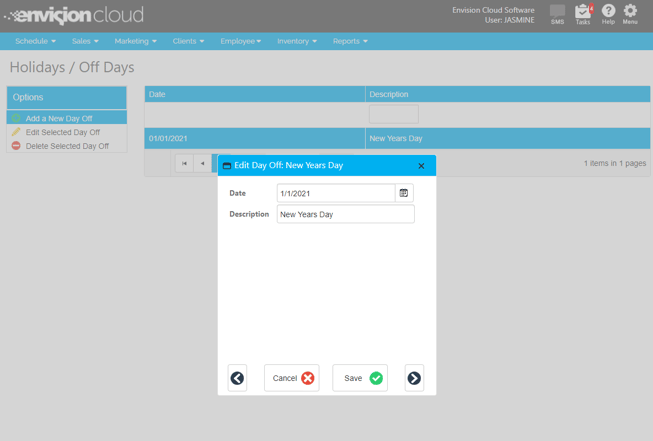
Holidays can now be used to set days for your business to close. When a holiday is set, online booking will show 0 available times for the holiday. The waiting list will not scan or show availability for holidays. If you attempt to book an appointment on a holiday, a warning will appear to alert you are attempting to book on a holiday, but if you wish to book on a holiday, you can bypass the warning.
- Schedule > Schedule Options > Setup Holiday /Off Days
🤩Service Without Completion Time
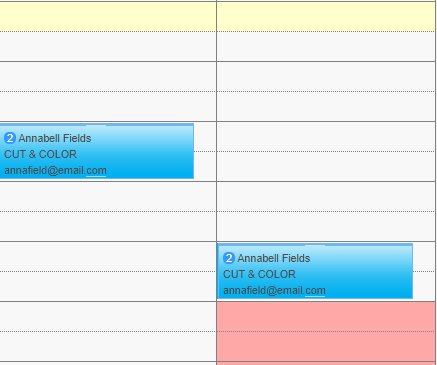
Process times can be entered without completion times using the "Book & Continue" feature to accommodate appointments in which a client sees two different service providers. For example, if a client is getting a cut and color and will be seeing a hair colorist and then a separate hairstylist with a processing time in between the two, the "Book & Continue" feature would allow you to schedule that accurately on the calendar. To schedule appointments this way:
- Add a New Appointment. Select the first service provider the client will see. Select the client and the service with the completion time set to zero.
- Select book and continue.
- Select the second service provider the client will see. Select the same service as before.
- Select Book Appointment.
Online Booking
🤩Online Booking Terms
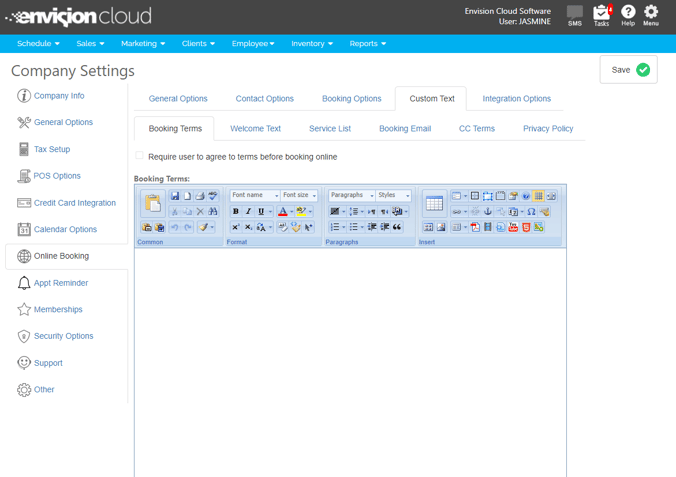
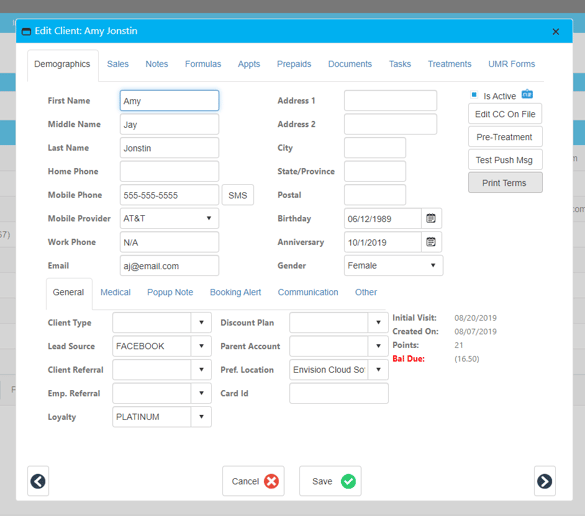
Booking terms can now be set and can be required to be agreed to for clients to book online. This option allows your business to write and communicate terms to clients and require acceptance of these terms to finalize their online booking. The Terms Page is its own page in the online booking process after a date is selected. If this setting is enabled, the client ID, date, time, and IP address of the person accepting the terms will be recorded and saved in Envision Cloud. Clients will have to reaccept the terms every time they book an appointment online. Salon booking/gift card sites will have a link to “Terms and Conditions” so clients can review on future visits. Terms can also be printed from the client profile.
- Company Settings > Online Booking > Custom Text
- Client > Client List > Select a client > Print Terms
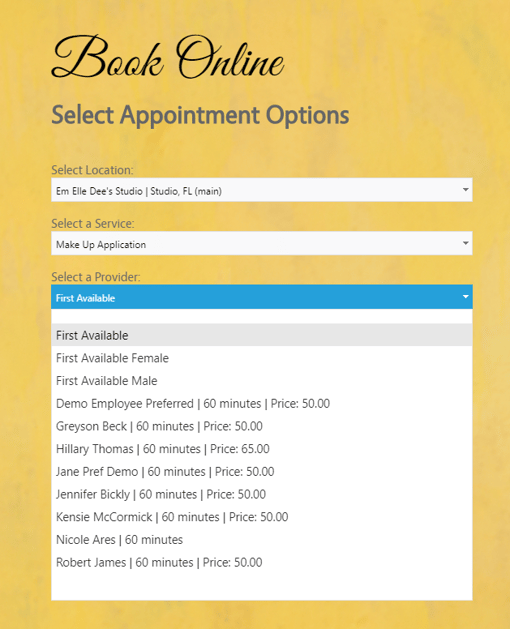
🤩Online Booking Appointment Type
An appointment type will now be automatically assigned based on how a client books online or from your business's mobile app. If a client selects “First Available” then the Appointment Type will be marked as “Shop Client," and if a client selects an employee, then the Appointment Type will be considered “Repeat / Request.”
🤩Online Booking Screen Optimized for Mobile Booking
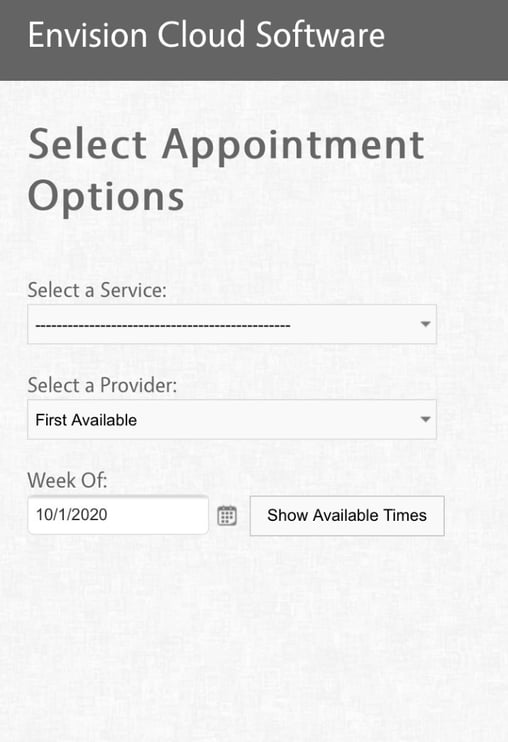
The online booking screen has been enhanced to allow for a clearer and larger display on mobile phones. The shop hours will be hidden to accommodate this improvement. This update can make online booking easier for your clients!
Sales Register
🤩Manage On Account in Sales Register (Preferred & Ultimate)
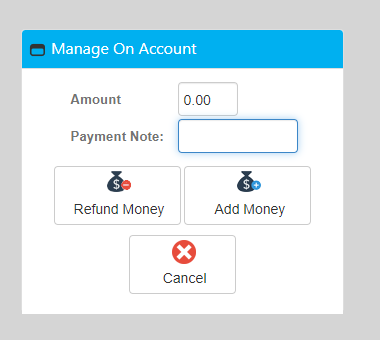
On Account transactions have been simplified with the Manage On Account button in the Sales Register. With this new button, adding and refunding money to a client’s account is easier. The new pop up allows you to select to add or refund, input the amount, and add a payment note if necessary. (15-character max.)
- Sales > Sales Register > Select a Client > Manage On Account
🤩Open New Drawer Each Day Company Setting
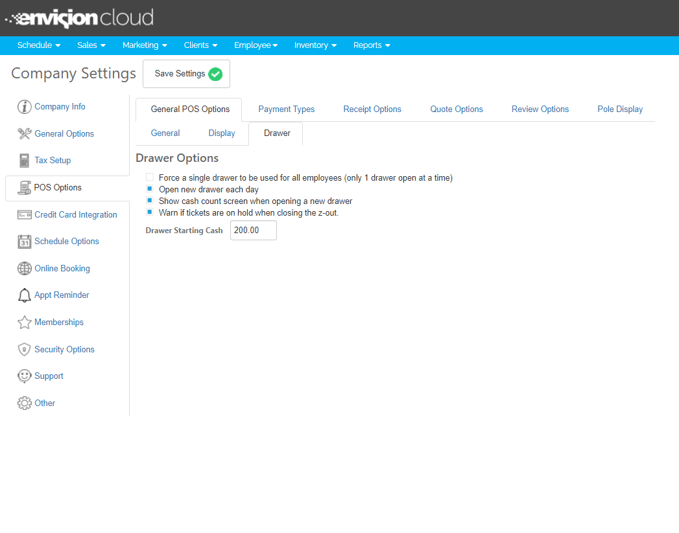
A new drawer can be set to open every day. With this setting enabled, when the Sales Register opens it checks the Open Date of the currently assigned drawer. If the open date is today it simply uses that drawer. If the Open Date is from a previous day, it will prompt the user to select or open a new drawer. Only drawers opened today will be visible. When the "Force a single drawer to be used for all employees (only 1 drawer open at a time)" setting is off, by clicking the view button on the z-out screen all drawers will be displayed and can be closed from that screen.
- Company Settings > POS Options > Drawer > Open a new drawer each day
Marketing
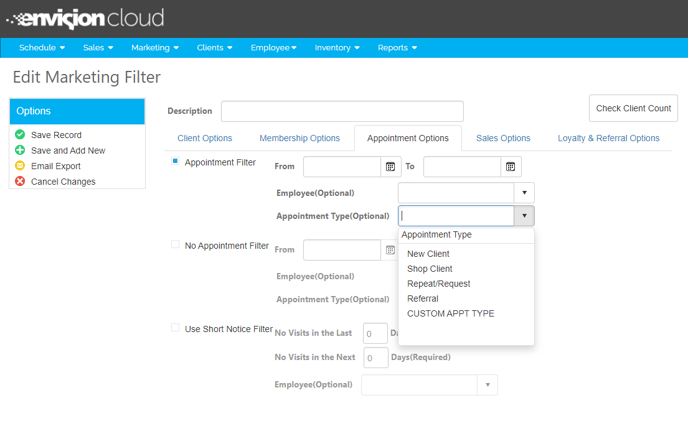
🤩Appointment Type Marketing Filter
Clients can be filtered by Appointment Type using Marketing Filters. This allows you to send targeted marketing email and SMS campaigns to groups that may have a referral appointment coming up or just had their first appointment at your business.
- Marketing > Client Filters > Add a New Filter or edit an existing filter > Appointment Options > Appointment Type
Clients
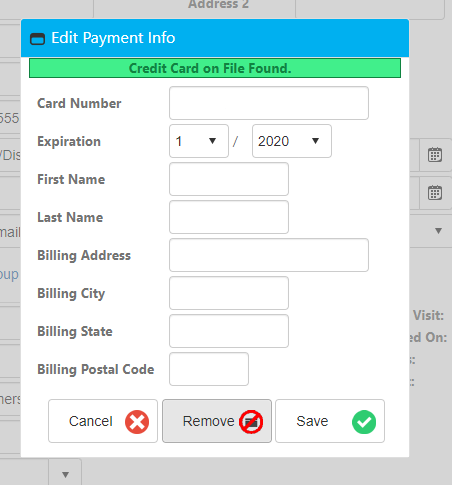
🤩Remove Card on File (Preferred & Ultimate)
A card that has been saved on file can now be removed. The remove button can be used to take cards off file for various reasons!
- Client > Select a client > Edit CC On File > Remove
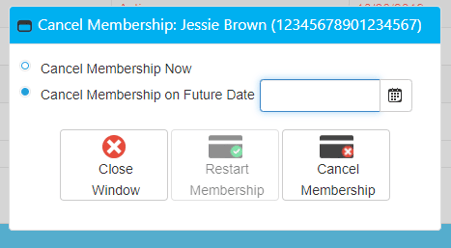
🤩Set Future Membership Cancellation Date (Preferred & Ultimate)
A membership can be set to be canceled on a future date. This feature can eliminate the need to go in and manually cancel memberships that are coming up to their end date and are not going to be renewed.
- Clients > Membership Options > Membership Billing > Select a membership > Cancel Membership > Cancel Membership on Future Date
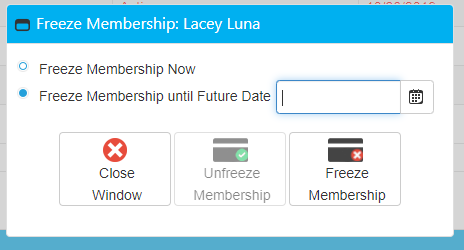
🤩Freeze Membership Until Future Date (Preferred & Ultimate)
Memberships can be set to be frozen until a future date. This future date determines when the client would be billed again, and their account would be unfrozen. This feature can eliminate the need to go in and manually reinstate memberships that have decided to unfreeze at a certain date.
- Clients > Membership Options > Membership Billing > Select a membership > Freeze Membership > Freeze Membership until Future Date
Employees
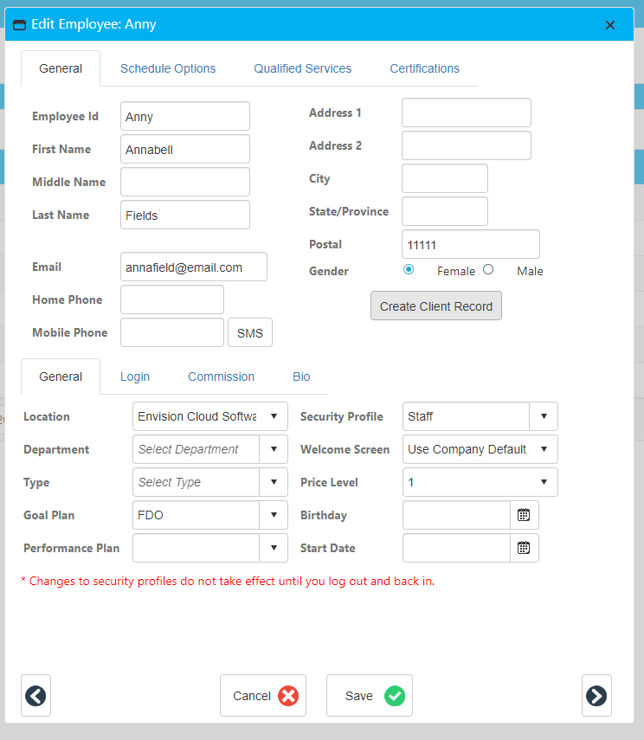
🤩Client Profile for Employees
The new Create Client Record button under an employee profile allows employees to have client profiles created for them to use services at your business. A mirror record will be created for the employee on the Client List. This feature makes employee purchase history, formulas, and more accessible in Envision Cloud and still connected to their employee status allowing them to get employee pricing. Note that a Client Record manually created for an employee will not be recognized by the system as an Employee’s Client Record. It must be created via the Create Client Record button. Note that deleting and purging Client Records of employees will not affect the employee record – only the counterpart Client Record for that employee. When either the client or employee record has an updated name, phone number, address, or email, both records auto-update with the most current demographic information.
- Employee > Employee List > Select an employee > Create Client Record
🤩Employee Pricing
There is now a free form field for Employee pricing on retail items, services, packages, and other items. The employee pricing is linked to the client record that is created through the employee’s profile. The employee price will only be applied if the employee has a Client Record created via the Create Client Record button from the Employee Profile and the employee price is not set to 0.00. The employee pricing feature allows your business to easily set a discounted price for employees both encouraging them to get services done at your business and giving them a perk!
- Inventory > Retail List or Service List > Sale tab > Employee Pricing
- Inventory > Package List or Other Item List > Employee Price

Inventory
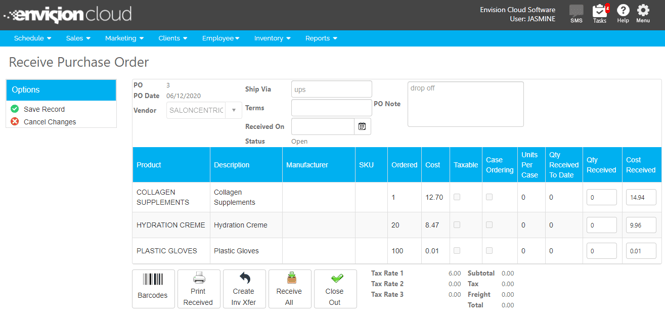
🤩Enhanced PO Receiving Screen
The PO system has been improved to feature more detailed PO receiving. The Received Purchase Orders screen now displays quantity ordered, quantity received to date, quantity received, cost ordered, and cost received. There are also now fields titled Quantity Received and Cost Received which can be filled and/or edited upon receiving an order. This update can make the PO receiving process more thorough and accurate!
- Inventory > Receive Purchase Order > Select a PO
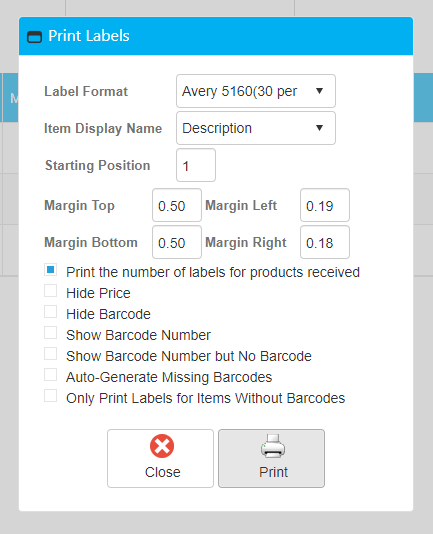
🤩Print Labels for Received PO
Inventory labels can be printed from the Receive Purchase Order screen once the received quantities have been entered on the screen under Quantity Received. This intuitive update allows for easy label printing when an order is received by printing labels specifically for the items that need to be labeled.
- Inventory > Receive Purchase Order > Select a PO > Print Received
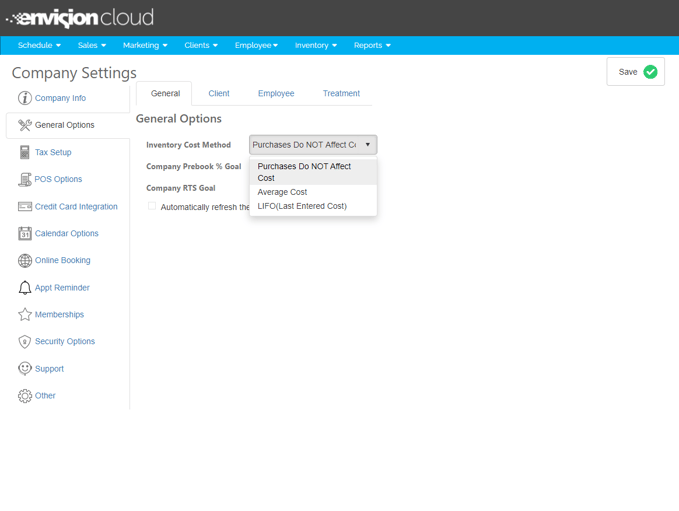
🤩Inventory Cost Method
The new Inventory Cost Method company setting allows a company to select in which method they would like cost calculated after receiving a PO. These different methods can adjust the cost of items based on what has been received. This allows you to calculate the cost in a way that is up-to-date and most effective for your business. Does Not Affect Cost, Average or LIFO are the options available!
- Does Not Affect Cost will not affect the cost of received items.
- The Average method will calculate an average price between what the product was received at and what it is being received at using the following formula: ((QTY ON HAND * CURRENT COST) + (RECEIVED QTY + RECEIVED COST) ) / NEW TOTAL QTY. If you have an item with a quantity of 1 and a cost of $10 and a new PO you receive with 1 the same item but the new cost is $20 – then the average setting would change the cost of the item to $15.
- The LIFO method of receiving inventory will change the new cost to the last received cost of the item, meaning the RECEIVED COST is assigned to the inventory item. The old cost is $10 for an item– you now receive it at $15. LIFO will now change the cost of the item to $15.
- Company Settings > General Options > Inventory Cost Method
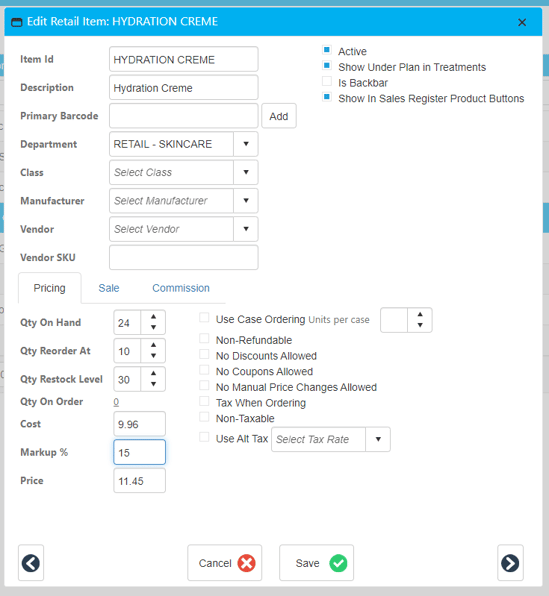
🤩Retail Margin / Markup %
There is now a field for a markup percentage when editing an item. The price for the item will calculate based on the cost and markup/margin percentage. If either should be changed, the price will recalculate and update accordingly. This function allows your business to streamline prices based on the profit desired with specific retail items.
- Inventory > Retail List > Select a Retail Product > Cost > Markup %
🤩Retail Merge Option
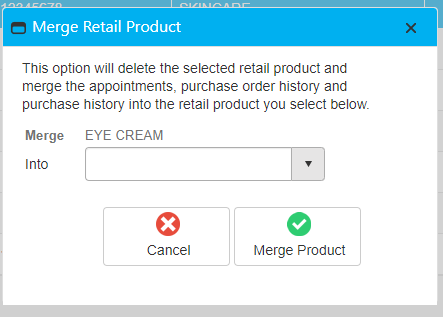
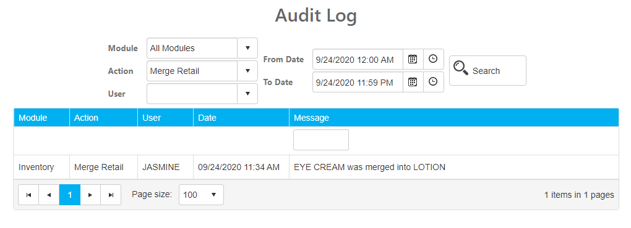
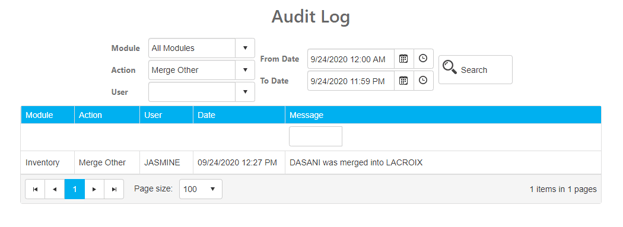
Retail products can now be merged. The item selected will be merged into the secondary item selected. The merge will erase the existing item’s record from the system, sales history, reports, appointments, etc. A merge cannot be undone. A new action has been added to the audit log to show when an item was merged. I.e. “Item A was merged into Item B.” This feature can be used to cut down on duplicate retail items.
- Inventory > Retail List > Select retail product > Merge Selected Product

- Employee > Audit Log
🤩Service Merge Option
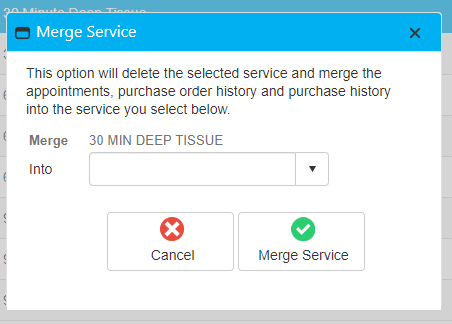
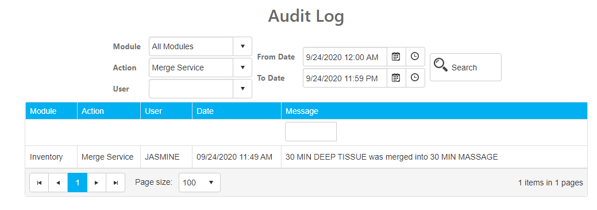
Service Items can now be merged. The service selected will be merged into the secondary service selected. The merge will erase the existing service’s record from the system, sales history, reports, appointments, etc. A merge cannot be undone. A new action has been added to the audit log to show when a service was merged. I.e. “Service A was merged into Service B.” This feature can be used to cut down on duplicate service items.
- Inventory > Service List > Select service > Merge Selected Service

- Employee > Audit Log
🤩Package Merge Option
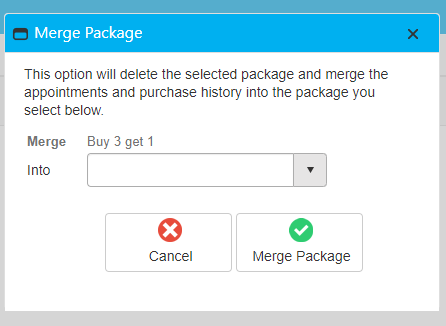
Service Packages can now be merged. The package selected will be merged into the secondary package selected. The merge will erase the existing package's record from the system, sales history, reports, appointments, etc. Note that duplicate services, when merging from one package to another, will not display twice in the (merged into) package. Any services not duplicated in both packages will be added to the newly merged into package. This feature can be used to cut down on duplicate packages or bring similar packages into one.
Package 1: Has service A, B, and C
Package 2: Has service A, B, and D
Merge Package 1 into Package 2
Package 2: Now contains Service A, B, C, and D
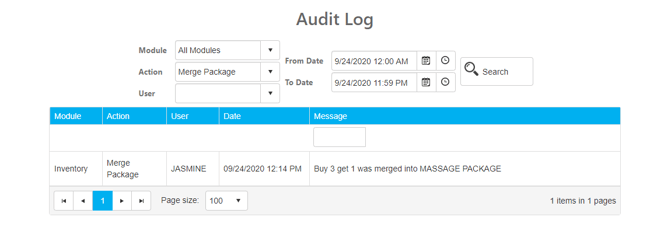
A merge cannot be undone. A new action has been added to the audit log to show when a package was merged. I.e. “Package A was merged into Package B.”
- Inventory > Package List > Select package > Merge Selected

- Employee > Audit Log
Other Item Merge Option
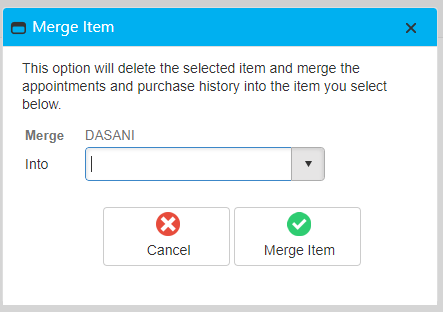
Other Items can now be merged. The item selected will be merged into the secondary item selected. The merge will erase the existing item’s record from the system, sales history, reports, appointments, etc. A merge cannot be undone. A new action has been added to the audit log to show when an item was merged. I.e. “Item A was merged into Item B.” This feature can be used to cut down on duplicate other items.
- Inventory > Other Item List > Select item > Merge Selected Item

- Employee > Audit Log
Company Settings
🤩Company Settings Redesign
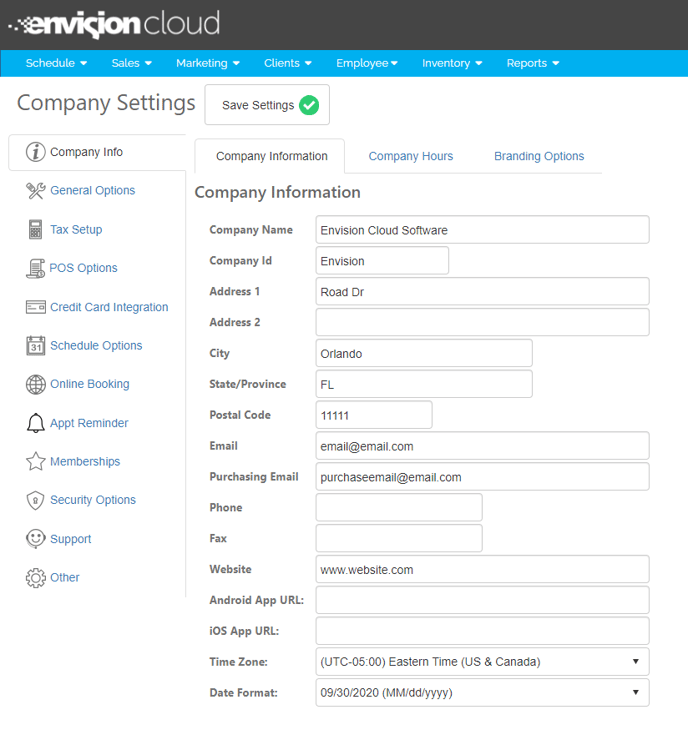
Company Settings now features a menu on the left side with icons to improve usability! The sections within Company Settings have been reorganized to be more specific and compartmentalized to make finding settings easier.
- Company Settings
Reports
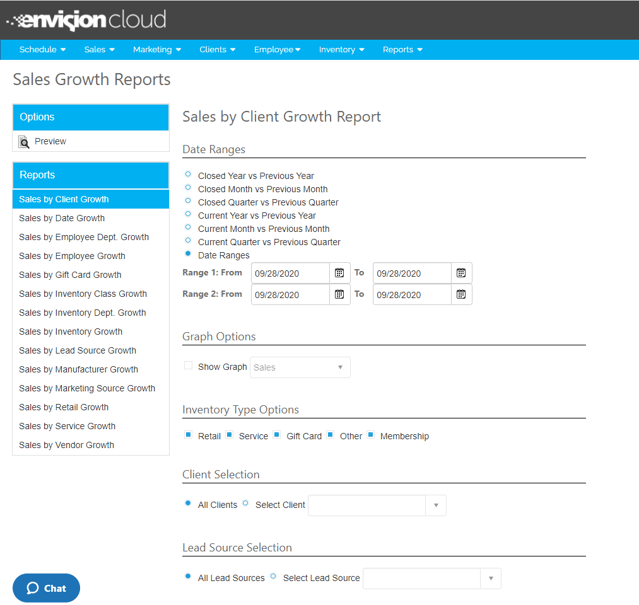
🤩Sales Growth Reports
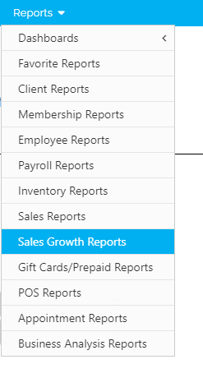
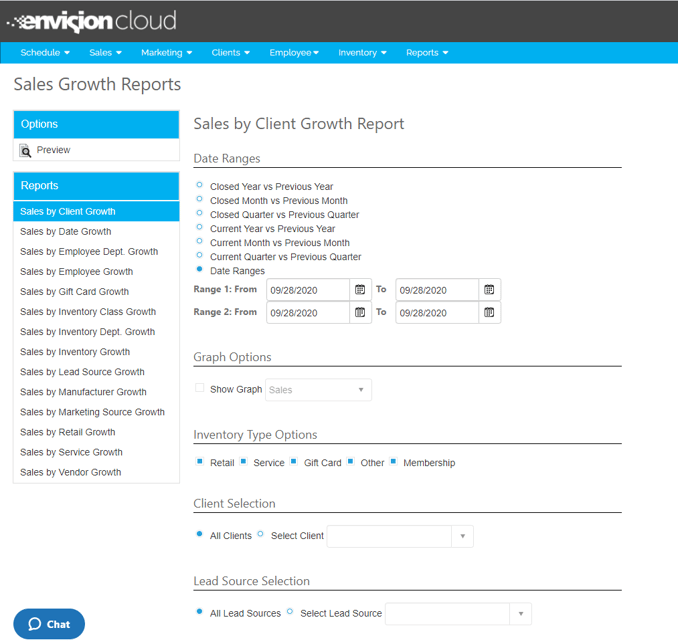
Sales by Comparison reports are now called Sales Growth reports. These reports have also been given their own dropdown option under Reports called Sales Growth Reports.
- Reports > Sales Growth Reports
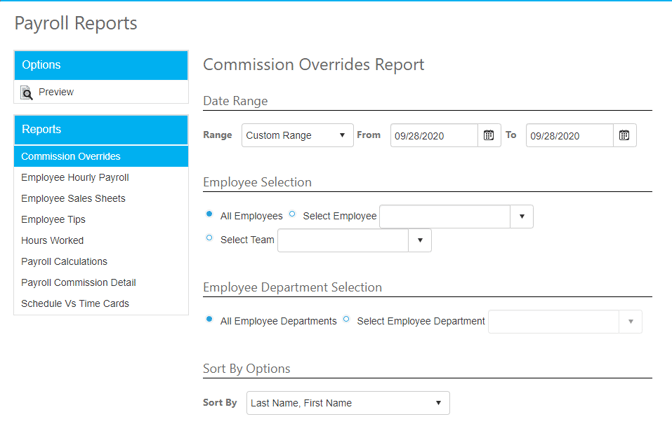
🤩Payroll Reports
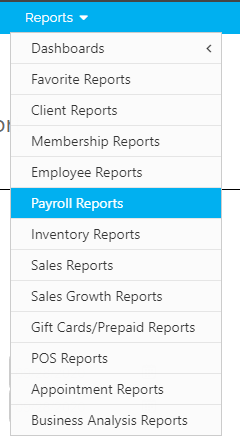
Employee Reports have now been broken up into Employee Reports and Payroll Reports, meaning reports pertaining to payroll information will be found in its own dropdown option under Reports called Payroll Reports.
- Reports > Payroll Reports
🤩Sales By Reports
The Sales By Reports now feature subtotal options making it easier to generate the exact report you are looking for! Reporting and data analysis can be more efficient with this update!
- Reports > Sales Reports
Update My Records
🤩UMR For Ink
The Update My Records system has been optimized for tattoo shops! For Ink users, the forms will now be labeled for clients rather than patients.
🤩UMR For Paws
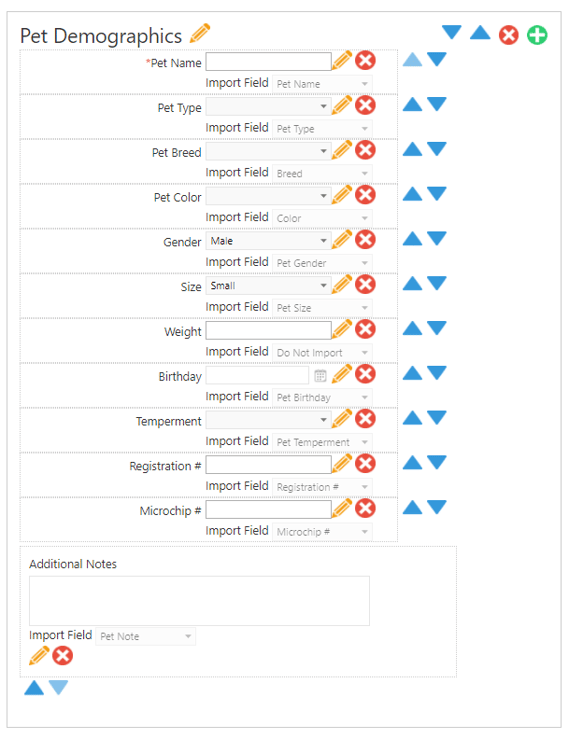
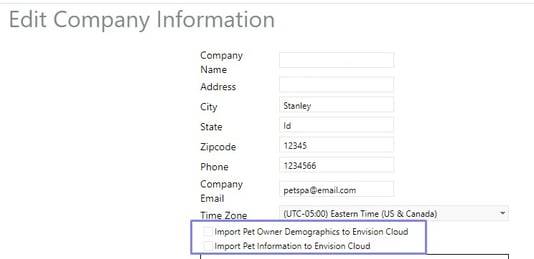
The Update My Records system has now been optimized for pet grooming salons and is now being made available as an add-on for Paws users! The forms are designed for pet owners, and pet/client information can be set to import into Envision Cloud from UMR. To send UMR forms that connect to both client and pet profiles:
- Client > Update my Records Forms
Pet and client profiles will also be connected to forms auto-emailed for appointments made where the pet is specified if UMR auto-email is enabled in Company Settings.
Paws
🤩Pet Information During Appointment Booking
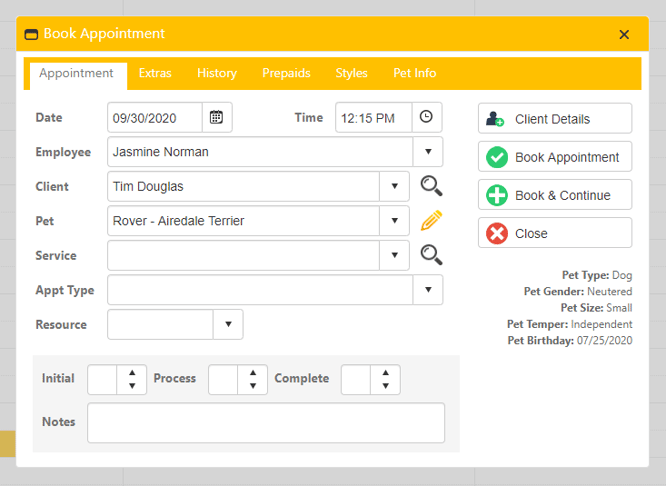
When a pet is being booked for an appointment, their information will appear in the appointment booking window. For Paws, pet type, gender, size, temper, birthday, and last visit will be displayed. This information can be used to better serve clients while scheduling them!
- Schedule > Appointments > Add New Appointment or double-click free space on calendar > Select a pet
🤩Additional Pet Sizes
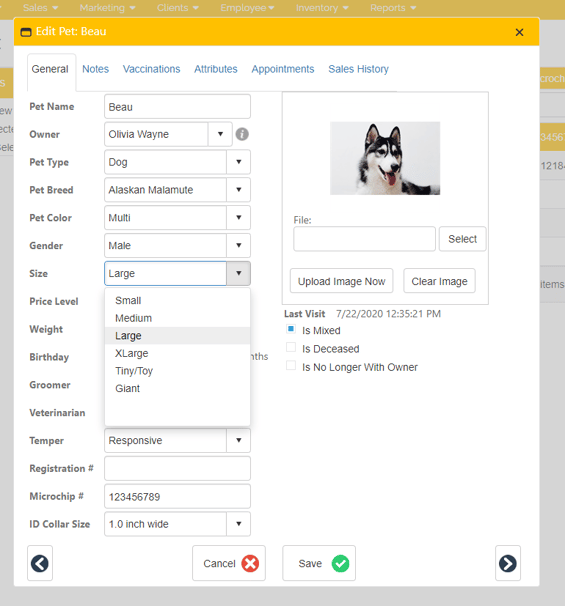
More pet size options are now available in the Paws version of Envision Cloud. These new sizes are Tiny/Toy, XLarge, and Giant to accommodate a wider range of pet sizes.
- Clients > Pet List > Add or edit a pet > Size
🤩Grooming Styles from Appointment
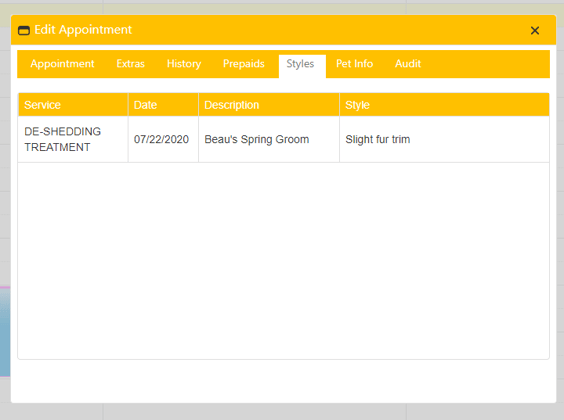
Grooming Styles for pets are now accessible from their appointment on the Appointment Schedule. This option allows a groomer to view a grooming style easily. If a pet is not selected, it will show grooming styles for the client selected.
- Schedule > Appointments > Add a New Appointment or select existing appointment > Styles
🤩Pet Info Tab Appointment Booking
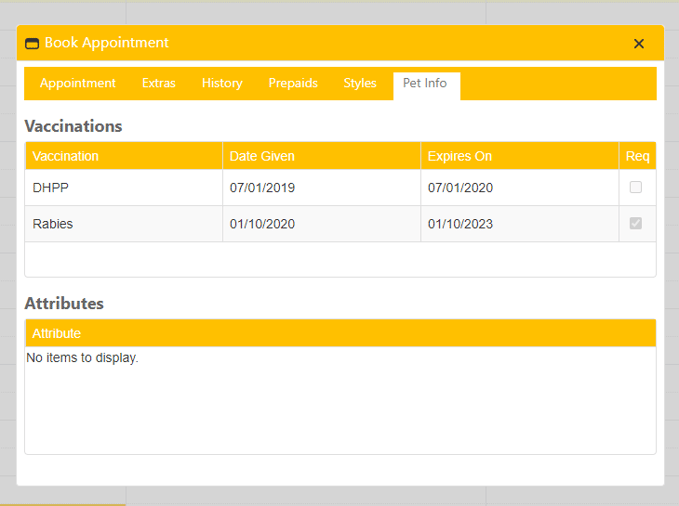
There is now a Pet Info tab on the Appointment Booking screen. The screen displays pet attributes and vaccination information. This tab can be used to best schedule pets and ensure they have required vaccines for the appointment they are attempting to schedule.
- Schedule > Appointments > Add New Appointment or double-click free space on calendar > Select Pet > Pet Info
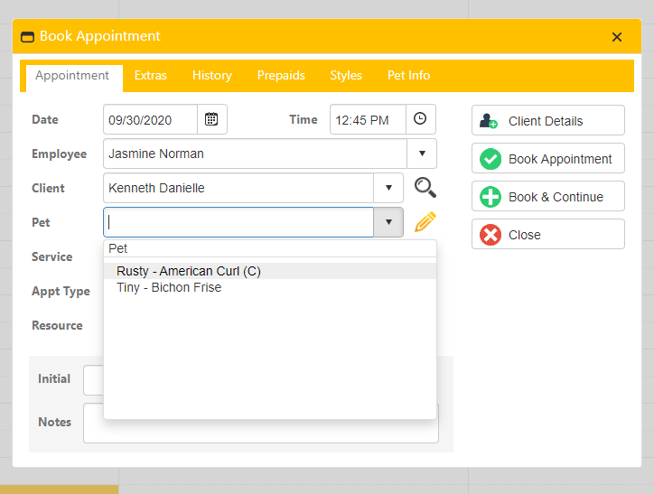
🤩Pet Breed in Pet Dropdown
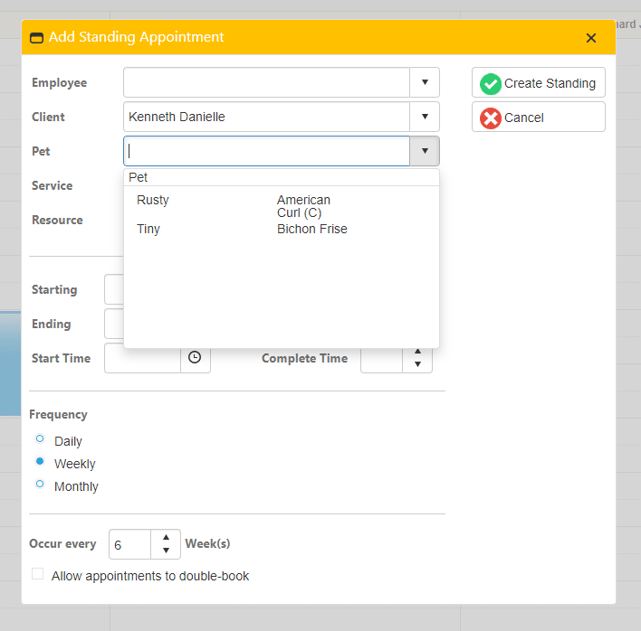
When selecting a pet during appointment booking, the pet breed will now appear next to the pet name. This allows the user to easily schedule a service that would be best suited to the pet's breed.
- Schedule > Appointments > Add New Appointment or double-click free space on calendar
🤩Pet Name in Manage Standing Appointments (Ultimate)
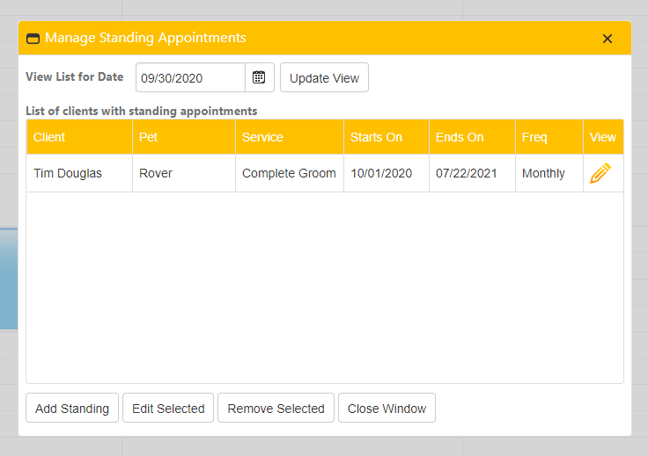
Pet names now appear in the Manage Standing Appointment window. Pets can be selected when creating or adding a standing appointment. These options help to avoid any confusion with standing appointments and clients with multiple pets.
- Schedule > Appointments > Manage Standing > Pet
