
CareCredit allows your practice to offer flexible financing options to your clients with the CareCredit credit card, helping your practice drive revenue and improve the front desk experience.
PatientNow Essentials has integrated with CareCredit to make the credit application and payment processes more accessible. This allows you to leverage CareCredit as a payment type by introducing a new option for clients to apply to become CareCredit cardholders. An additional benefit is that application approvals and transaction results are posted automatically to the client record.
Getting Started with CareCreditⓇ
Configure CareCredit Integration
Enable or Disable Batch QuickScreen
Send a CareCredit Application to a Client
Process a Payment with CareCredit
CareCredit Promotions and Reports
Getting Started with CareCredit
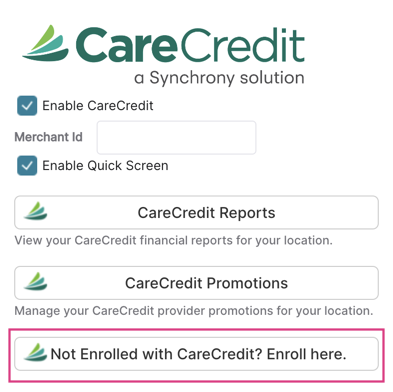
Enroll with CareCredit for a Merchant Account
Note: If you are already enrolled with CareCredit, please skip to Getting Started with CareCredit.
- Log in to PatientNow Essentials.
- Navigate to Company Settings > Integrations > CareCredit.
- Click the Not enrolled with CareCredit? Enroll here. button.
- Follow the prompts in the CareCredit pop-up window.
Configure CareCredit Integration
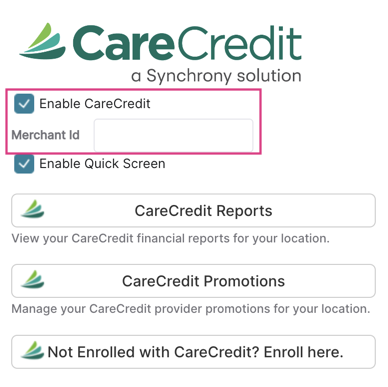
You can easily configure CareCredit in your system if you have your CareCredit Merchant Id available and access to a Security Profile that has Company Settings enabled.
- Log in to PatientNow Essentials.
- Navigate to Company Settings > Integrations > CareCredit.
- Click the Enable CareCredit checkbox.
- Enter your CareCredit Merchant Id into the Merchant Id field.
See Send a CareCredit Application to a Client and Process a Payment with CareCredit to familiarize yourself with the new process.
Batch QuickScreen
About Batch QuickScreen
PatientNow Essentials automatically sends requests to CareCredit to determine the status of scheduled clients. The Batch QuickScreen checks the status of clients two days before their scheduled appointment. The request is a “soft” request, and therefore does not affect the client’s credit report.
The QuickScreen request can only be used for clients that have the following information in their client record:
- First Name
- Last Name
- Address
- At least 1 phone number (Home Phone and/or Mobile Phone)
If any of the above information is missing, the request will not be processed.
Note: If Batch QuickScreen is enabled, icons on the client appointment will be displayed to indicate the result of the QuickScreen request.
- Apply

- Current Cardholder

- More Info Needed

- Pre-Approved

Enable or Disable Batch QuickScreen
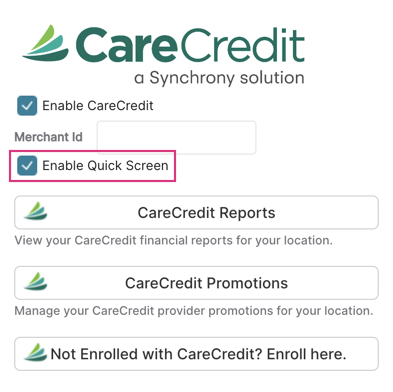
- Navigate to Company Settings > Integrations > CareCredit.
- To enable Batch QuickScreen, click the check box next to Enable Quick Screen
OR - To disable Batch QuickScreen, uncheck the box next to Enable Quick Screen
- To enable Batch QuickScreen, click the check box next to Enable Quick Screen
CareCredit Client Status
When the CareCredit integration is enabled, a CareCredit box is displayed in the Edit Client Details screen of every client record. In the box, the status of the client’s CareCredit account is displayed. You may click each CareCredit status box to take further action.
- Apply for CareCredit → Look up the client’s status with CareCredit to determine if they have an active account, have already been sent an application, or are not an active CareCredit cardholder. See Send a CareCredit Application to a Client for additional information.
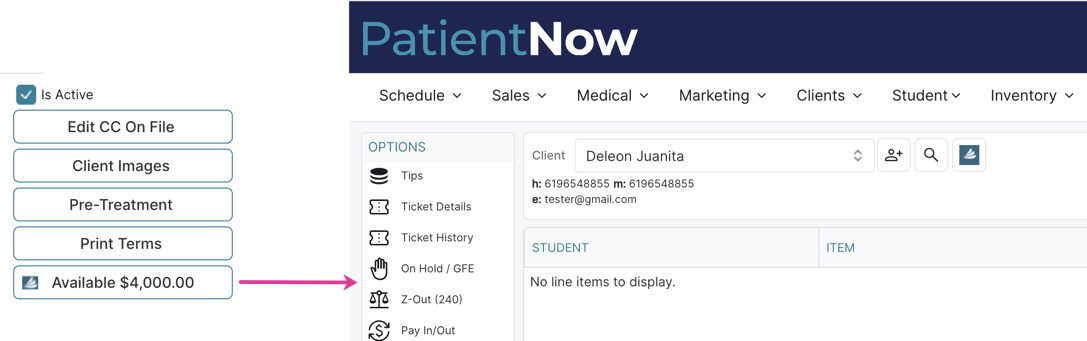
- Available → The client completed an application and was approved with an available balance. Navigate to the Sales Register to take a payment by clicking the Available status.
- Need More Info → More information is needed from the client to proceed with their application status. Click the Need More Info button if the client is not pre-approved or if the application has been sent to a client, but has not yet been submitted. See Resend an Application for additional information.

- Not Approved → The client completed an application that was not approved.
- Pre-Approved → The client has been pre-approved and can be sent an application. Accept or decline pre-approval offer on behalf of the client, or send a text to the client so they can accept/decline on their own device.

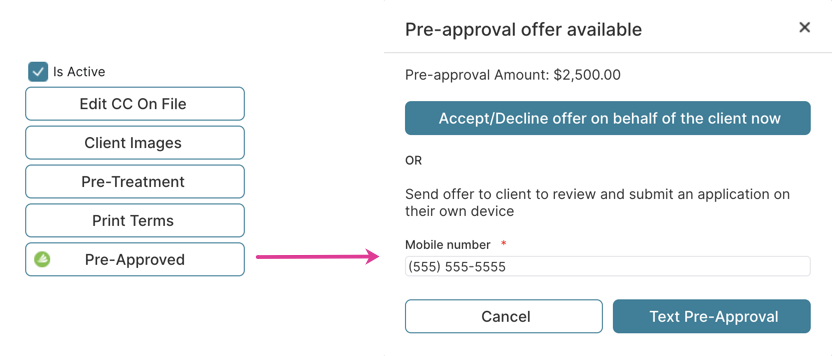
Send a CareCredit Application to a Client
- Navigate to the Edit Client Details screen .
- In the Demographics tab, click the Apply for CareCredit button.

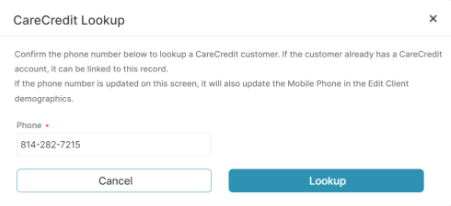
3. In the CareCredit Lookup window, verify that the information is correct.
4. Click the Lookup button to proceed, or Cancel to exit.
-
- Phone number is required to proceed with the lookup.
Note: If the phone number is updated on the CareCredit Lookup screen, it will also update the Mobile Phone in the Edit Client demographics.
5. If the client is not in the CareCredit system, a message appears prompting you to send an application.
6. Enter the client’s cell phone number in the field provided, or confirm that the cell phone number displayed is correct.
7. Click the Text to Client button to text the client the application request, or click Open CareCredit Application Portal to submit an application on behalf of the client. Cancel to discard.

Note: To send the application using the Text to Client button, please ensure the client is consented to receive texts. Navigate to Edit Client Details > Demographics > Communication to change consents.
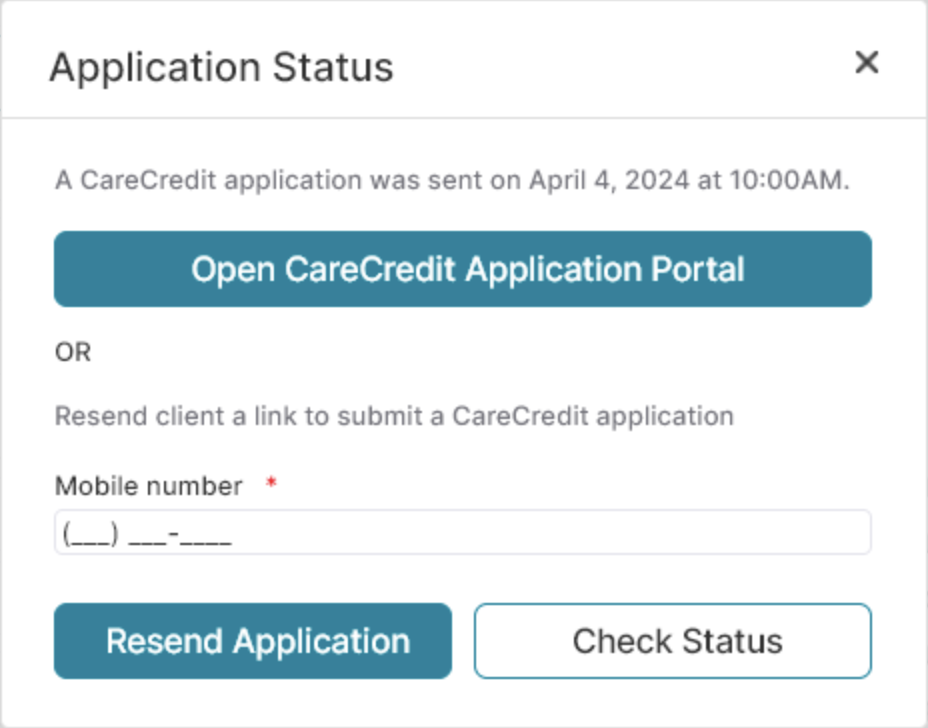
Resend an Application
- Navigate to the Edit Client Details screen.
- In the Demographics tab, click the More Info Needed button.
- Enter the client’s phone number, then click the Resend Application button to text an application link to the client, or click Open CareCredit Application Portal to submit an application on behalf of the client. Cancel to discard.
- Click the Check Status button to see an updated status of the application on the Edit Client Details screen.
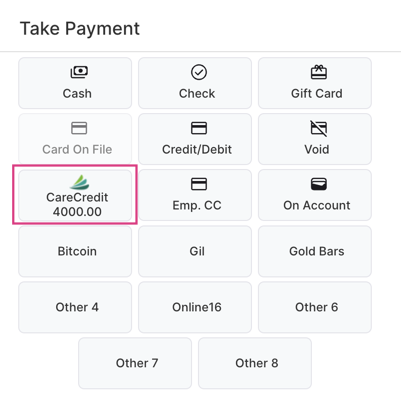
Process a Payment with CareCredit
- Navigate to the Sales Register and create a Ticket as usual.
- Click Take Payment to open the Take Payment window.
- Click the CareCredit button to request client payment via CareCredit.
- Click Add Payment when you are ready to collect the payment.
Note: The client’s available credit is displayed if the client has an available balance.
5. Enter the client’s cell phone number in the field provided, or confirm that the cell phone number displayed is correct.
6. Click the Text to Client button to text the client the payment request, or click Start CareCredit Payment to submit an application on behalf of the client. Cancel to discard.

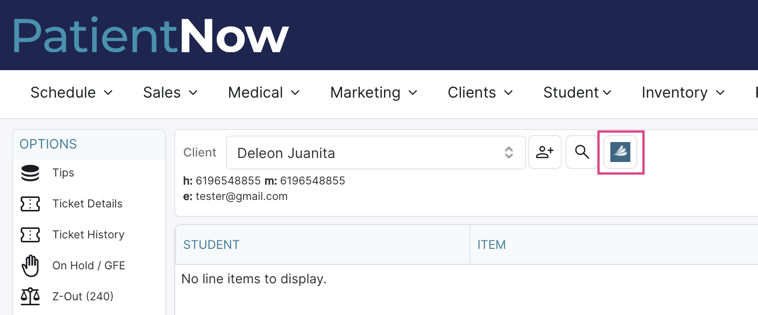
View CareCredit Activity
- Navigate to the Sales Register and select a client.
- Click the CareCredit icon next to the client name.
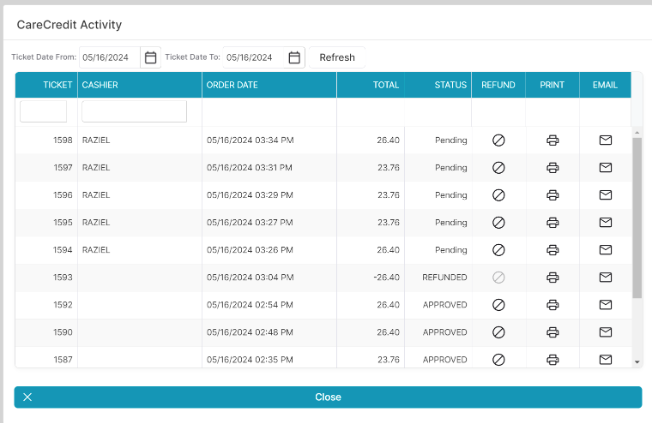
- View a history of the client’s CareCredit activity in the CareCredit Activity window.
- The payment status reads Pending until the patient submits the payment.
- Once the patient submits the payment, the payment status reads Approved.
Note: It takes up to one minute for the payment status to update after payment submission.
Refund a CareCredit Payment
- Navigate to the Sales Register and select a client.
- If the selected client has a CareCredit status of Approved, click the Approved CareCredit icon next to the client name.
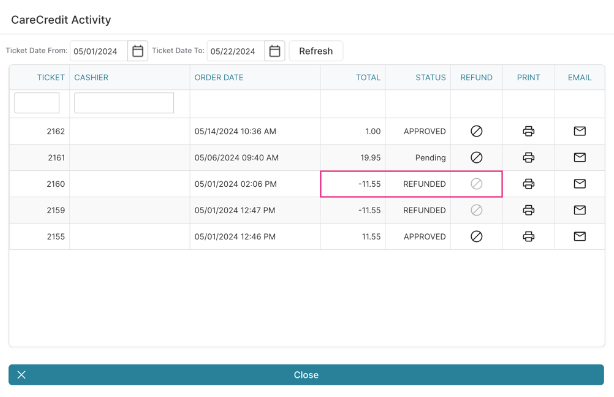
- In the CareCredit Activity window, find the line item you wish to refund.
- Click the icon in the Refund column that correlates to the payment line item you wish to refund.
- Click the Refund Payment button to initiate the refund process, or Close to return to the CareCredit Activity window.
- The CareCredit interface opens upon clicking the Refund Payment icon.
- Select the transaction and complete the refund in the CareCredit interface, then click the Complete button to return to PatientNow Essentials.
- A new line will be displayed in the CareCredit Activity window to reflect the payment refunded.
Note: the refund line is indicated with a negative (-) sign in front of the total and an inactive Refund button - The status reads Pending until the refund has been approved.
- Once the refund is approved, the status reads Refunded.

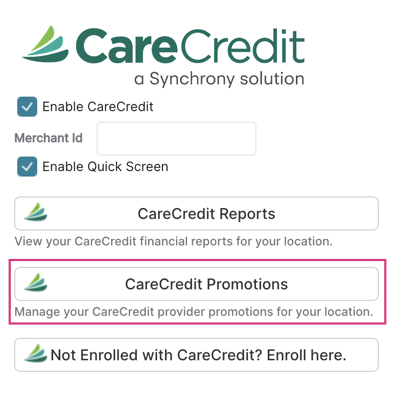
CareCredit Promotions and Reports
You can access the CareCredit interface to review current promotions and run reports on:
- Recent Applications
- Recent Purchase Transactions
- Pending Patient Activity
- QuickScreenⓇ Report
Promotions
- Navigate to Company Settings > Integrations > CareCredit.
- Click the CareCredit Promotions button to open the CareCredit interface.
Reports
- Navigate to Company Settings > Integrations > CareCredit.
- Click the CareCredit Reports button to open the CareCredit interface.
