
Concierge: Your Ultimate Sales Ally! With Concierge, you can effortlessly guide your clients along a tailored "Pathway," initiating an almost fully automated drip campaign leveraging the power of email, text, phone, and task reminders.
Getting Started with Concierge
Add a Stage to a Pathway in Concierge
Add a Step to a Pathway in Concierge
Set the Client’s Pathway Start Stage
Preparing Consultation Services
Assign a Service Type to a Service
Assign a Service Type to a Pathway
Assign a Service Type to a Client
Add the Lead Form to a website
Turn Off Automatically Assigning Web Clients to Pathways
Booking Appointments Automatically Places Clients on a Pathway
Turn off automated assignment to pathways with scheduling/booking
Assign Clients to Pathways in Bulk
Concierge Automation – New Tabs
Send a Notification When a Manual Task is Due
Added a Filter to Select Template page
Concierge is available in Envision
Adding an iframe code (the Lead Form) via HTML
Adding an iframe code (the Lead Form) via CMS (WordPress, Wix, etc.)
What is Concierge?
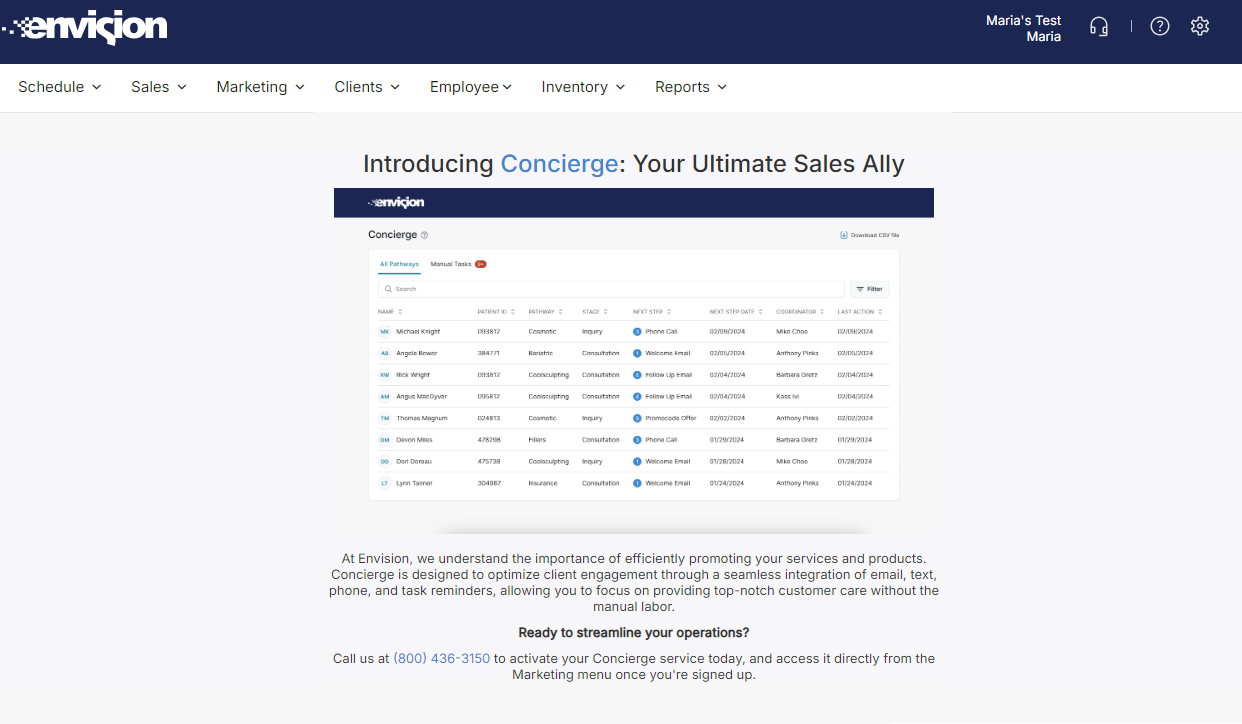
Introducing Concierge: Your Ultimate Sales Ally!
At PatientNow, we know how vital it is to promote your treatments and products, share useful information, and make it easy for clients to sign up for services through the most effective channels precisely when they're needed.
We understand that while client engagement is the cornerstone of sustained success, delivering unparalleled customer care remains a high priority. We acknowledge the time constraints your staff face, particularly when it comes to engaging in manual, time-consuming activities.
We present Concierge, your ultimate solution to this dilemma. With Concierge, you can effortlessly guide your clients along a tailored "Pathway," initiating an almost fully automated drip campaign leveraging the power of email, text, phone, and task reminders. Say goodbye to manual labor and hello to streamlined efficiency with Concierge by your side!
Why use Concierge?
Personalization in multi-channel communication has been shown to significantly impact sales performance. Here are some statistics that support this:
- Increased Customer Engagement: According to a study by Infosys, 86% of consumers say that personalization plays a role in their purchasing decisions.
- Improved Conversion Rates: Research by Epsilon found that personalized email messages have 6x higher transaction rates compared to non-personalized messages.
- Enhanced Customer Loyalty: A study by Accenture revealed that 91% of consumers are more likely to shop with brands that provide relevant offers and recommendations.
- Higher Revenue: According to a report by McKinsey & Company, personalization can drive revenue uplifts of 10% or more.
- Improved Cross-Selling and Upselling: A study by Evergage showed that 33% of marketers who implemented personalization saw a significant uplift in sales.
- Better Customer Satisfaction: Salesforce reported that 59% of consumers say that personalization influences their decision to purchase from a company.
- Optimized Marketing Spend: Research by Monetate revealed that marketers who personalize their web experiences see an average 19% uplift in sales.
These statistics collectively demonstrate the tangible benefits of personalization in multi-channel communication, ranging from improved engagement and loyalty to increased revenue and optimized marketing spend.
Drip campaigns, when executed effectively, can also drive sales and conversions. Here are some statistics that support their effectiveness:
- Increased Engagement: According to research by HubSpot, drip email campaigns generate 80% more sales at 33% less cost.
- Improved Lead Nurturing: Marketo reports that nurtured leads make 47% larger purchases than non-nurtured leads.
- Higher Conversion Rates: A study by EmailMonday found that drip email campaigns have an average open rate of 80% higher than single-send campaigns, with click rates about three times higher.
- Long-Term Customer Relationships: The Annuitas Group discovered that nurtured leads make 47% larger purchases than non-nurtured leads.
- Consistent Communication: Salesforce notes that 79% of top-performing companies have been using marketing automation for more than two years. Drip campaigns are a key component of marketing automation.
- Improved ROI: According to a study by the Lenskold Group, 63% of companies that are outgrowing their competitors use marketing automation, including drip campaigns.
- Effective Lead Segmentation: Research by the Aberdeen Group found that personalized email messages improve click-through rates by 14% and conversion rates by 10%.
- Timely Follow-Up: A study by DemandGen Report revealed that nurtured leads produce, on average, a 20% increase in sales opportunities versus non-nurtured leads.
These statistics demonstrate the effectiveness of drip campaigns in nurturing leads, driving engagement, and ultimately increasing sales and revenue.
Consider the following:
- 2% of sales are made on the first contact;
- 3% of sales are made on the second contact;
- 5% of sales are made on the third contact;
- 10% of sales are made on the fourth contact; and
- 80% of sales are made on the fifth to twelfth contact,
YET...
- 48% of salespeople never follow up with a prospect;
- 25% of salespeople make a second contact, then stop;
- and just 12% of salespeople make more than three contacts (marketingprofs.com)
Welcome emails have open rates 50% higher than the average for all emails.
Email conversion rates are about 40 times higher than those recorded from social media (campaignmonitor.com).
Concierge Overview
Before we dive into the details of Concierge, let’s look at it from a high level to get a broad understanding of how it works.
Concierge assists you in building an automated marketing drip campaign for your clients. In this first version, there are three stages of the client journey included: Inquiry, Consultation, and Consultation Follow-up.
How does it work?
First, you need to make a Pathway.
- Create a Pathway. Name it whatever makes sense to your business.
- Add a Stage. Most often you will start with the first stage on a client’s journey, which is Inquiry.
- Add Steps to the Stage. The steps are where all the touchpoints you want to have with your client are scheduled and created. For example, when a client makes an initial inquiry, you may want to:
- Immediately respond with a welcome email and text message.
- Follow up with an email in 1-2 days explaining the benefits of a consultation appointment.
- Make a phone call another 2 days later inquiring if the prospect has any questions.
- Send an email 3 days after the phone call sharing information about products, services or promotions.
- Make a final phone call another 2-3 days later expressing genuine interest in addressing the prospect’s needs and helping in scheduling a consultation.
- Add another Stage. Now you can add the next stage in the client’s journey, the Consultation Stage.
- Add the Steps to the Stage. Add the steps to create the automated touchpoints you want to create with your clients.
- And repeat for the final Stage.
Second, you will assign your clients to a Start Stage.
Last, you will monitor the Pathway touchpoint activity in the Concierge Tracking page.
That’s it!
Within the following pages, you will find a sample Template Pathway constructed in accordance with industry best practices, provided as part of Concierge. This versatile template is fully customizable to align with your organization's unique requirements. Furthermore, comprehensive guidelines are included to assist you in creating your own Pathway from the ground up.
Version Specifics
As mentioned above, the first version of Concierge includes the Inquiry, Consultation and Consultation Follow-up Stages. It is also limited to one active Pathway. You may create more than one Pathway, but only one can be active at a time in this first version.
But don’t worry! We will be following up with a second version later this year that will include these additional Stages: Appointment, Appointment Follow-Up, Retention, Cancellation, and No Show. Also, we will be adding in the ability to segment Pathways within Concierge based on treatment type, which will enable you to have multiple active Pathways. Lastly, we will be including the ability to capture leads from provider websites.
Getting Started with Concierge
Enroll in Concierge
- Log in to PatientNow Essentials.
- Navigate to the Settings icon > Manage Account > Additional Services
- Click “View Concierge information”
- Follow the prompts in the “Signup for Concierge” pop-up window.
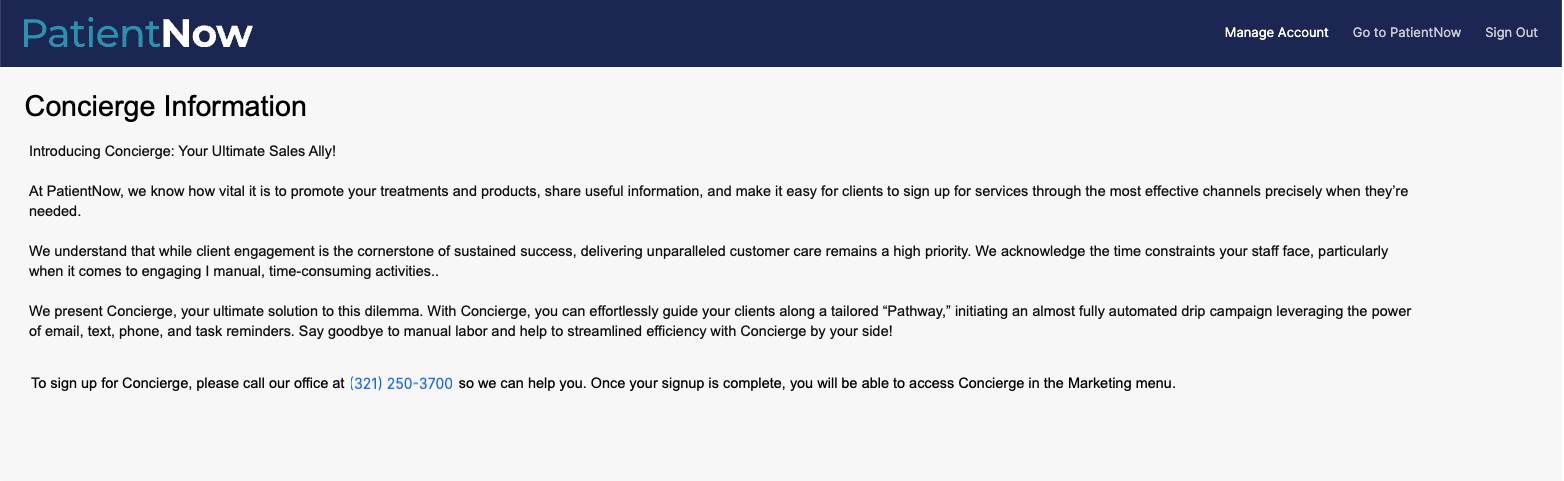
If a User is Not Yet Enrolled in Concierge

When a user goes to the Marketing menu and clicks on Concierge, the user will be directed to this page, populated with marketing and sales contact information.
View Pathways in Concierge
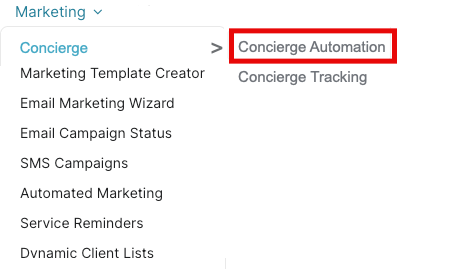
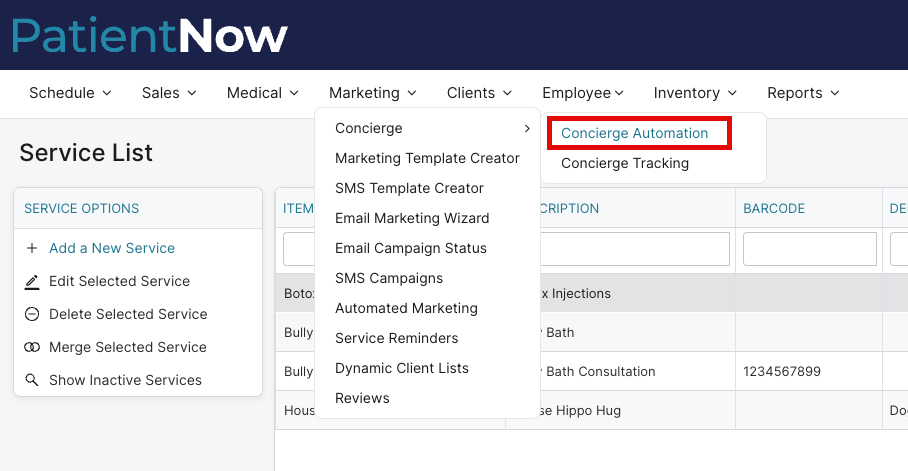
- On the main menu, navigate to Marketing > Concierge > Concierge Automation.
-
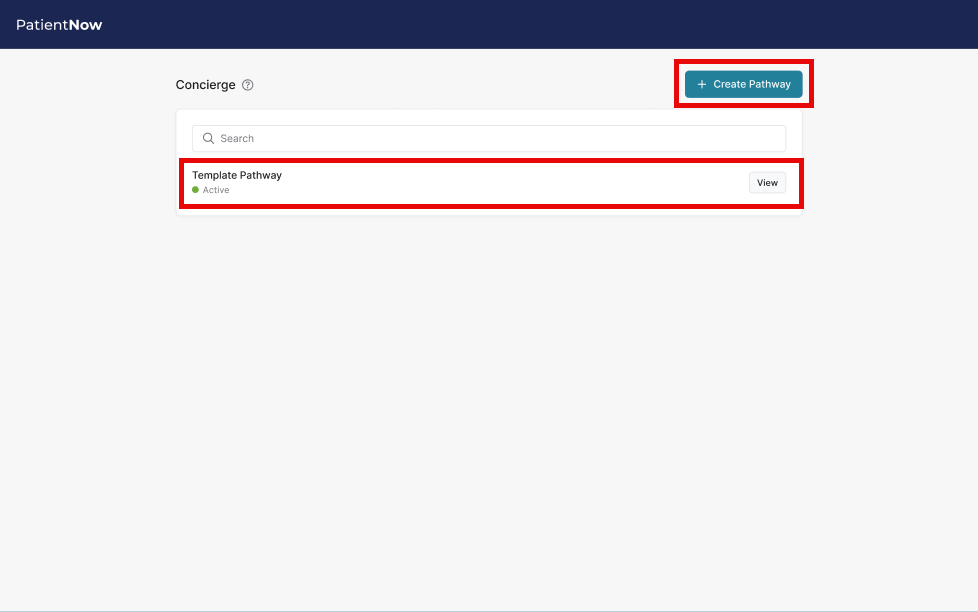
- The “Template Pathway” was carefully put together using the best methods in the industry, giving you a sample Pathway to follow.
- The template pathway features carefully sequenced steps, strategically spaced to yield optimal results, coupled with impactful language.
- Feel free to customize the “Template Pathway” to align with your organization's unique requirements, whether adjusting timing, language, logo, font, or imagery.
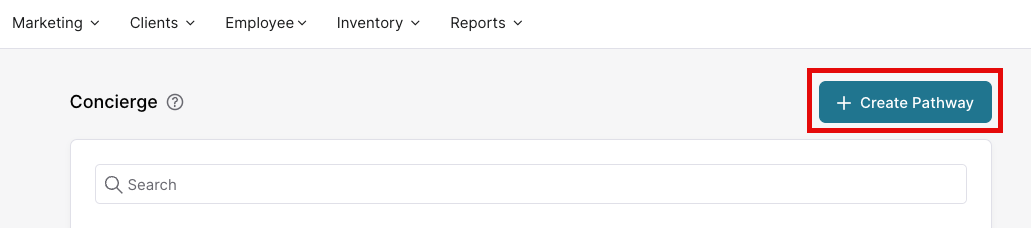
- Alternatively, you can initiate your own Pathway from scratch by simply clicking Create Pathway.
- Note that in this first version of Concierge, only one Pathway may be active at a time. But don’t worry! In our next version, launching within the next three months, you’ll have the exciting ability to create and manage multiple active Pathways based on treatment type, giving you even more flexibility and control!
Template Pathway
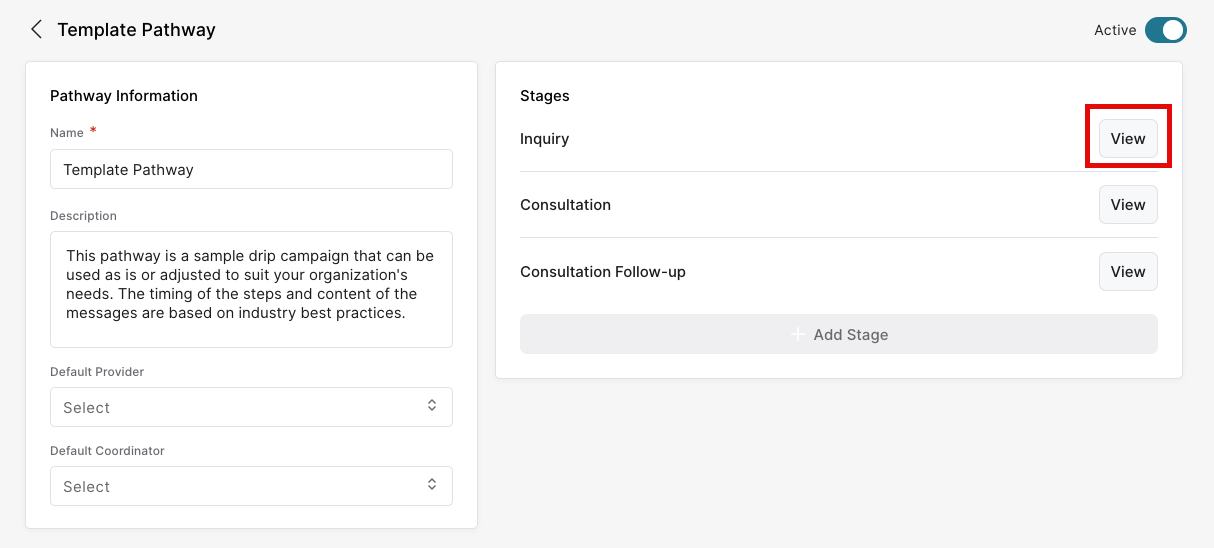
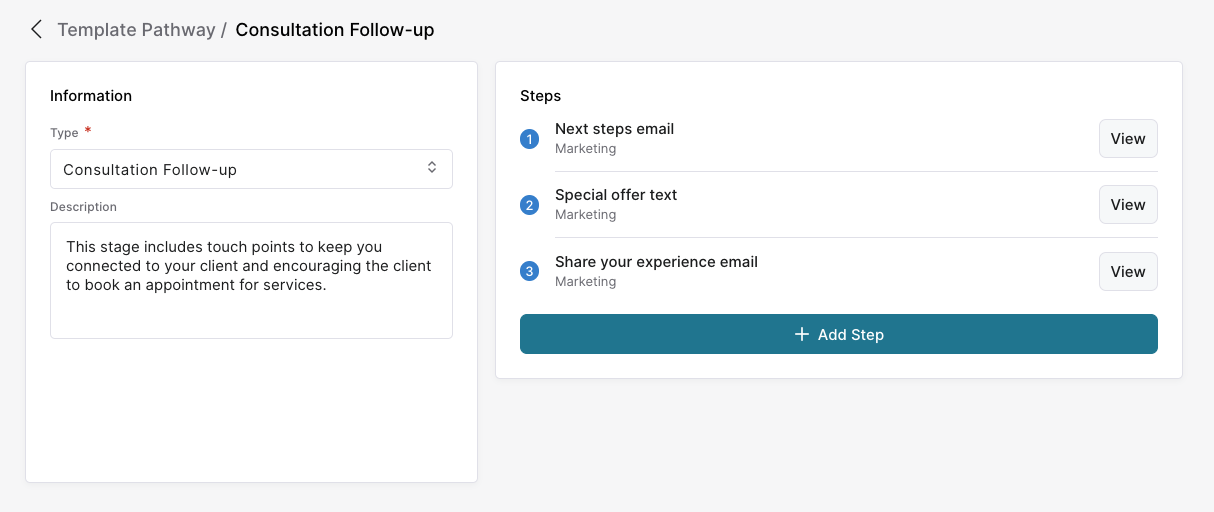
- Click View on the “Template Pathway”.
- Notice there are 3 Stages already built in this Template Pathway
- Inquiry
- Consultation
- Consultation Follow-up
2. Click View to the right of any of the three to see the Steps
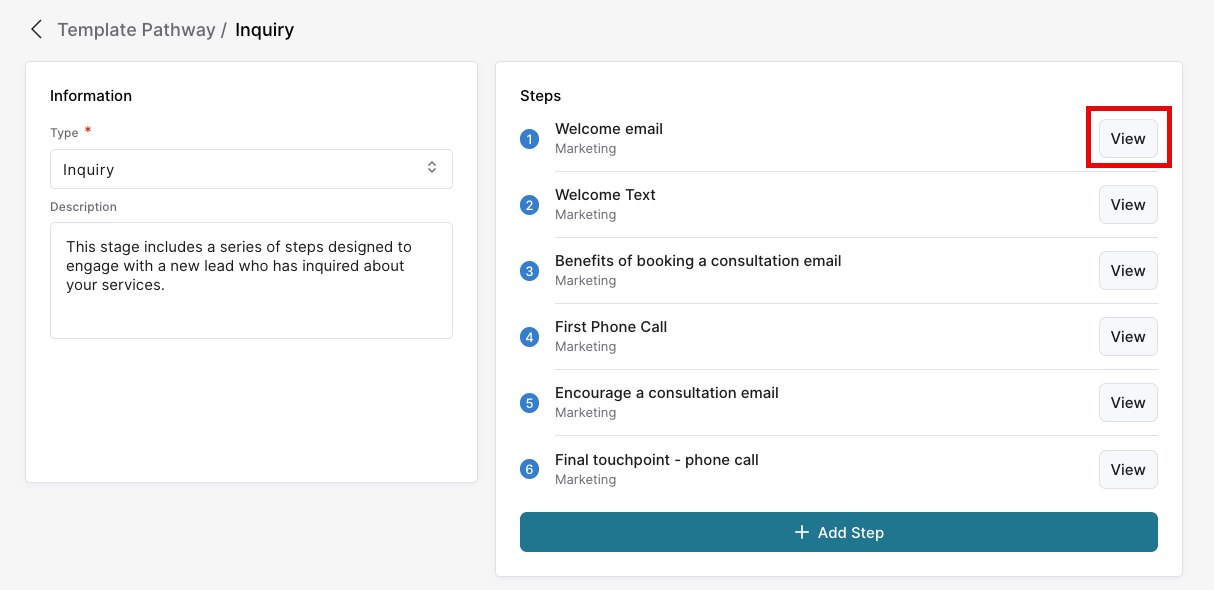
3. Click View to the right of the Inquiry stage.
-
- Notice the list of Steps included in the Inquiry stage
- This template can be adjusted to suit your needs.
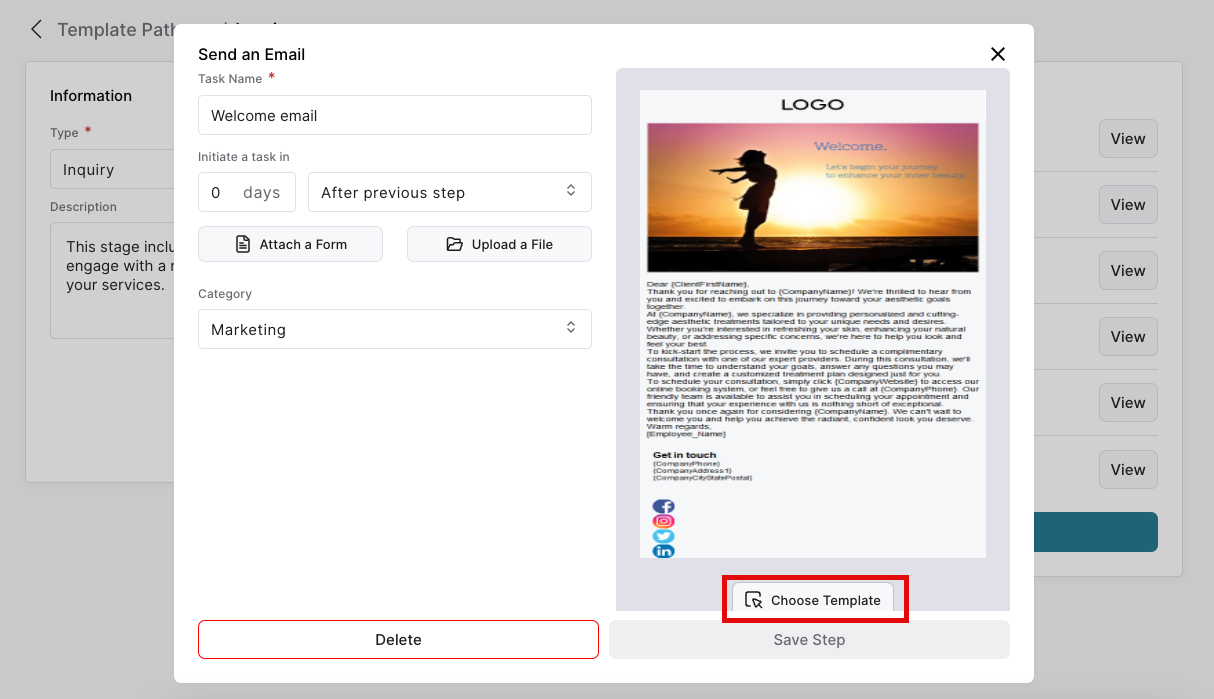
- Click Choose Template to view the template and make edits.
- Notice the list of Steps included in the Inquiry stage
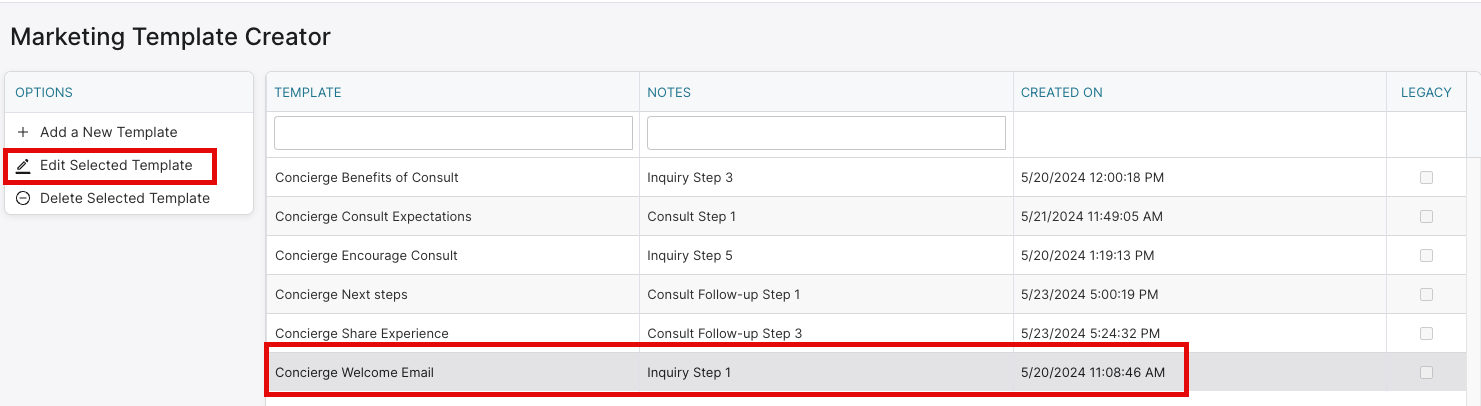
5. Select the template you wish to edit and click Edit Template.
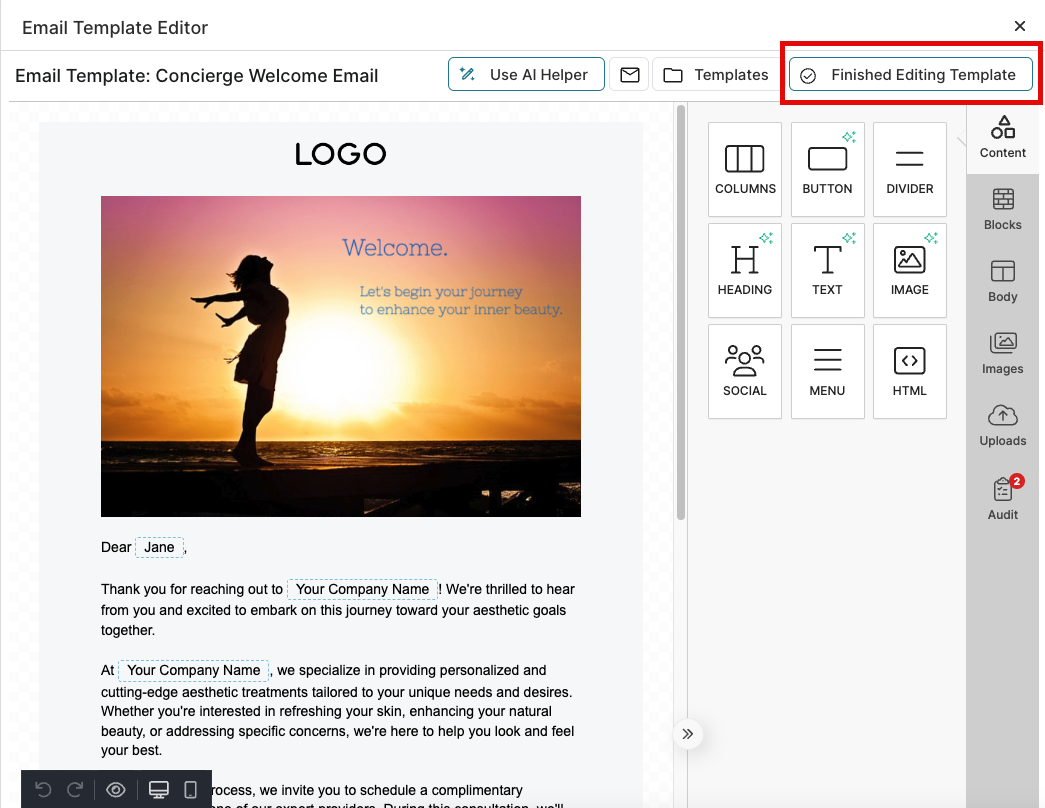
6. Edit anything within the template to fit the needs of your business. When done, click Finished Editing Template and then Save Template.
-
- Your changes will automatically update to the template in the Template Pathway.
- Your changes will automatically update to the template in the Template Pathway.
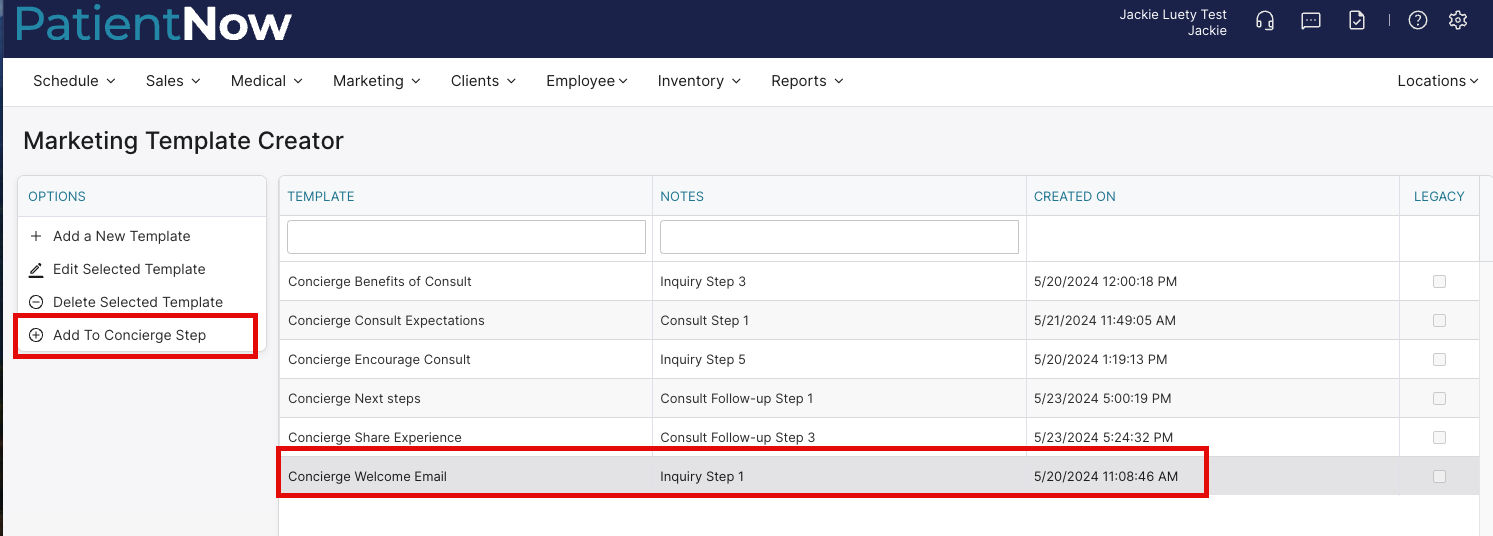
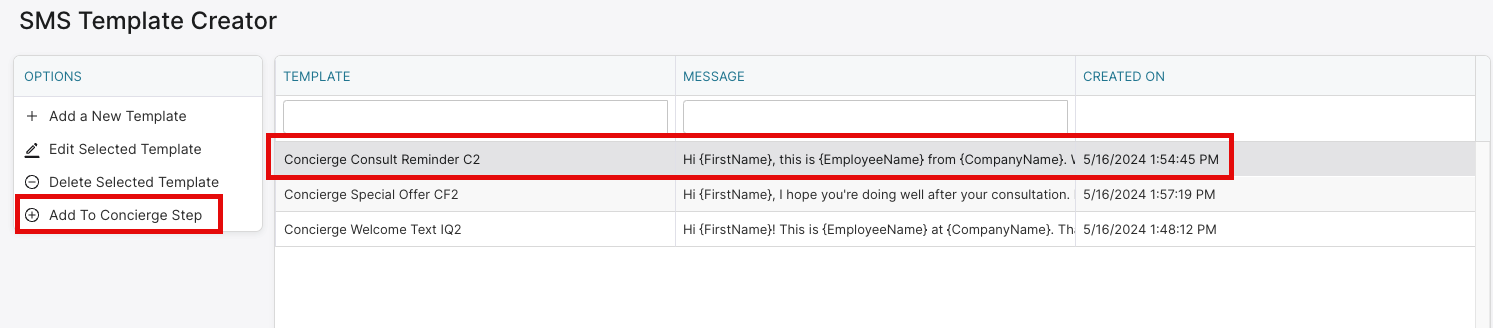
Pro Tip: The option to “Add to Concierge Step” only appears when you have clicked “Choose Template” from a pathway step to reach either the Marketing Template Creator or the SMS Template Creator.
Pro Tip: The content entered in the Notes field in the Marketing Template Creator becomes the Concierge Email Subject line. Be sure to create a subject line that will work well with your email template!
- 8. Click
- when you are satisfied with the settings on the step.
- 9. Repeat this process for each step in the Inquiry stage.
- 10. Repeat this again for the Consultation stage and its steps. Click
- to the right of a step.

11. Click Choose Template to edit the template.
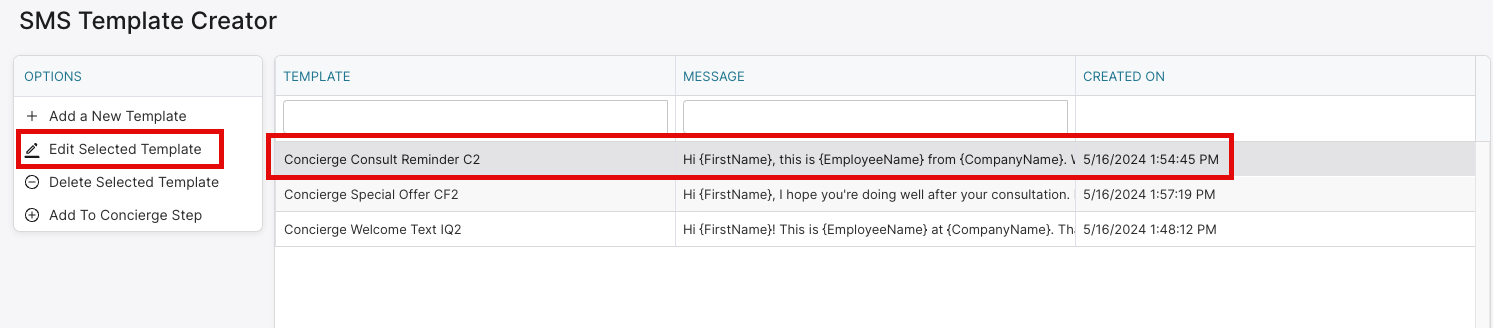
12. Select the template to be edited and click Edit Selected Template.
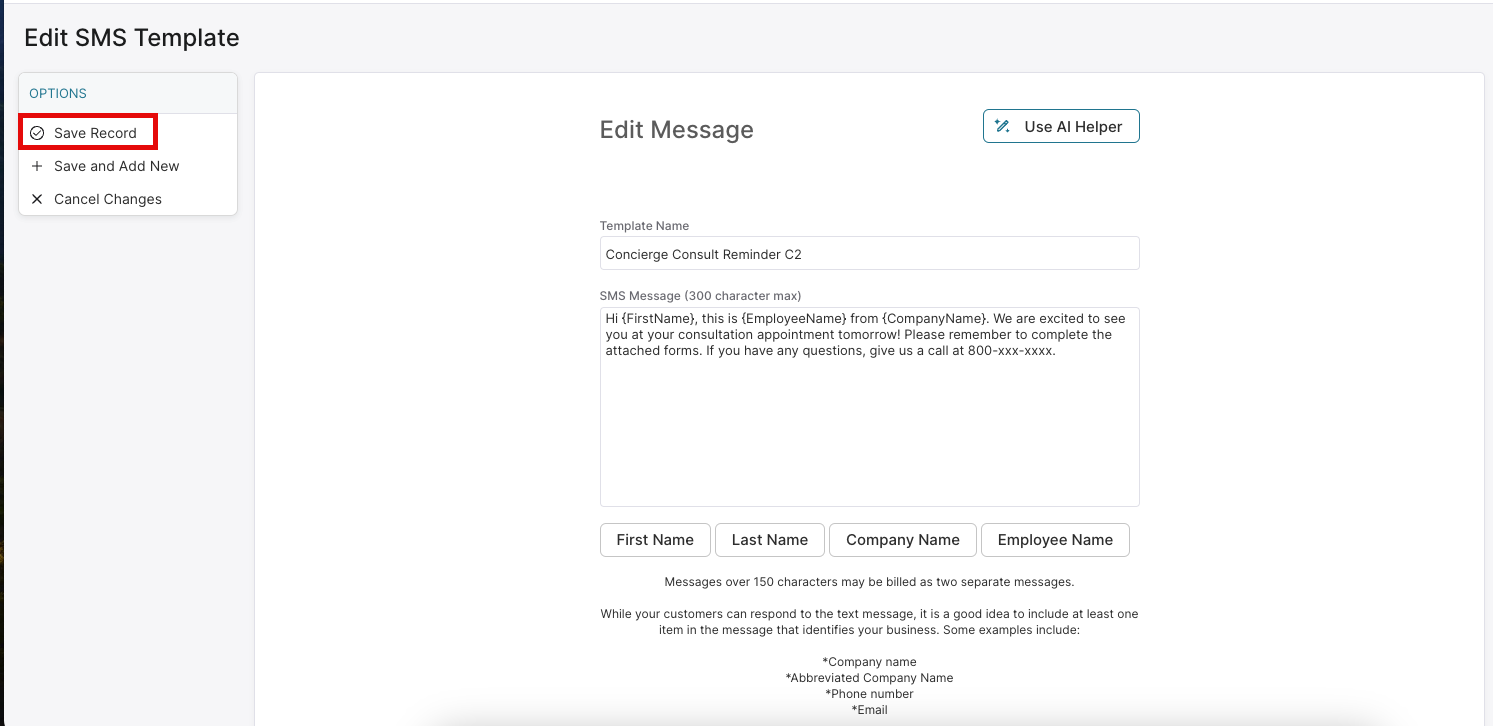
13. Click Save Record.
- 15. And again, for the Consultation Follow-up stage and its steps, to make the Template Pathway work however suits your business best. Or just use these stages and steps as a guideline to build your own pathway.
Build a Pathway in Concierge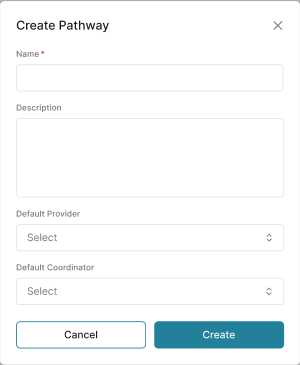
- Navigate to Marketing > Concierge.
- Click Create Pathway.
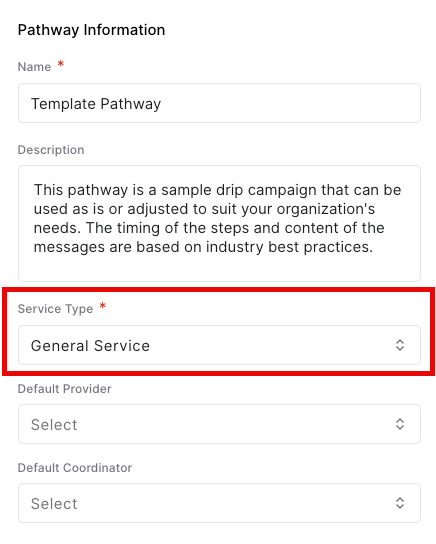
- Enter a Pathway Name.
- Pathway names must be unique.
- Description: This field is optional.
- Default Provider: This field is populated from your employee list.
- Default Coordinator: This field is also populated from your employee list.
- Click Create.
Add a Stage to a Pathway in Concierge
After a Pathway has been created, the next step is to add any desired stages. Concierge’s first version comes with the Inquiry, Consultation, and Consultation Follow-up stages.
- Navigate to Marketing > Concierge > Select an active Pathway.
- Click Add Stage.

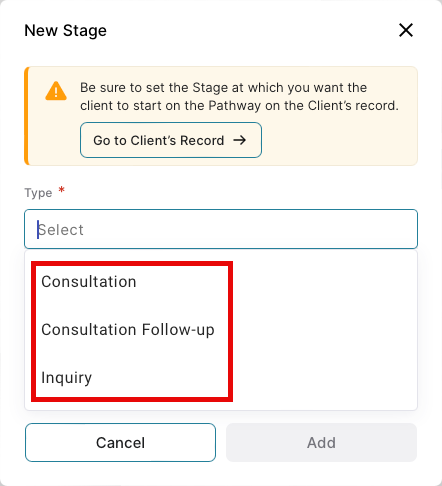
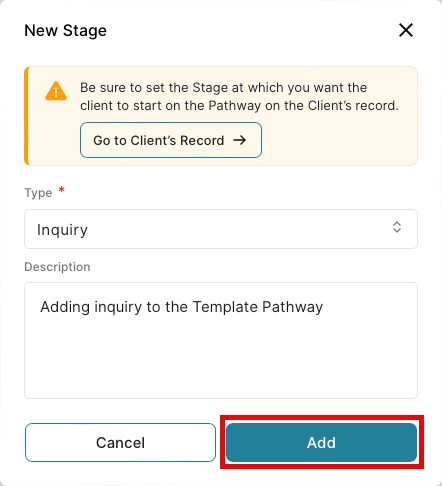
- Note the cautionary message: This message is provided to let you know you must link your clients to the appropriate stage in the pathway. For example, if you want a client to start the pathway at the Inquiry stage, you will need to assign the Pathway Start Stage on the Client Record as “Inquiry”.
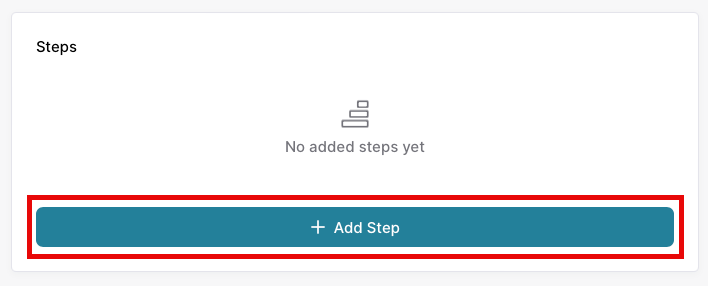
Add a Step to a Pathway in Concierge
- Navigate to Marketing > Concierge > a Pathway > and click View on a Stage.
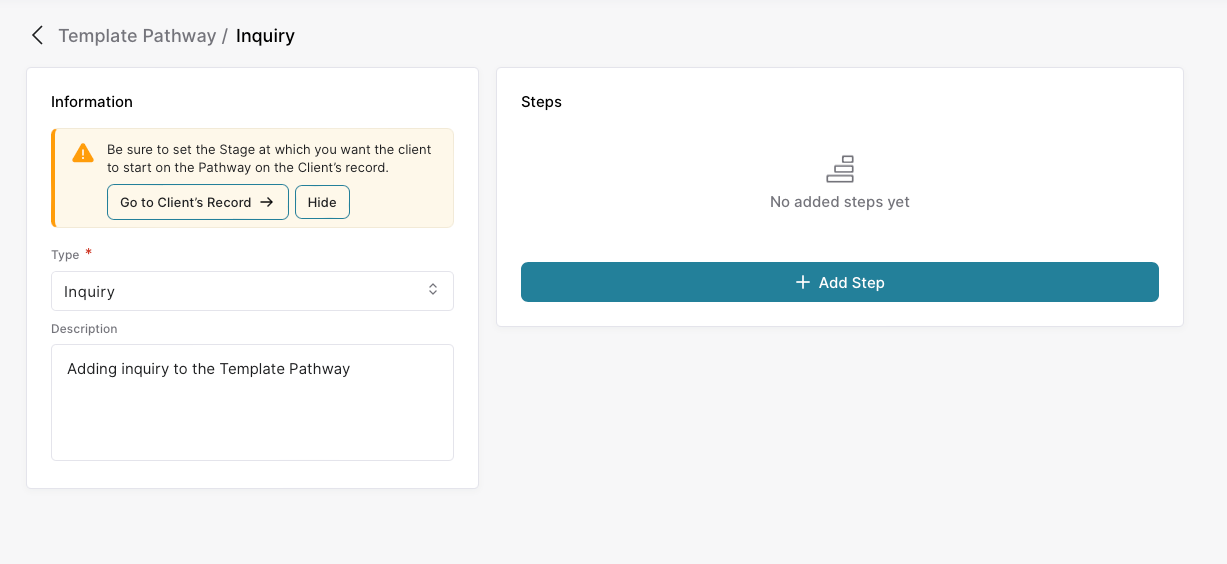
- Notice you may edit any of the Stage information if desired.
- You may also click Hide to hide the cautionary message about assigning the Pathway Start Stage for your clients. This message will reappear whenever a new pathway is created.
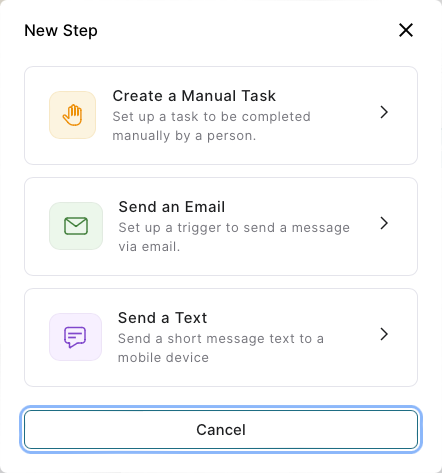
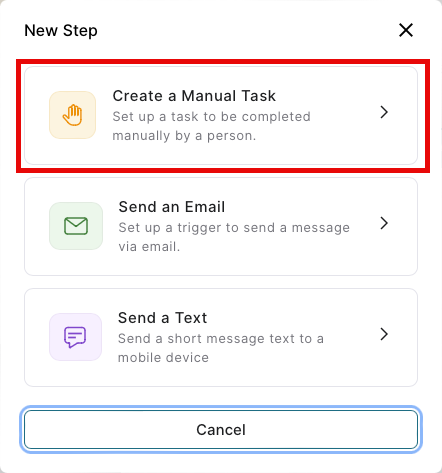
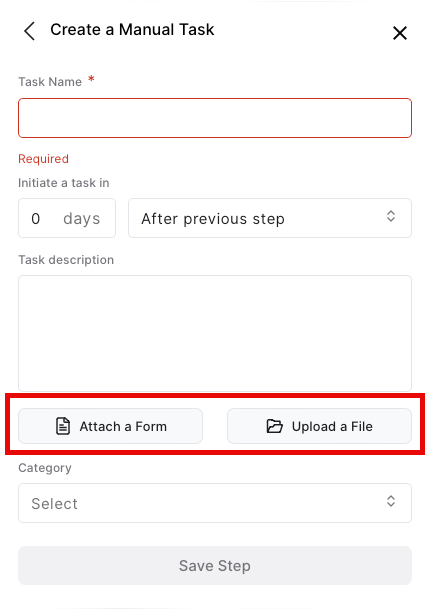
Add a Manual Task
- Click Create a Manual Task.
-
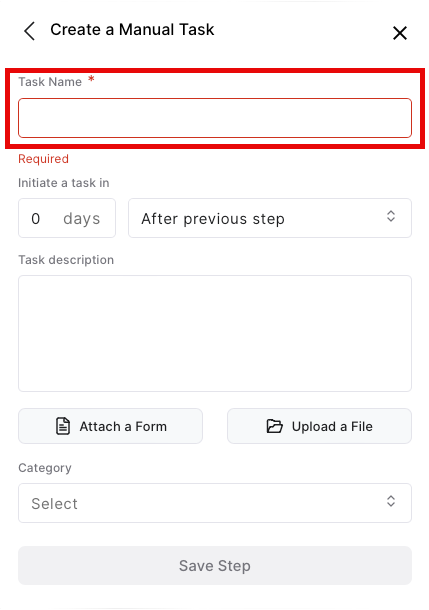
- This field is required.
- Assign a logical name that will make sense later when a user is required to perform the task. For instance, if the task will be to make a phone call to reach out to a new inquiry, name the task “Inquiry Phone Call” or something similar.
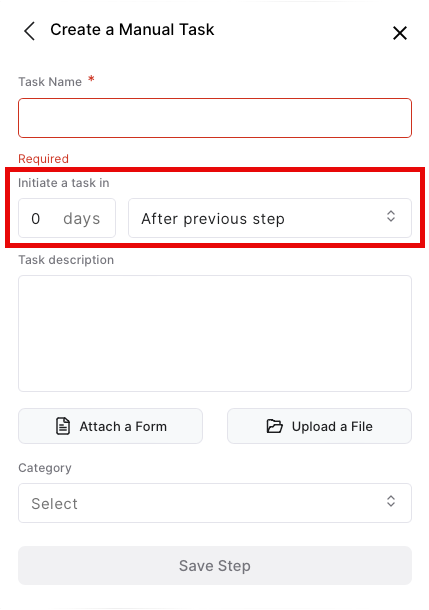
3. “Initiate a task in”
-
- This field is asking, when do you want this task to occur?
- There are two fields necessary to setting the timing of a task.
The first is the number of days, which can be from 0 to 365, and the second is what the number of days is based on, which is one of three options: after the previous step, after appointment, or before appointment.
- For example, if a step should occur immediately, the number of days is 0 and we select “After previous step” (when there is no previous step, it will prompt the step to occur NOW). Or, if you want the step to occur 3 days before an appointment, the number of days is 3 and the selection is “Before appointment”
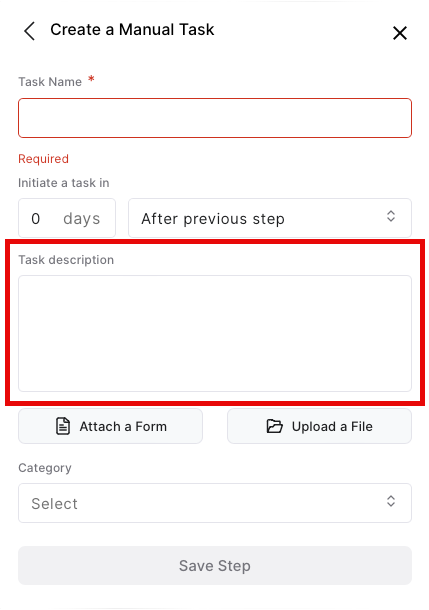
4. Add a task description.
-
- Add any instructions needed to the task description.
- These instructions will be view only when the user performs the task, but the user will be able to add additional comments to the description if desired.
-
5. Attach a form.
-
- If you have integrated with RxPhoto or UpdateMyRecords, you may access any forms from these applications and attach them to the step.
-
- Click to browse your computer and select a maximum of five files to upload to the step.
-
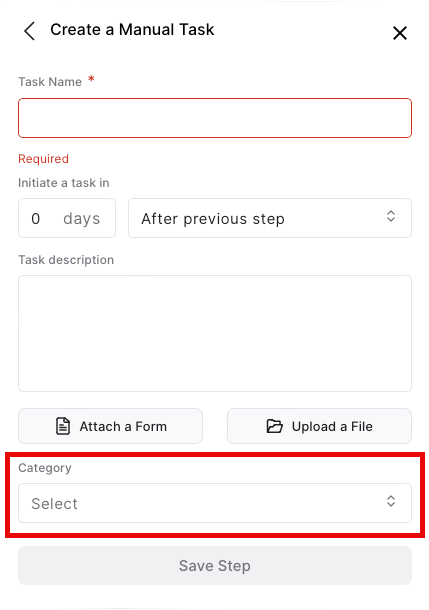
- There are five categories available in the dropdown to help track step activities: Administration, Clinical, Financial, Marketing and Scheduling.
- This field is not required.
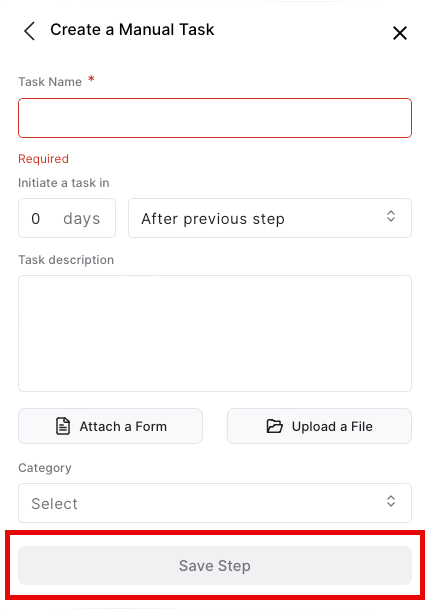
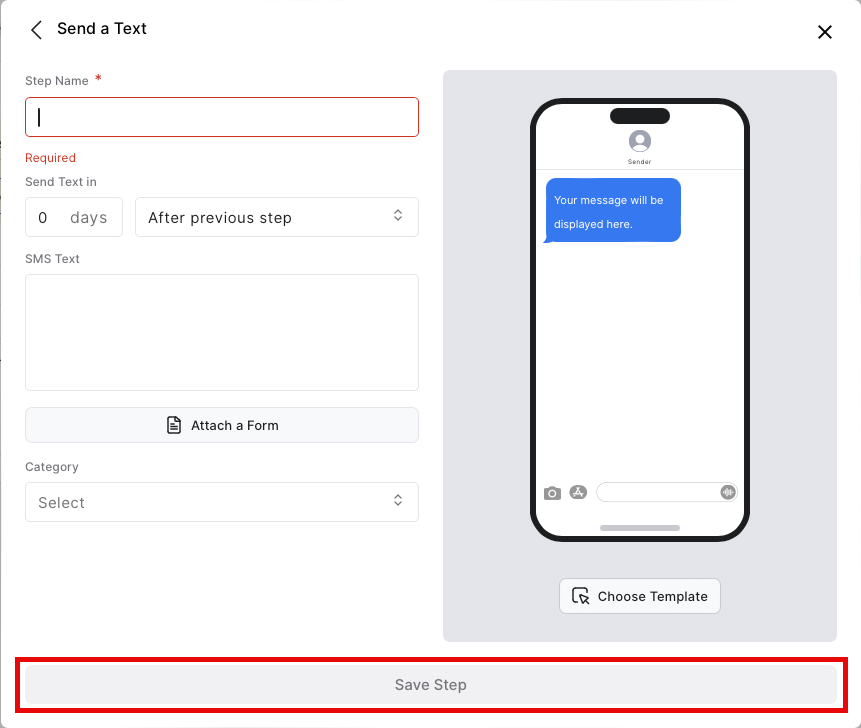
8. Save the step.
-
- When the step has been completed as desired, click Save Step.
- The Save Step button will activate when the required fields have been completed.
- The step may be edited or deleted.
- Any Manual Task that needs to be completed will be listed on the Concierge Tracking > Manual Tasks page.
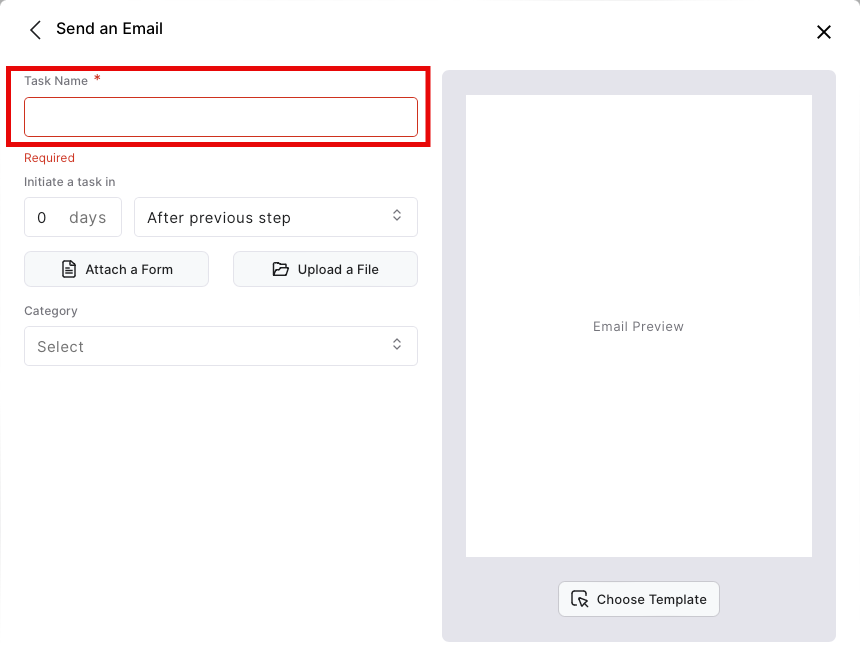
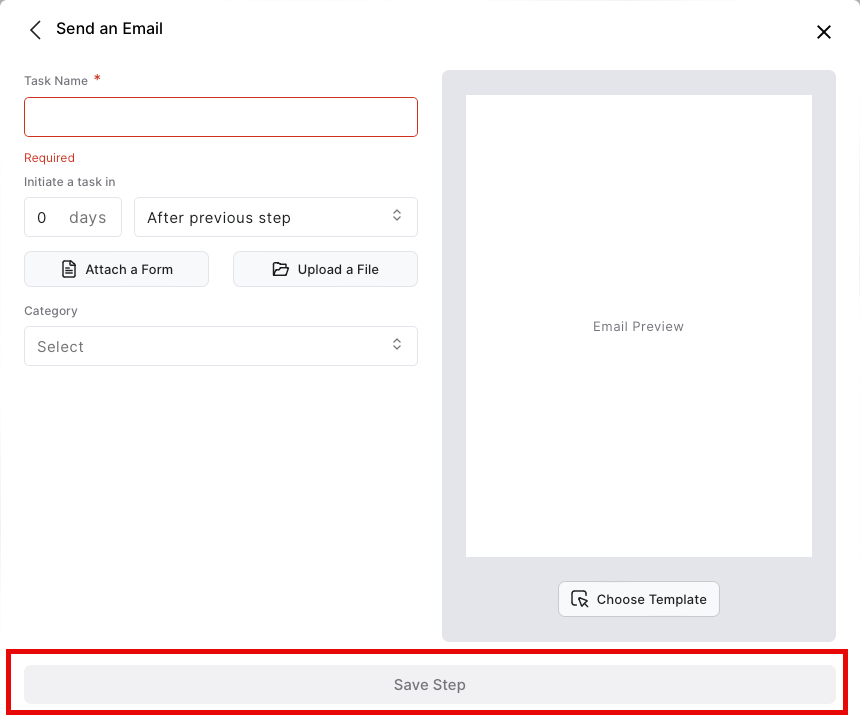
Add an Email Step
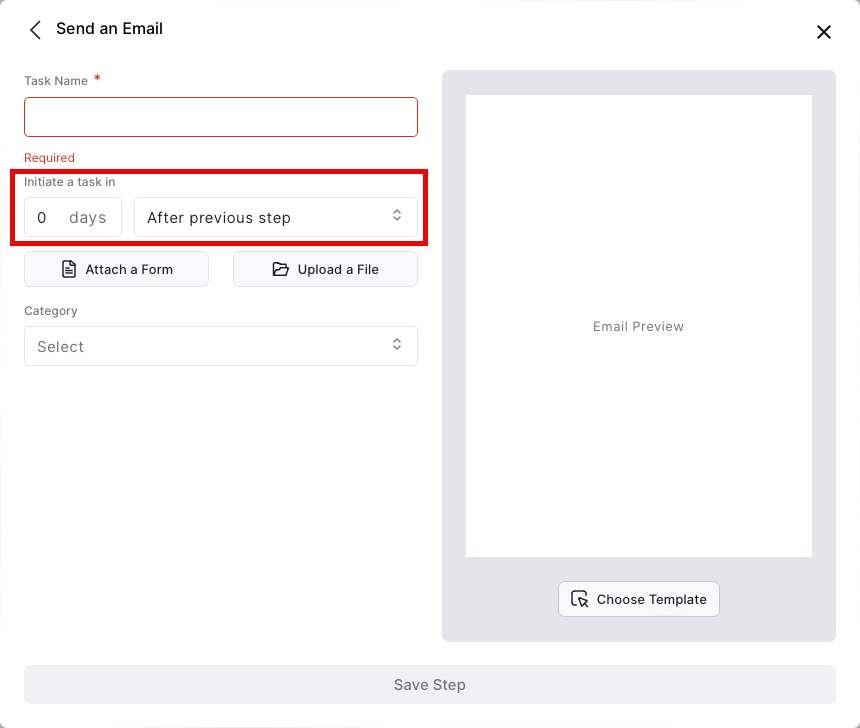
- Click Send an Email.

-
- This field is required.
- Assign a logical name that will make sense later when you view the task in the Concierge Tracking table. For instance, if this is an initial email to welcome a potential client who has made an inquiry, use a task name like “First Inquiry Email”.
-
- This field is asking, when do you want this task to occur?
- There are two fields necessary to setting the timing of a task.
The first is the number of days, which can be from 0 to 365, and the second is what the number of days is based on, which is one of three options: after the previous step, after appointment, or before appointment.
- For example, if a step should occur immediately, the number of days is 0 and we select “After previous step” (when there is no previous step, it will prompt the step to occur NOW). Or, if you want the step to occur 3 days before an appointment, the number of days is 3 and the selection is “Before appointment”
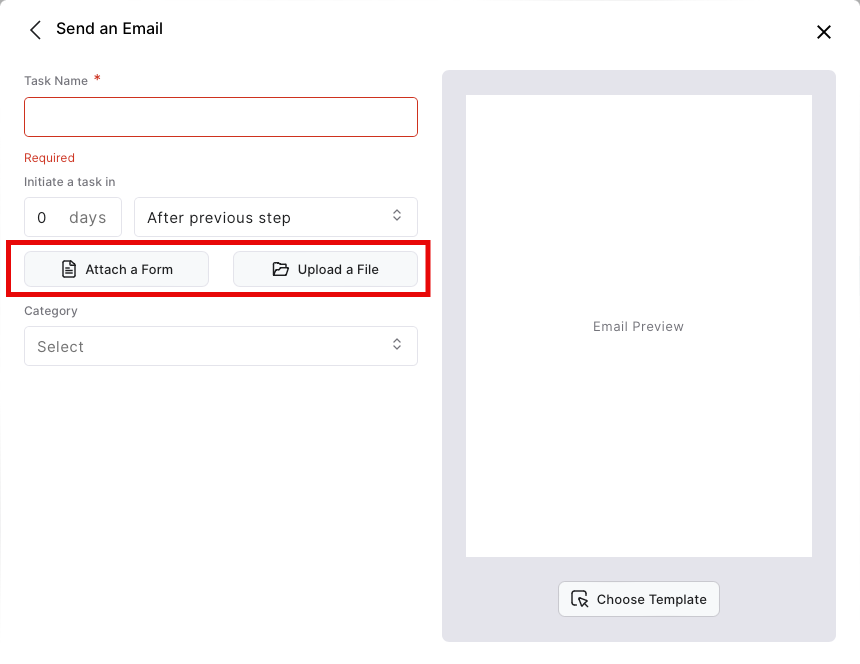
4. Attach a form.
-
- If you have integrated with RxPhoto or UpdateMyRecords, you may access any forms from these applications and attach them to the step.
- Click to browse your computer and select a maximum of five files to upload to the step.
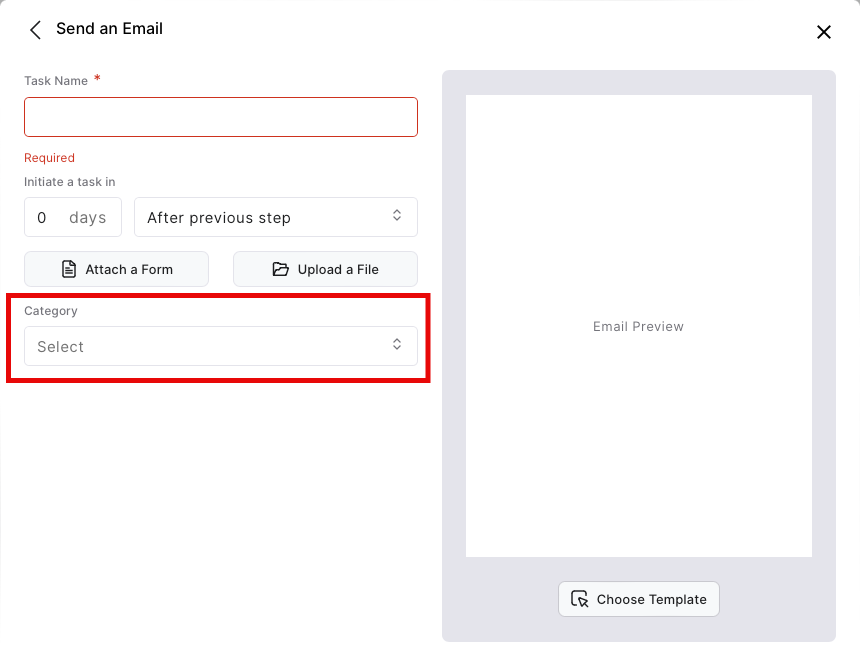
 6. Assign a Category
-
- There are five categories available in the dropdown to help track step activities: Administration, Clinical, Financial, Marketing and Scheduling.
- This field is not required.
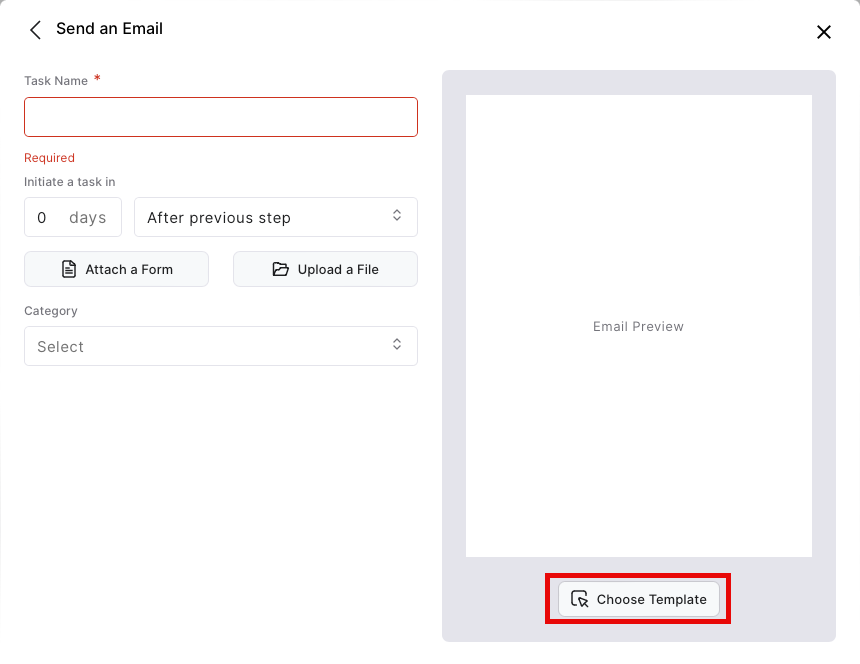
7. Choose Template.- Click Choose Template to open the Marketing Template Creator.
- An existing email template may be selected, or a new email template may be created and then added to the step.
- Simply click on which email template you wish to add to the step, then click “Add Selected Template to the Step”.
- A preview of the template will display in the window.
Pro Tip: The content entered in the Notes field in the Marketing Template Creator becomes the Concierge Email Subject line. Be sure to create a subject line that will work well with your email template!
-
- The Save Step button will activate when the required fields have been completed.
- The step may be edited or deleted.
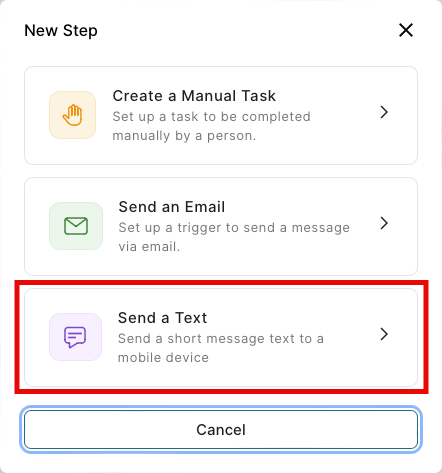
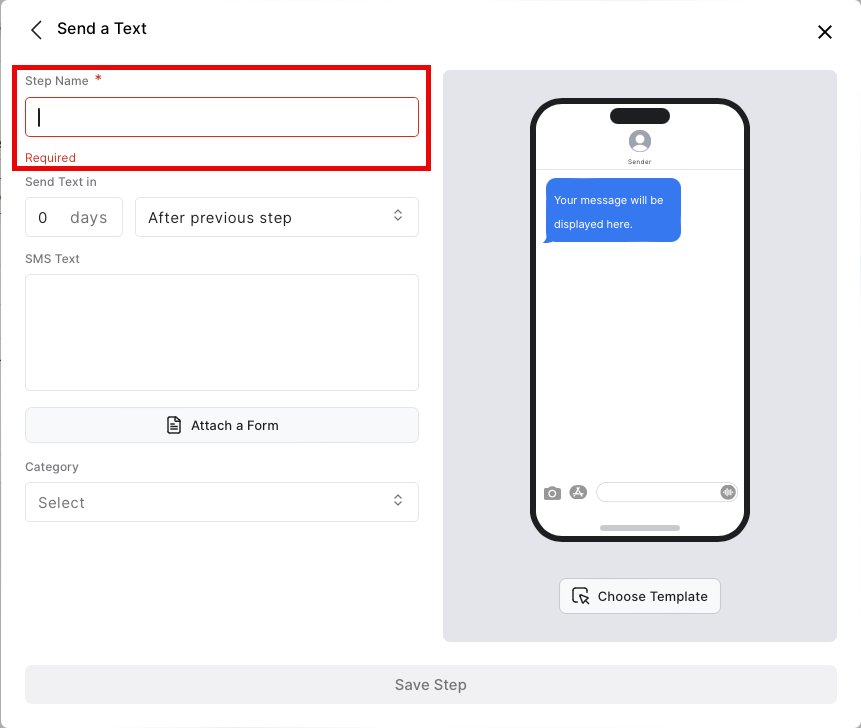
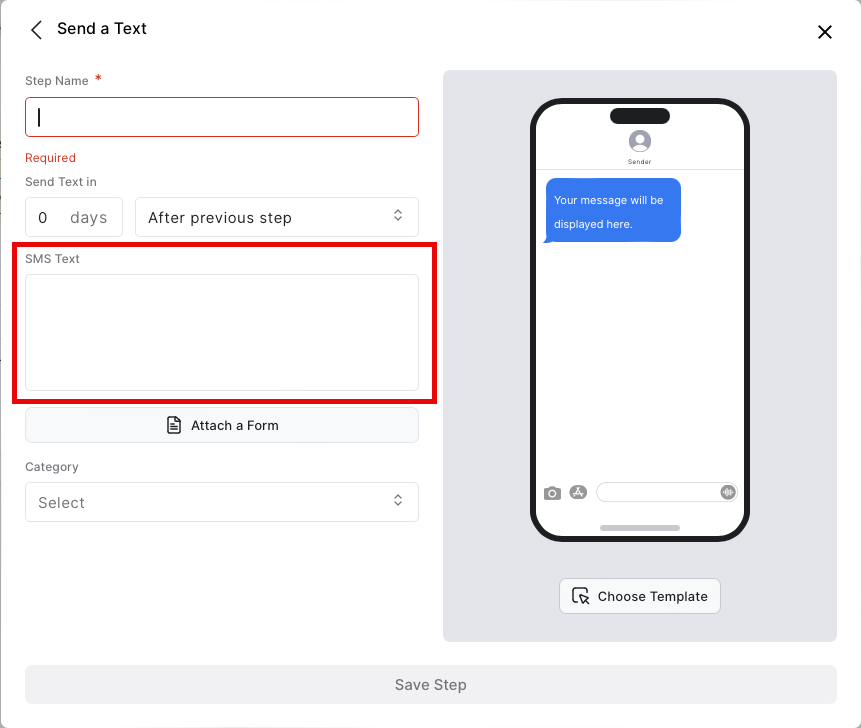
Add a Text Step
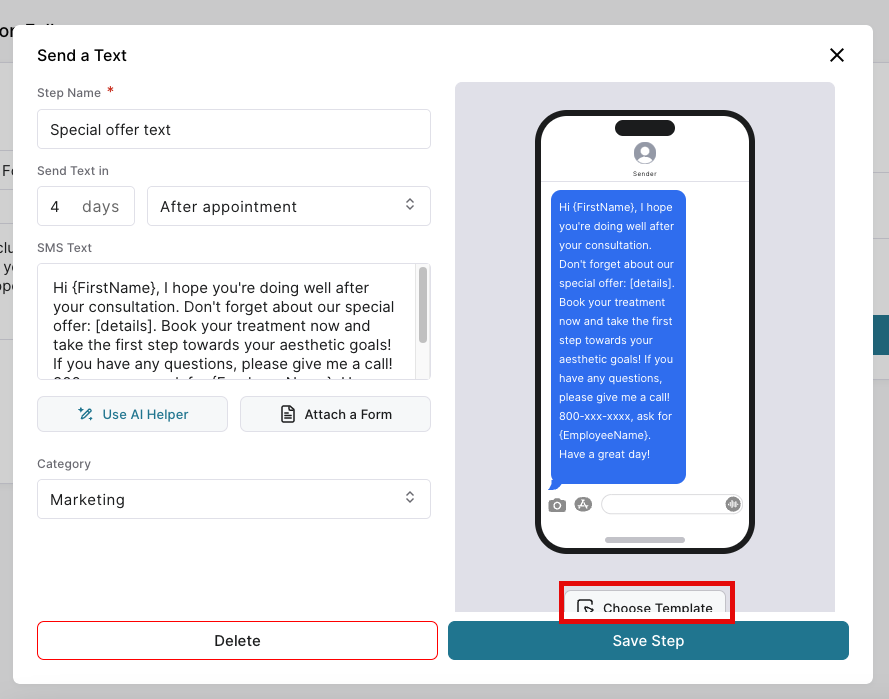
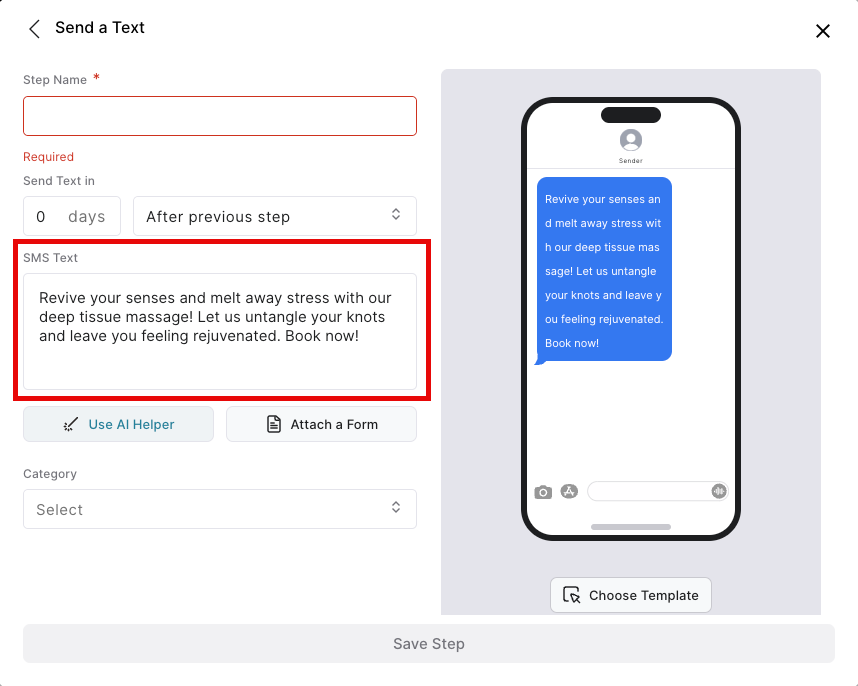
- Click Send a Text.
-
- This field is required.
- Assign a logical name that will make sense later when you view the task in the Concierge Tracking table. For instance, if this is an initial text to welcome a potential client who has made an inquiry, use a task name like “First Inquiry Text”.
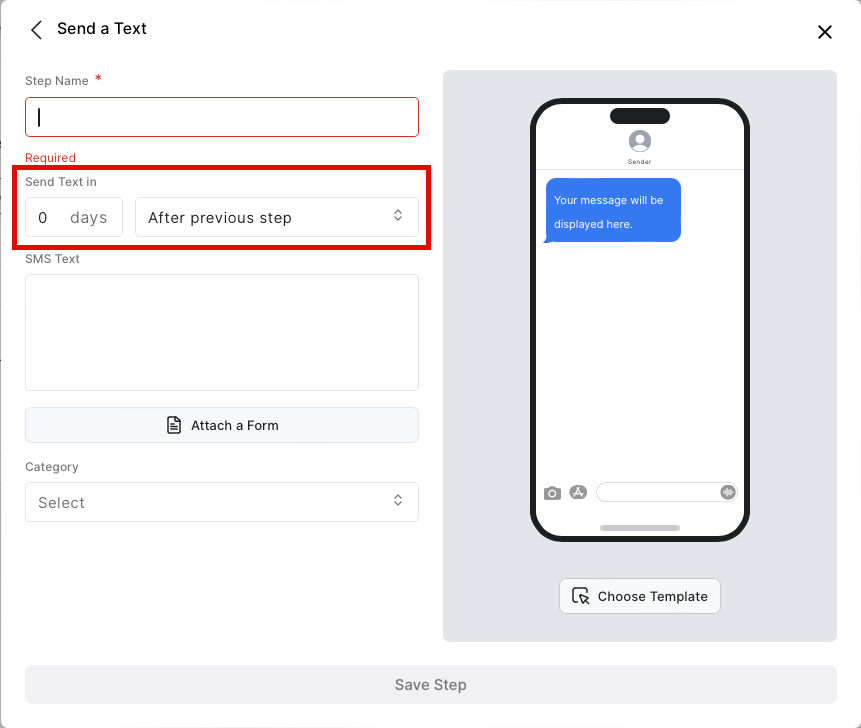
3. “Send Text in”- This field is asking, when do you want to send this text?
- There are two fields necessary to setting the timing of a task.
The first is the number of days, which can be from 0 to 365, and
The second is what the number of days is based on, which is one of three options: after the previous step, after appointment, or before appointment.
- For example, if the text should send immediately, the number of days is 0 and we select “After previous step” (when there is no previous step, it will prompt the text to send NOW). Or, if you want the text to send 3 days before an appointment, the number of days is 3 and the selection is “Before appointment.”
- 1 – Create a short text in the SMS Text window (shown to the right), OR
2 – Click the Choose Template button and select a template text (covered in step 7) - The SMS text field is limited to 150 characters
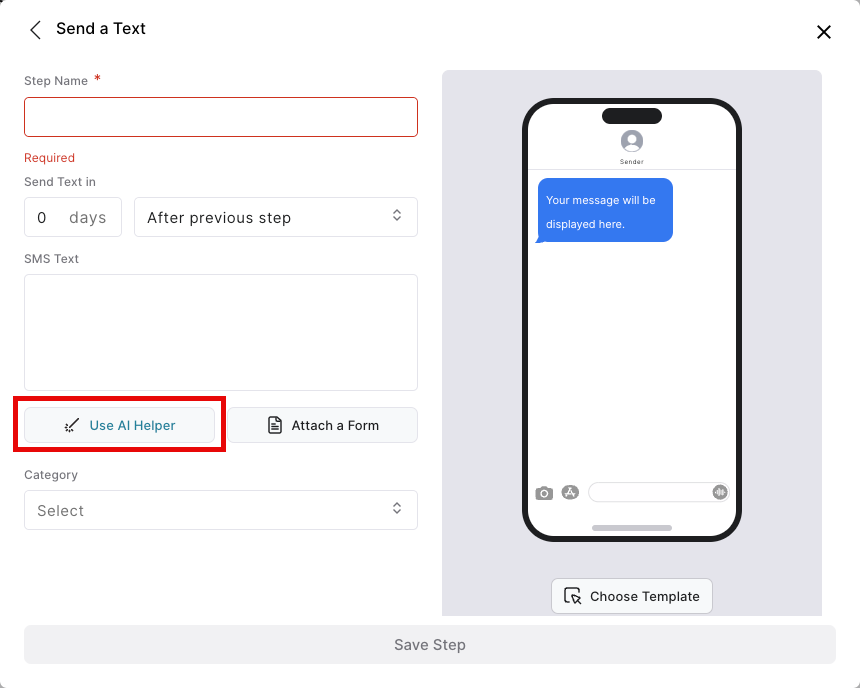
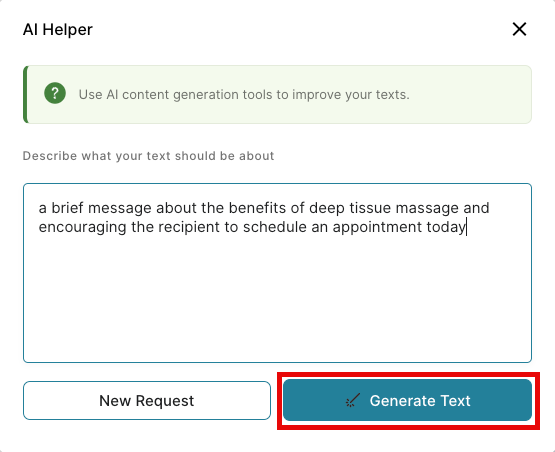
- The AI Helper can assist you with creating just the right wording for your texts.
- Click Use AI Helper to open it.
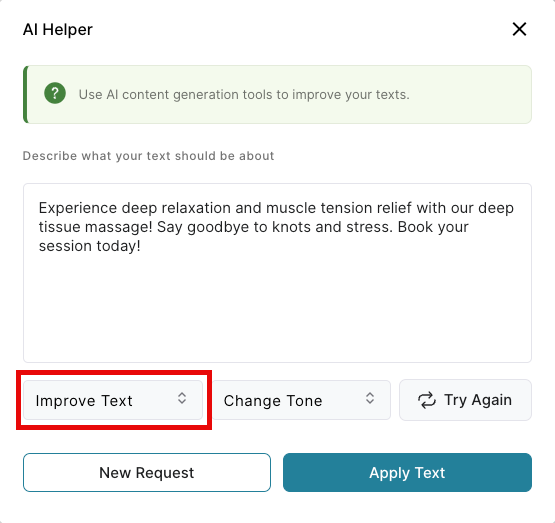
7. Use the “Improve Text,” “Change Tone” and “Try Again” buttons to enhance the response further.
- Click Improve Text.
- Select Add Creativity.
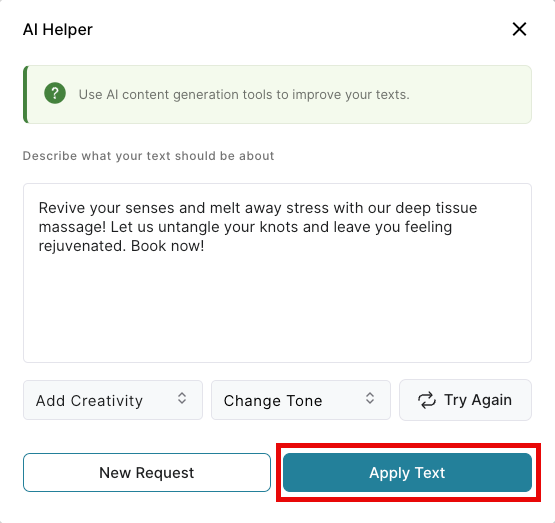
Pro Tip: The AI Helper is also available in the Email Template Editor within the Marketing Template Creator and in the Edit SMS Template within the SMS Template Creator to help with content creation and wordsmithing your texts and emails. It is easy to use and creates great content quickly to help you move through your tasks fast!
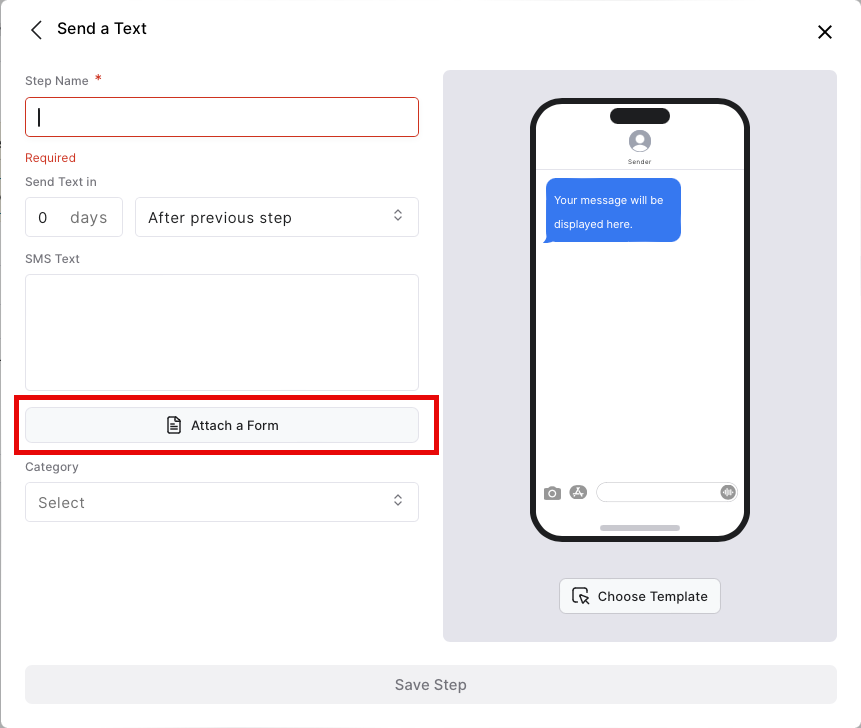
9. Attach a form
- If you have integrated with RxPhoto or UpdateMyRecords, you may access any forms from these applications and attach them to the step.
- Attached forms will appear as a link below the text message.
- Details of attaching forms are explained here. Don’t worry, it is super easy!
-
- There are five categories available in the dropdown to help track step activities: Administration, Clinical, Financial, Marketing and Scheduling.
- This field is not required.
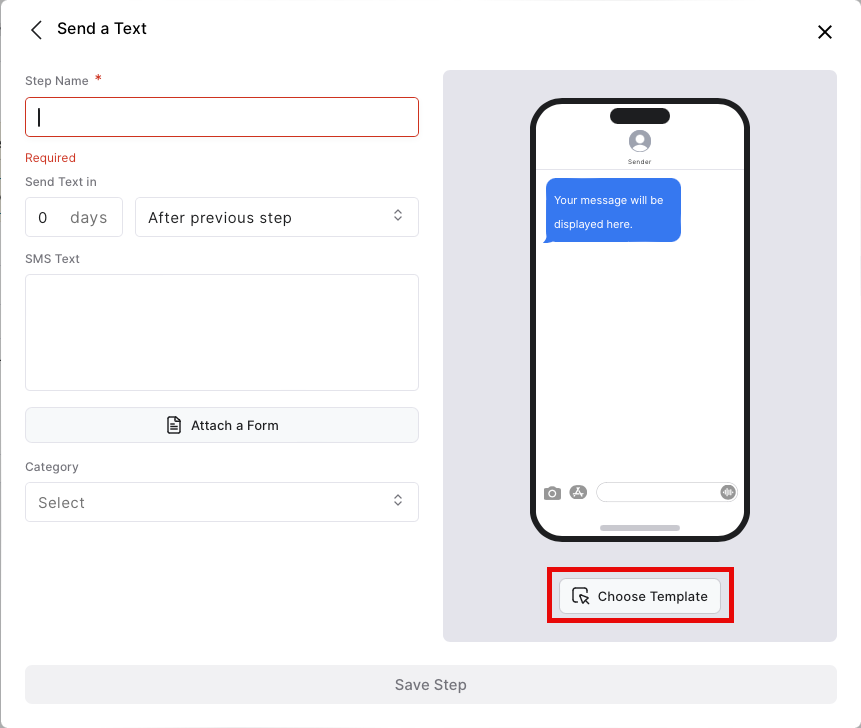
- 7. Choose Template.
- Click Choose Template to open the SMS Template Creator.
- An existing SMS template may be selected, or a new SMS template may be created and then added to the step.
- Simply click on which text template you wish to add to the step, then click “Add Selected Template to the Step”.
- A preview of the template will display in the window.

- The Save Step button will activate when the required fields have been completed.
- The step may be edited or deleted.
Repeat this process, adding additional Stages to the Pathway, and Steps to each Stage until you have created a full client journey of touchpoints that suits your organization’s needs, from Inquiry to Consultation appointment to Consultation Follow-up.
Now, let’s look at connecting the Pathway to the Client.
Start a Client on a Pathway
Set the Client’s Pathway Start Stage
- Navigate to Clients > Client List.
- Select the client you wish to start on a pathway.
- Click on the Concierge tab.
Pro Tip: Be sure to get your client’s phone number and email so you can send texts and emails!

- 4. From the dropdown, select the
- If you want the client to go through all the steps in the Inquiry stage, set the Pathway Start Stage to Inquiry
- If the client has moved past the Inquiry stage and is ready for Consultation, set the Pathway Start Stage to Consultation

- at which you would like the client to start on the Pathway.
Preparing Consultation Services
Check the Consultation Box!
It is important to distinguish Consultation appointments from other appointments with Concierge, since two of the Stages in a pathway are Consultation and Consultation Follow-up.
Concierge will automatically move the client from Inquiry to Consultation when an appointment is made on the schedule that has a service marked as a Consultation.
Also, when that appointment’s status changes to “Checked Out Client,” Concierge will automatically move the client to the Consultation Follow-up stage.
For any service that is a Consultation, the Consultation checkbox must be checked!
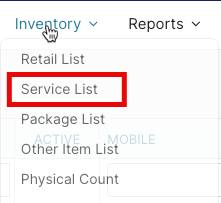
- Navigate to Inventory > Service List.
- Select or create any service that will be added to a Consultation appointment.
- On the General tab, check the Consultation box.


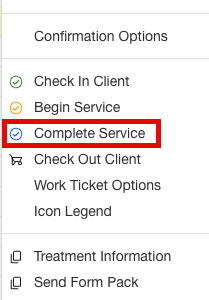
Pro Tip: When a Consultation service is done, change the appointment status on the schedule to “Complete Service.”
This triggers the client to automatically move to the Consultation Follow-up stage.
Concierge Tracking
All Pathways
Concierge has built in reporting with sort and filtering functions to help you track and monitor clients’ progress and participation in Concierge.
Navigate to Marketing > Concierge > Concierge Tracking.

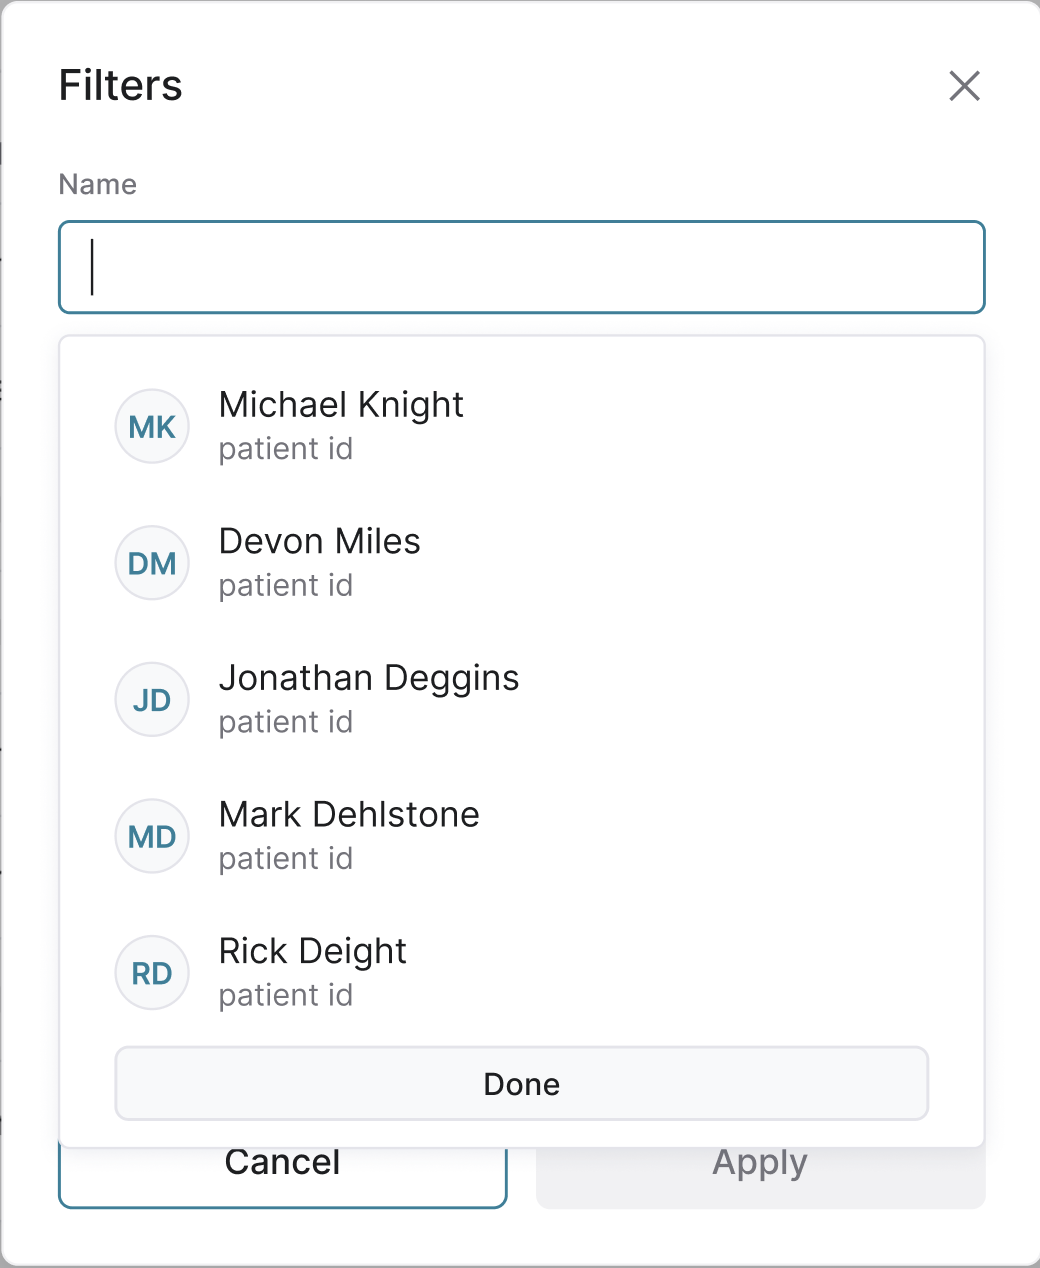
3. Click Filter to filter by the data in any column.
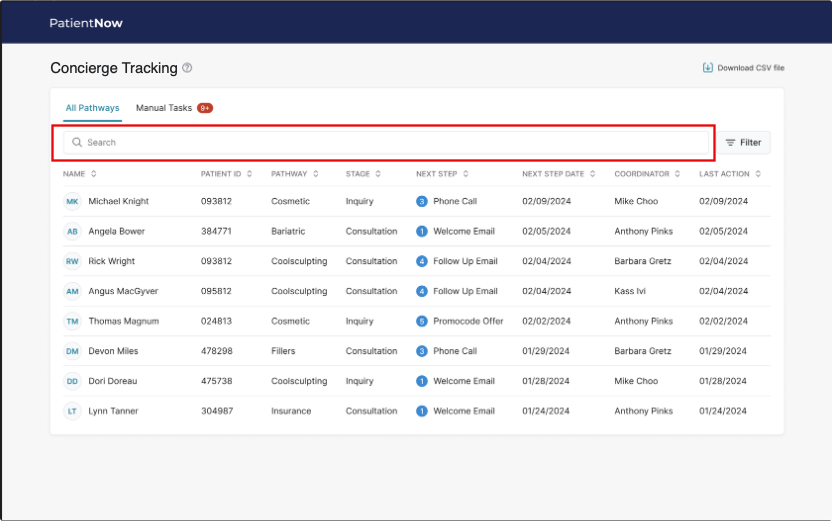
4. Click in the Search box and enter criteria to search for any data in the table.
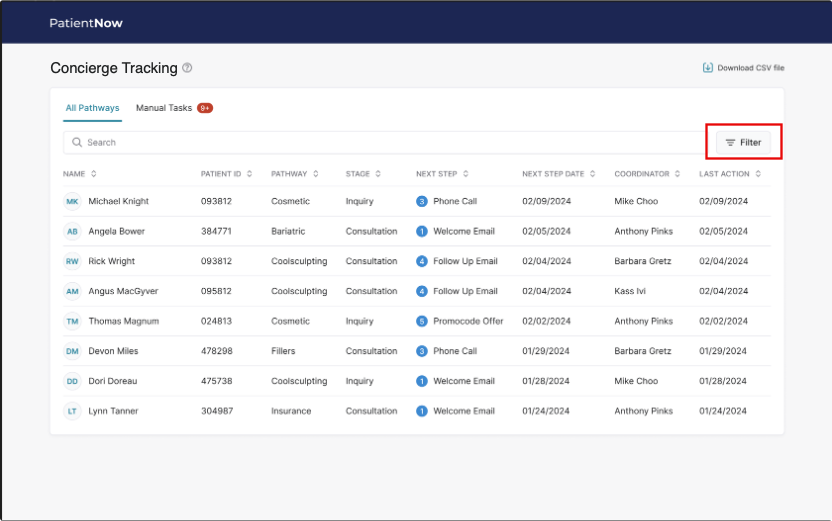
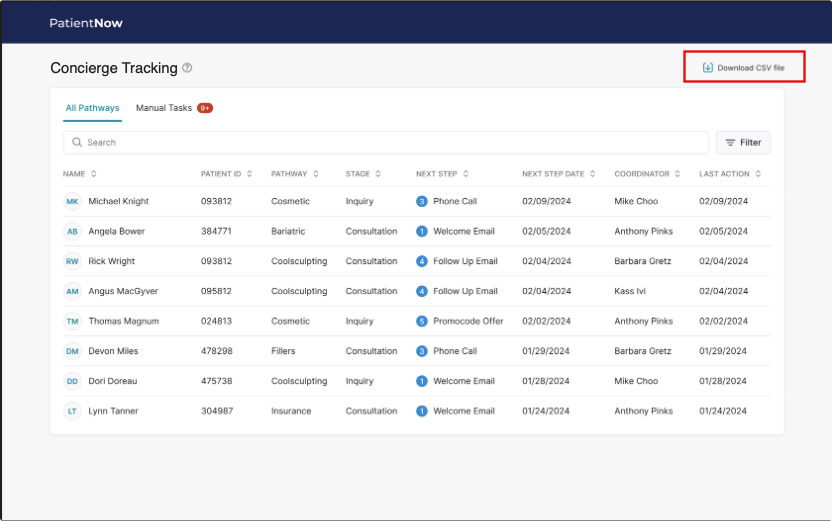
5. Click Download CSV file to download any view of the data in the table.
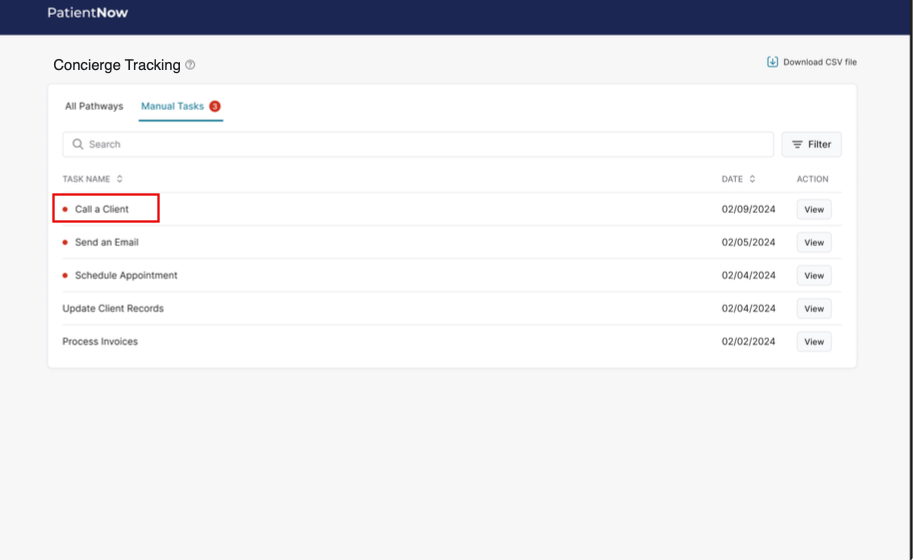
Manual Tasks
In Concierge Tracking, the Manual Tasks tab displays all Manual Tasks that need to be completed and those that have been marked completed.
- Navigate to Marketing > Concierge Tracking.
- Click the Manual Tasks tab.
- If there are incomplete Manual Tasks, the number of tasks will be displayed in a red dot to the right of the title of the tab.
- This table may be filtered and searched the same as the All Pathways table.

- Each Manual Task that is incomplete has a red dot before its name in the list.
- To view a Manual Task, click View.
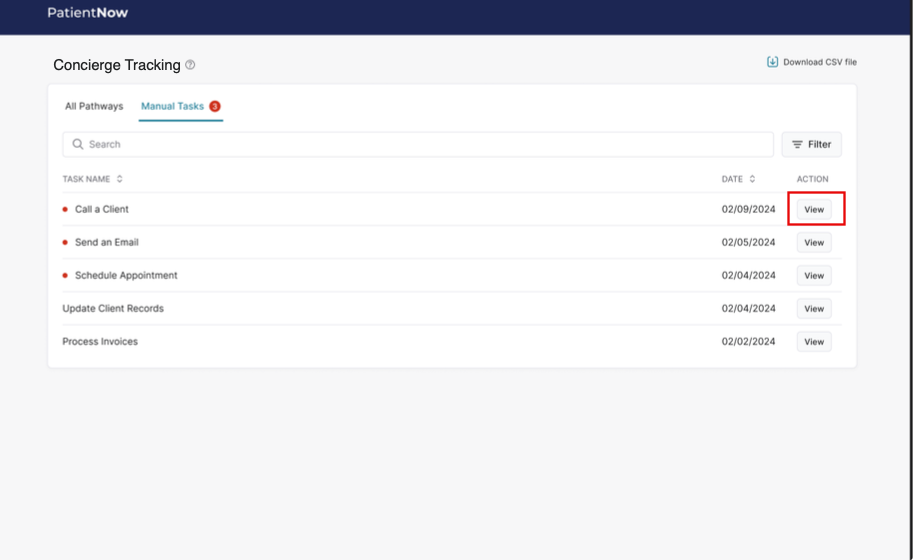
- The client’s Name and Phone is automatically included to make phone calls quick and easy.
- The task description is visible but not editable. Additional comments may be added.


9. Click Complete Task to mark the task Complete.
-
- You can also click Undo Task if the task is marked complete prematurely.
- All complete tasks move to the bottom of the Manual Tasks list.

Attach a Form
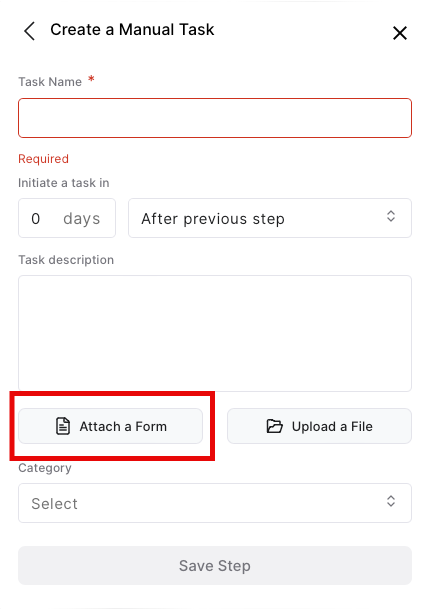
- Navigate to Concierge > a Pathway > a Stage > + Add Step.
- Click Create a Manual Task.
- Click Attach a Form.
- From the list of available forms on the left, click on the form(s) you want to add to the step.
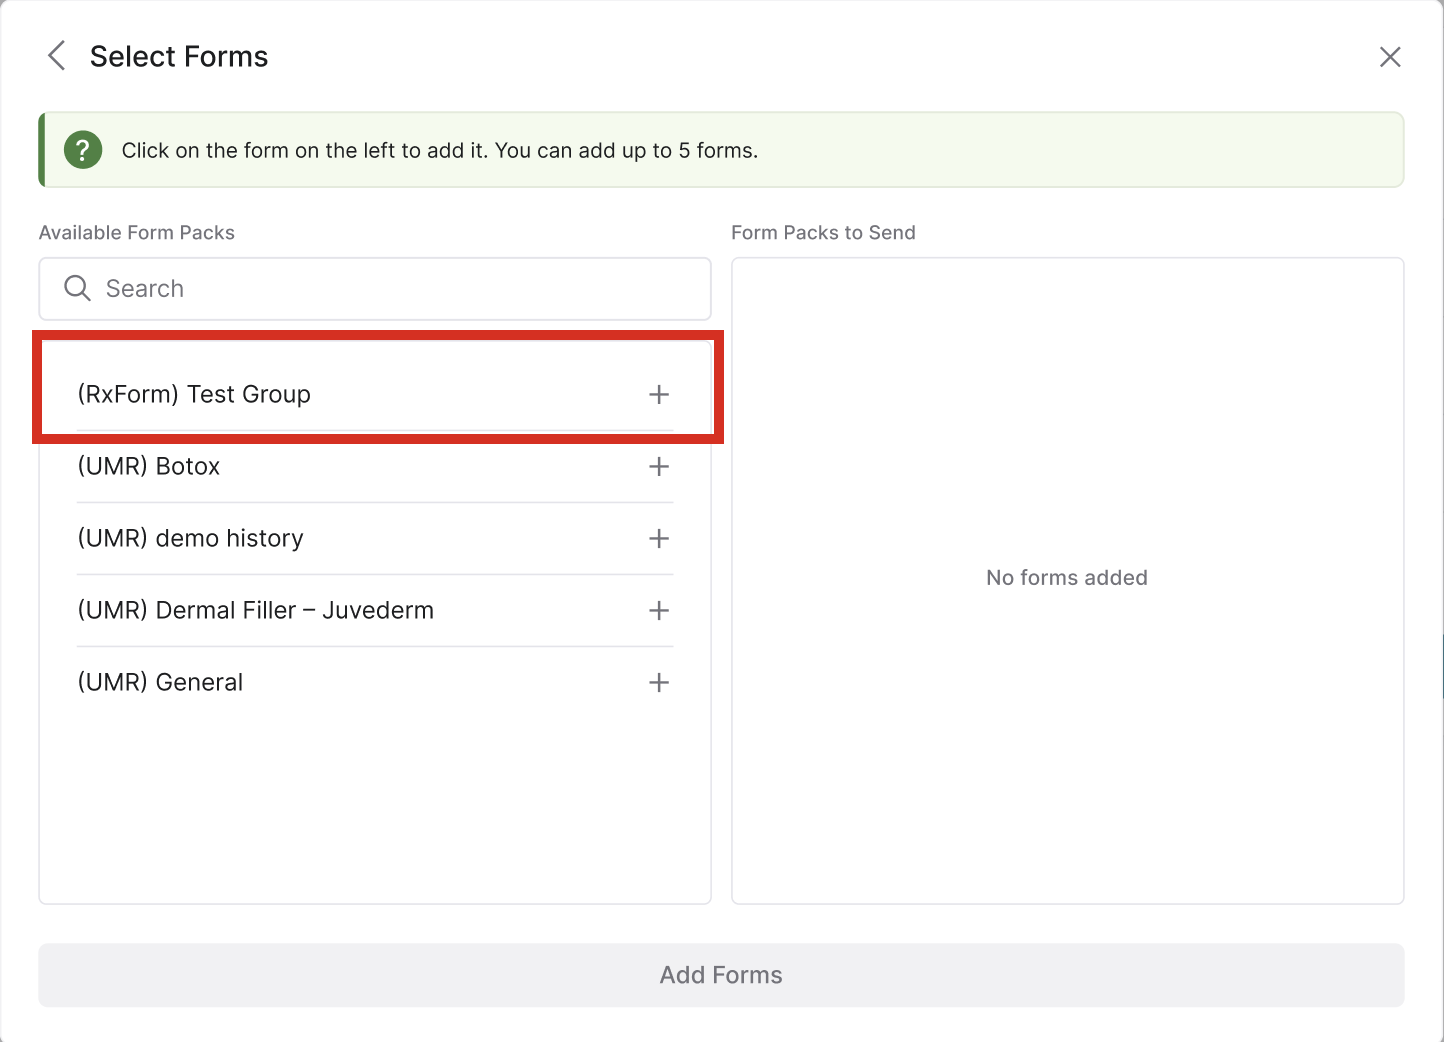
- Note that you may shift forms back and forth from box to box, adjusting your selection.
6. Attached Forms will be displayed below the Attach a form button.


Upload a File

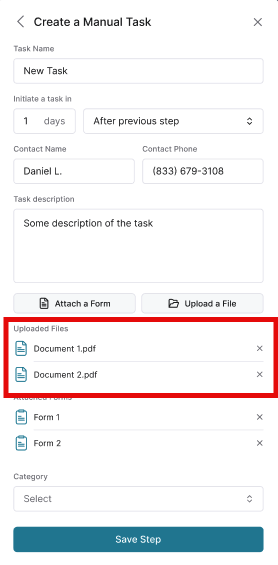
In addition to the Attach a Form feature, you can also upload a file on the Manual Task and Email steps. The process for uploading a file works the same for both steps and is like any other file upload process. We will use the Manual Task step to demonstrate how easily a file may be uploaded to a manual task or email step.
- Navigate to Concierge > a Pathway > a Stage > + Add Step.
- Click Create a Manual Task.
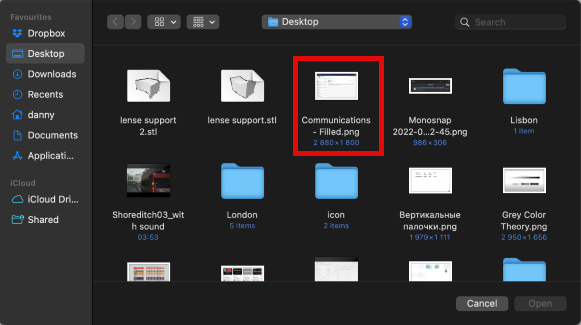
- Click Upload a File.
- A File Explorer or Finder window will open, allowing you to browse your computer and select a file.
- There is a limit of 5 files or a combined size of 15mb.
- There is a limit of 5 files or a combined size of 15mb.
- Uploaded files will display below the Upload a file button.
Creating Multiple Pathways
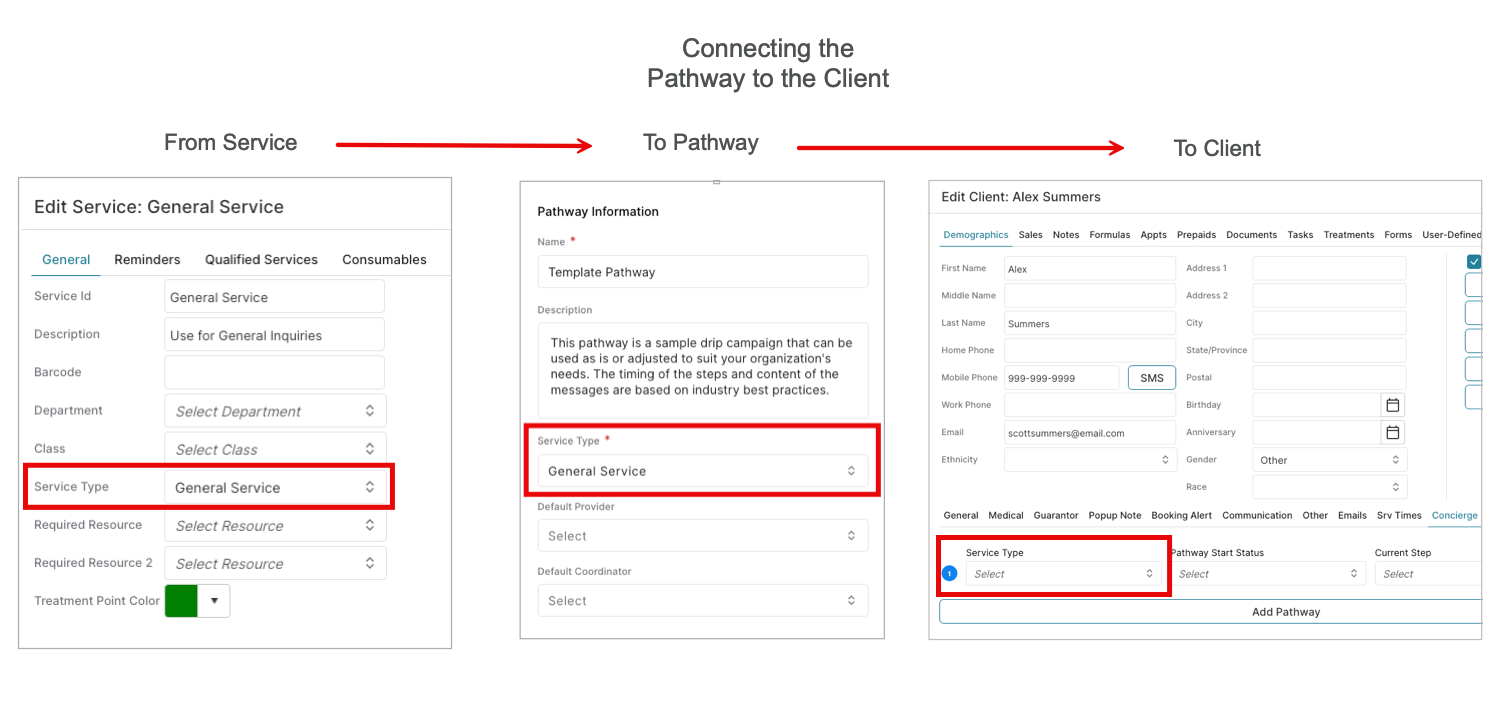
With the introduction of the “Service Type” field in Create Pathway, you can now establish and utilize multiple active pathways, targeting clients based on their treatment or service preferences. This list is populated with the Service Types created in Inventory Options. Maintaining a consistent service type alignment from Pathway to Service to Client is crucial to ensure that your clients receive targeted marketing drip campaigns effectively.
You will create the service types that you wish to use to target the different segments of your client base. Then you will assign this service type to the Service, the Pathway and the Client.
The 3 places that Service Type is set to make this connection are:
- Add/Edit a Service
- Create Pathway
- Edit Client
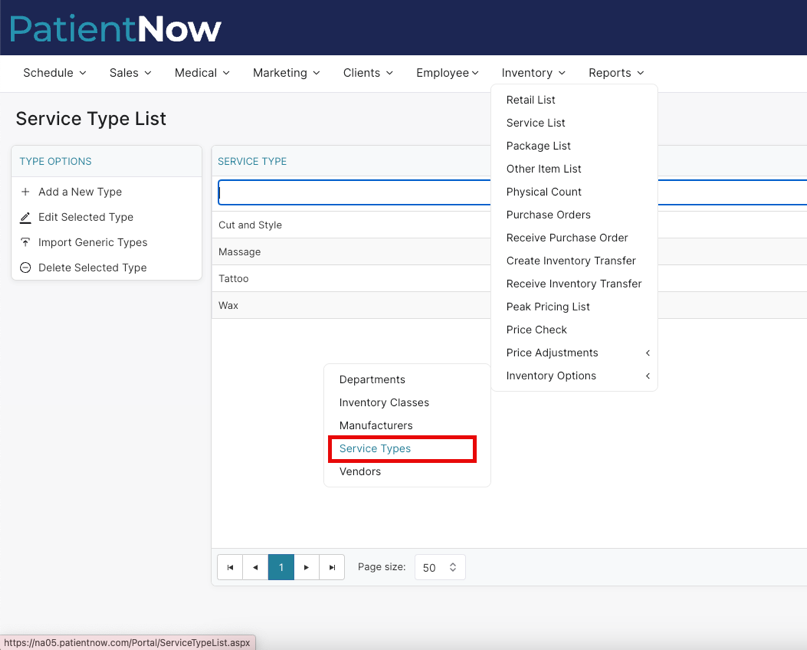
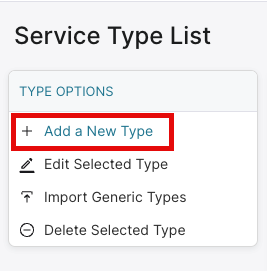
Set up Service Types
- Navigate to Inventory > Inventory Options > Service Types.
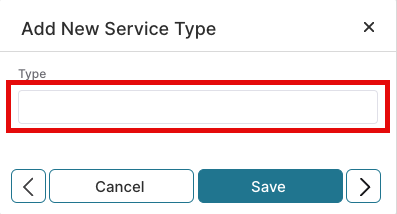
- Click Add a New Type
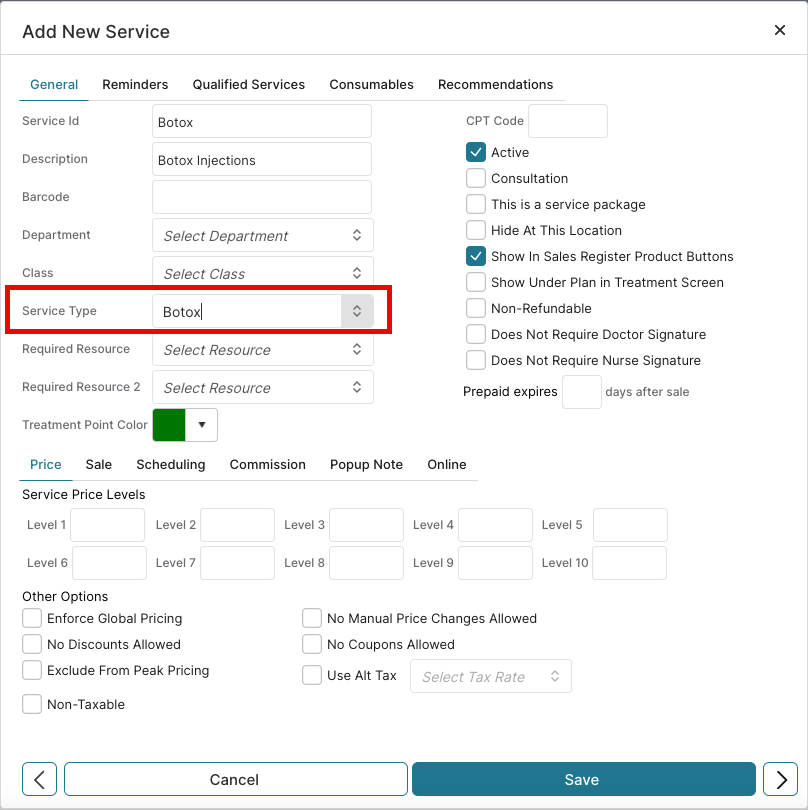
Assign a Service Type to a Service
- Navigate to Inventory > Service List.
Select Add a New Service or Edit Selected Service.
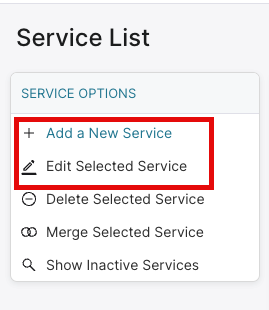
2. Assign the appropriate Service Type to the Service that will be used to book appointments related to the Pathway being created.
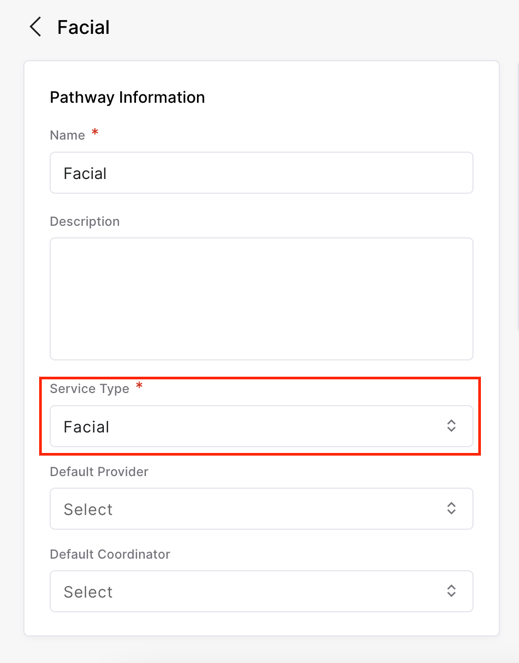
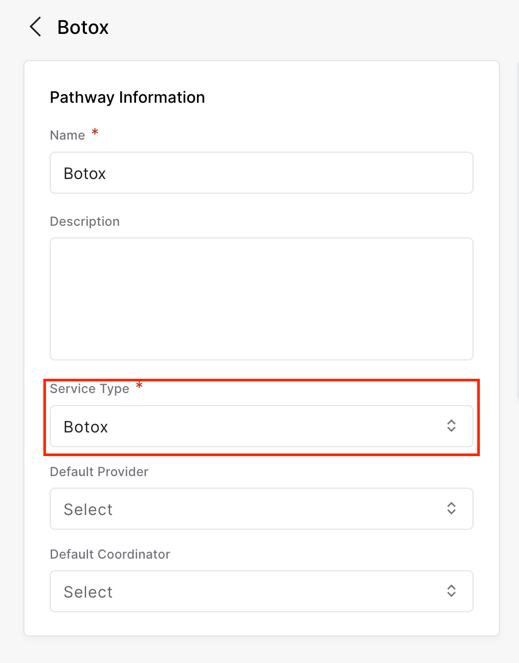
Assign a Service Type to a Pathway
- Navigate to Marketing > Concierge > Concierge Automation
- Click Create Pathway.
- Enter the Pathway Name, Description and select the Service Type, then Save. The Service Type list displayed here is the same list of Service Types created in Inventory > Inventory Options > Service Types.
Assign a Service Type to a Client
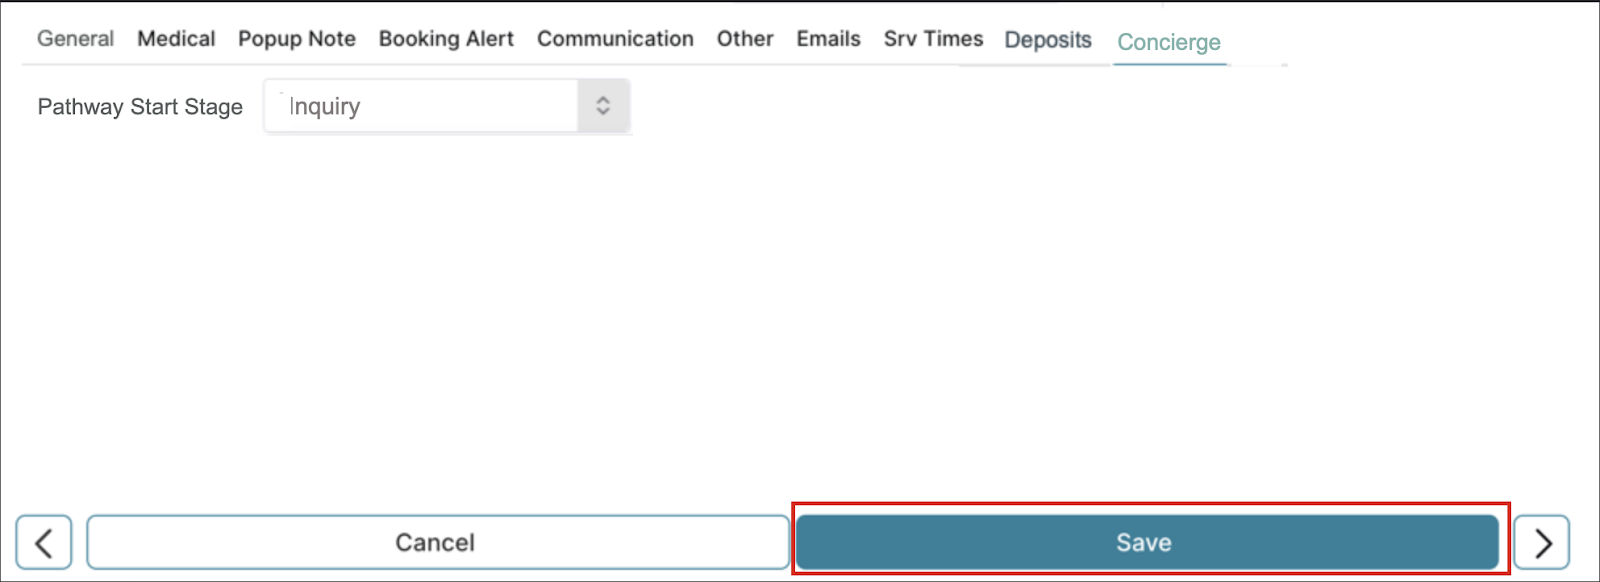
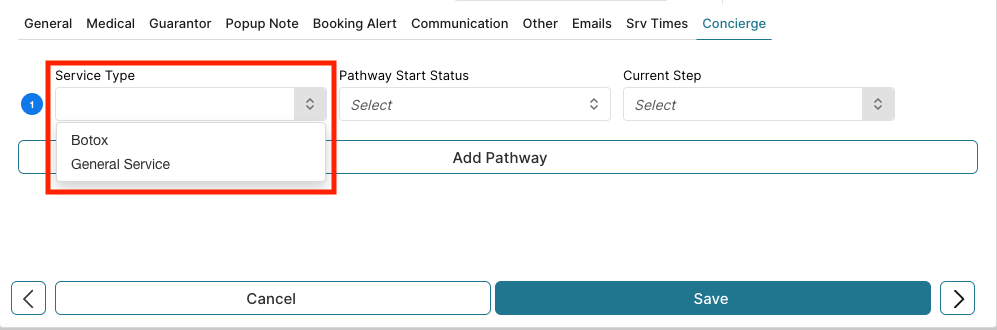
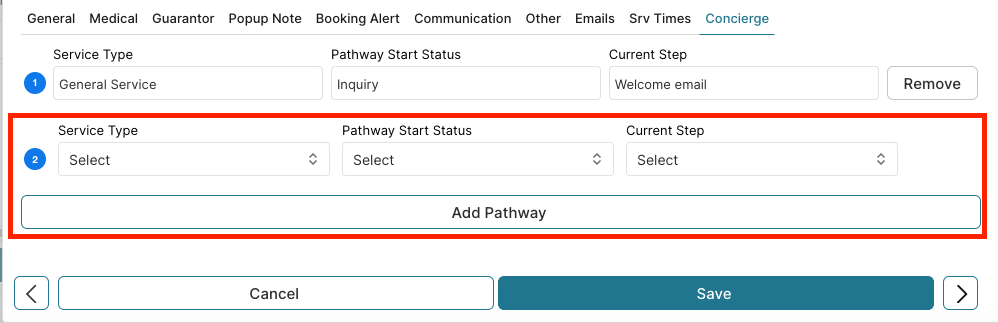
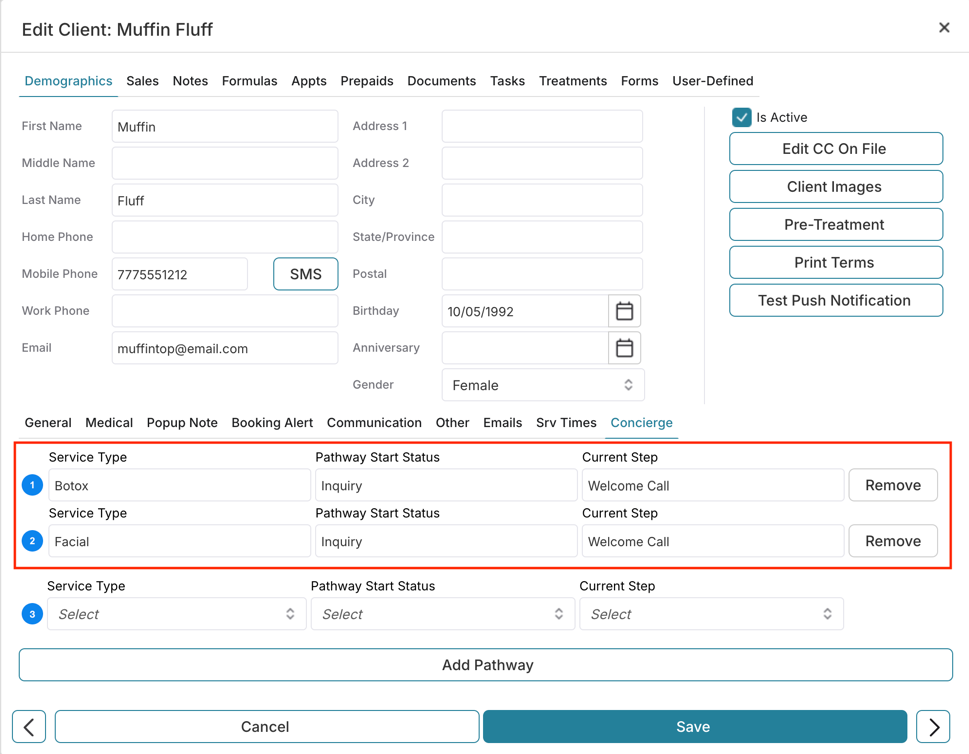
1. Navigate to Clients > Client List > Add/Edit Client > General Tab > Concierge.
2. Click the dropdown for Service Type and select the same Service Type from the dropdown that matches the service type on the pathway you want to assign to the client.
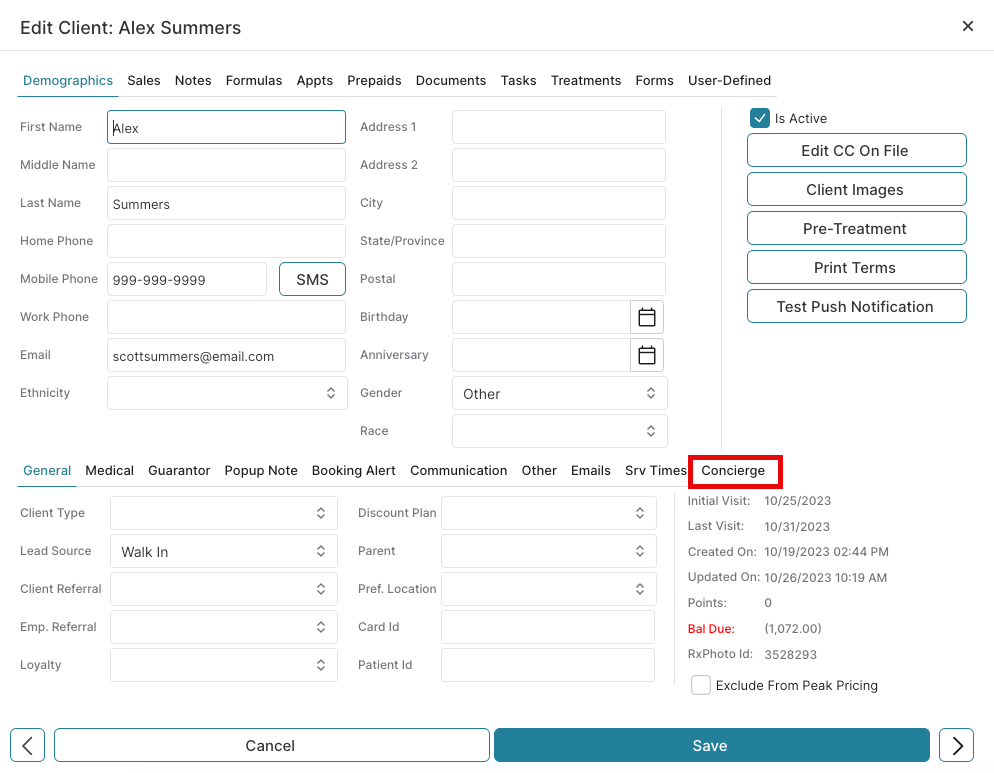
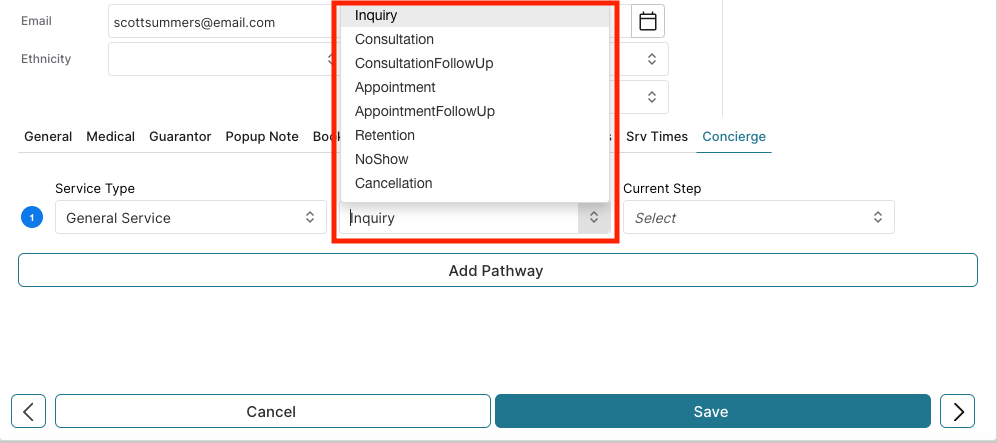
3. Click the dropdown for Pathway Start Status and select the Stage where you want the client to begin on the pathway.
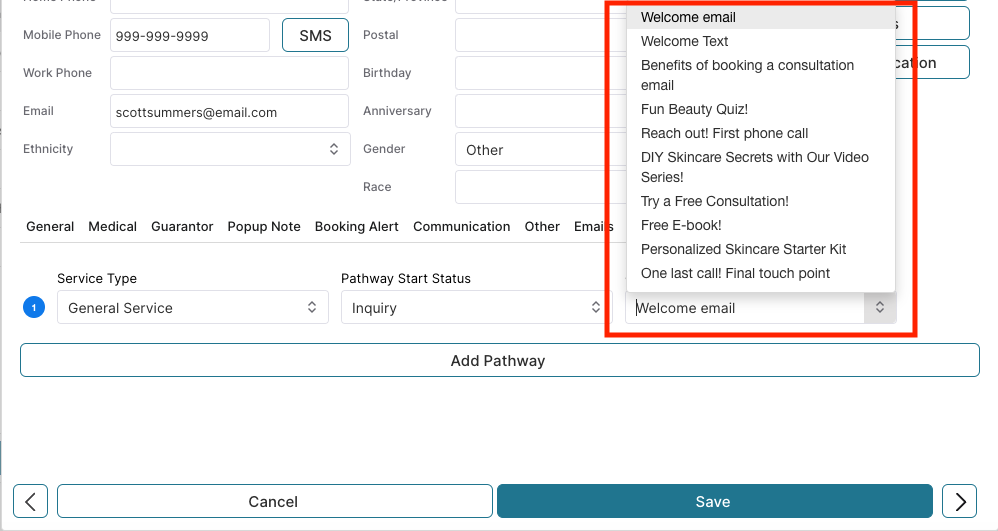
4. The Current Step will default to the first step of the stage selected for the client to begin on the pathway. You may click on the dropdown to select a different step if desired.
5. Click Add Pathway to assign the client to the pathway.
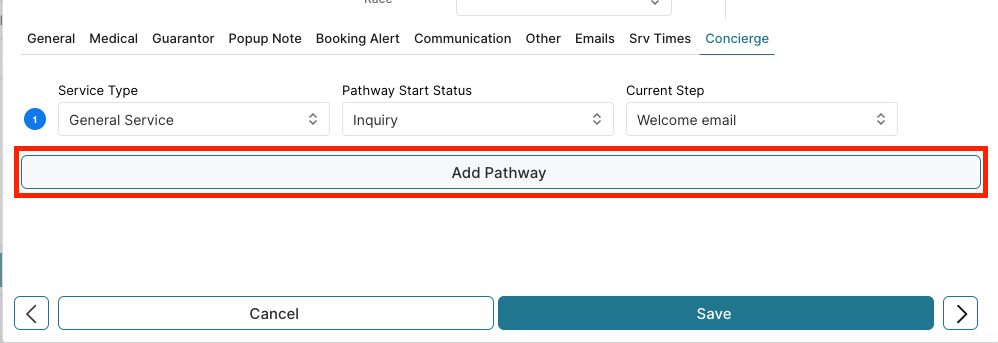
6. Additional pathways may be added to the client by completing the dropdowns and clicking Add Pathway. Note that a pathway may only be assigned to the client once.
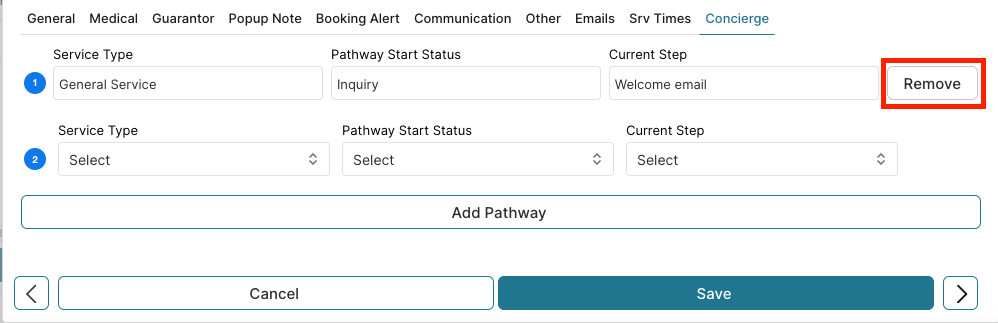
7. If a pathway is assigned to a client in error or circumstances change and you wish to remove the client from a pathway, simply click the Remove button. A pop-up message will ask you to confirm you wish to remove the pathway.
Additional Stages
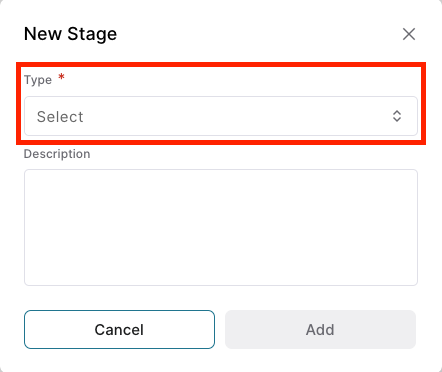
- Additional stages are available for selection when creating a pathway. Navigate to Marketing > Concierge > Concierge Automation and click View on an active pathway. You will see the following window. Click Add Stage.
- Select the dropdown for Type.
- In this dropdown, you will find all the additional stages needed to complete a client’s care journey:

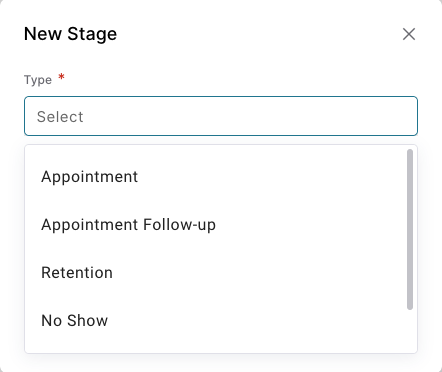
Appointment Follow-up
Retention
No Show
Cancellation
Each of these can be added to the pathway as distinct stages with specific steps designed to engage or re-engage clients, fostering stronger relationships and increasing revenue. Select the desired stage you wish to add to your pathway.
Pro Tip: The Template Pathway has been designed to utilize the Consultation and Appointment stages in conjunction with the Appt Reminder feature that already exists in PatientNow Essentials. These stages focus on additional ways to engage with the client outside of scheduling reminders in fun, educational, and entertaining ways to keep the client interested and excited about their upcoming appointments.
- Click Add Stage. Add any Steps to the Stage needed to build out the drip campaign (see the Template Pathway for ideas) and then repeat this process for each Stage.
Additional Features
Merge Tags
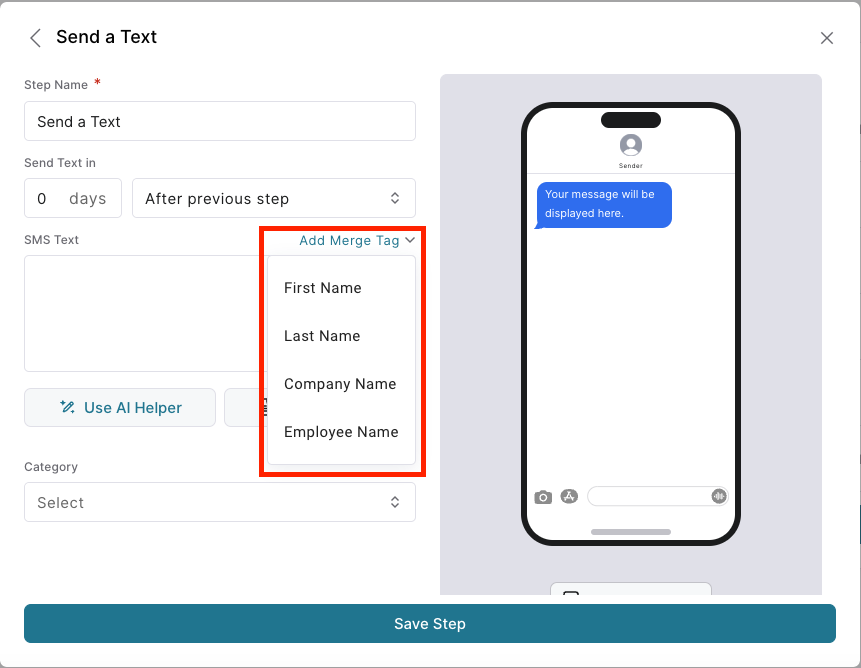
On the Send a Text Step, there is now a “Merge Tags” dropdown available that includes the four most used merge tags: First Name, Last Name, Company Name and Employee Name. To utilize this feature:
- Navigate to Marketing > Concierge > Concierge Automation > a Pathway > a Stage > and either click Add a Step and select “Send a Text” OR select a “Send a Text” step that already exists and click Edit.
- Just above the SMS Text field on the right, click the “Add Merge Tag” dropdown.
- Select the desired merge tag by clicking on it. The merge tag will be placed wherever the mouse is located within the SMS Text field. Note that this dropdown of merge tags is only available for the SMS Text field on the Step.
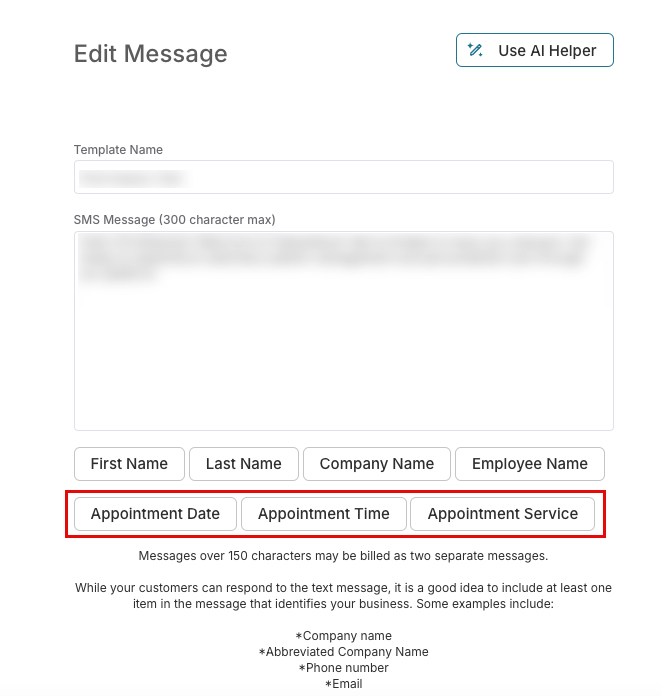
Additional merge tags have been added to both the Email and SMS templates in PNE, as requested by internal stakeholders and via client feedback.
To access SMS the merge tags:
- Navigate to Marketing > SMS Template Creator > Add a New or Edit Selected Template
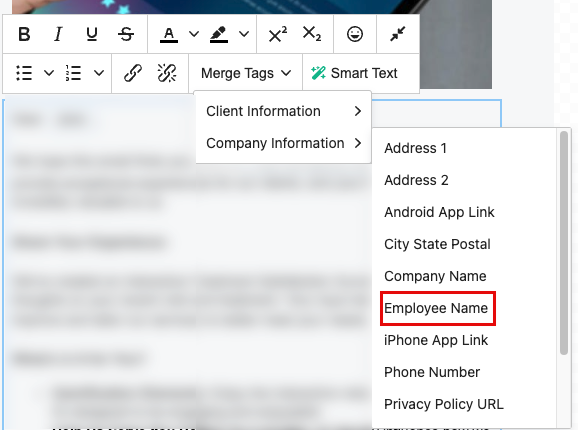
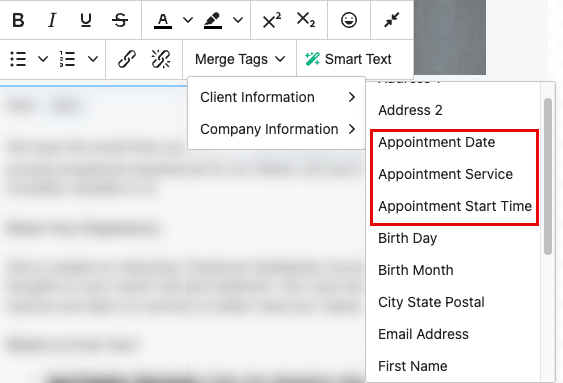
To access the Email merge tags:
- Navigate to Marketing > Marketing Template Creator > Add a New or Edit Selected Template.
- Add a text block to the email template.
Click on Merge Tags to select a merge tag.
Lead Capture
PatientNow Essentials now offers the ability to embed an iframe in your website to capture leads, automatically create these leads as new clients and assign them to two pathways in Concierge based on selected areas of interest. These leads can also be monitored for duplicates through available reporting in PatientNow Essentials.
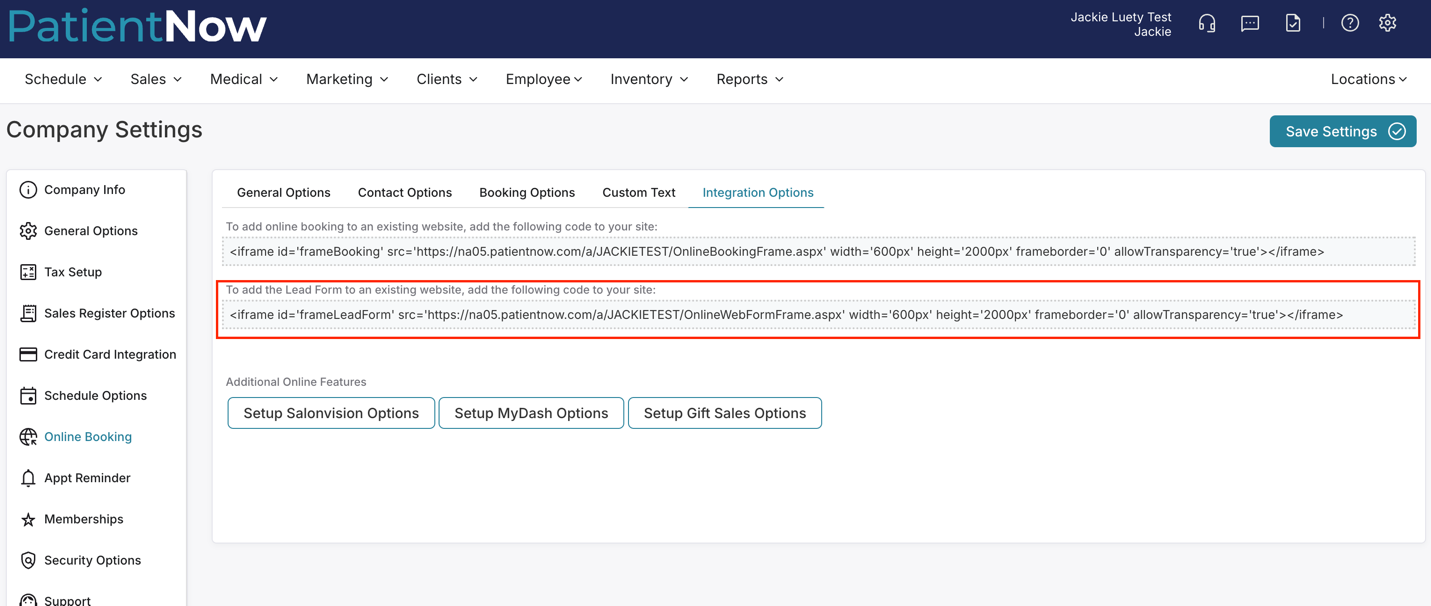
Add the Lead Form to a website
- Navigate to Company Settings > Online Booking > Integration Options
- Copy the code displayed under “To add the Lead Form to an existing website, add the following code to your site:”
- Paste the code within your HTML file for the web page where you want to add the Lead Capture form. This can be done through a file editor or directly through your website’s content management system, like WordPress, Wix, or another platform. See more detailed directions here.
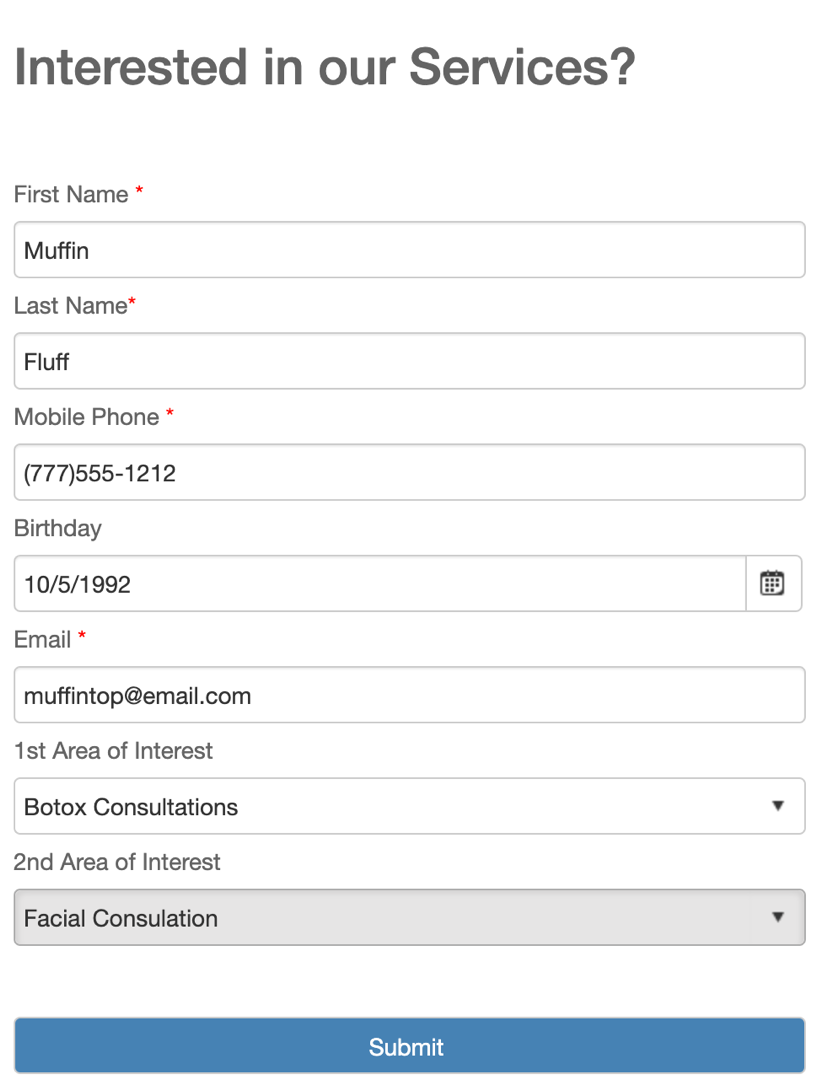
Lead Form Submission
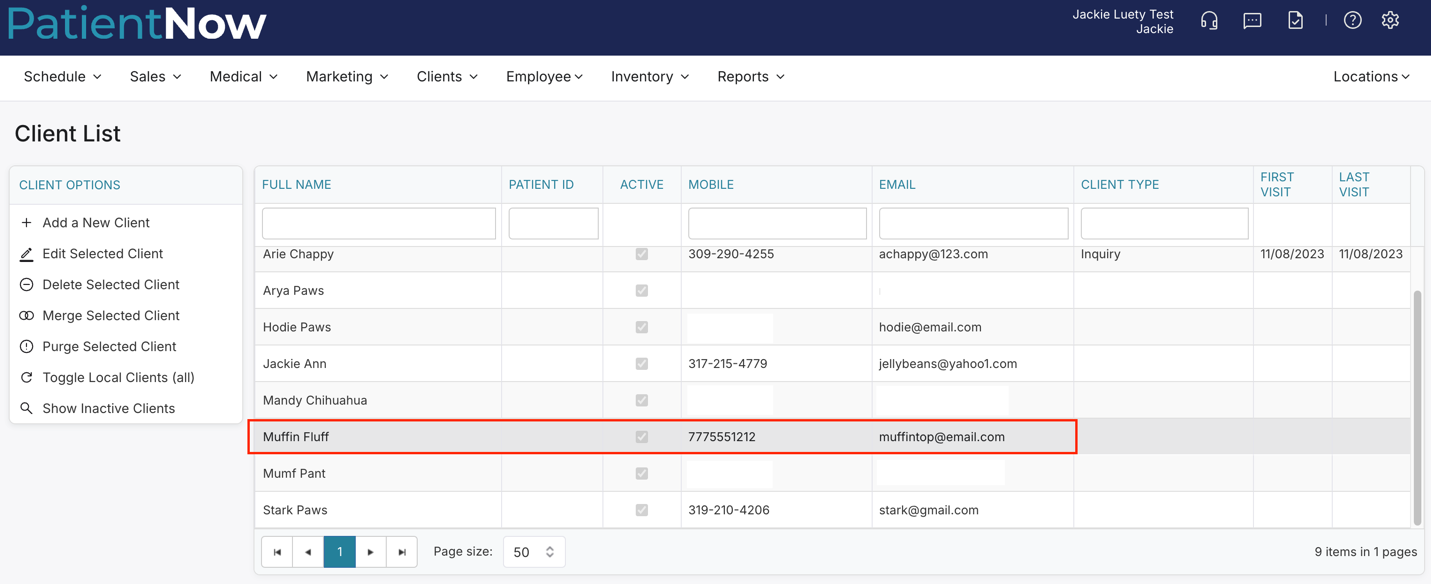
After a lead clicks Submit, the information entered on the lead form is automatically entered in PatientNow Essentials as a client.
Note that inquirer selected two areas of interest on the Lead Form:
- Botox Consultation
- Facial Consultation
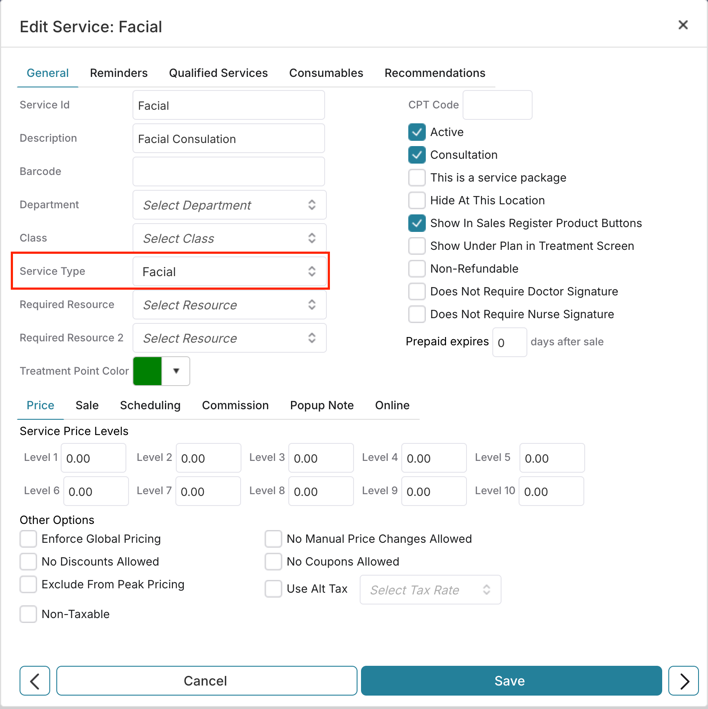
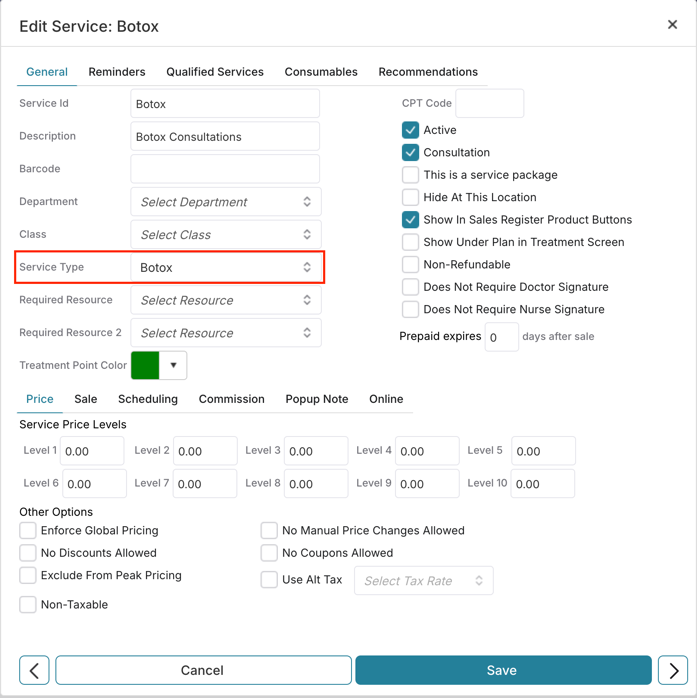
Each of these areas of interest are Services from the Service List. Each also has a Service Type associated with them:
These service types are also assigned to active pathways.
When we view the new client and look at the Concierge tab, we can see the client has automatically been assigned to these two pathways. The Service Type that was associated with the Service selected as an Area of Interest on the Lead Form provided the link to the Pathway with the same Service Type assigned to it.
Pro Tip: If a client is already assigned to a pathway with the same service type, the client will not be assigned to the pathway again. The automatic assignment request will be ignored.
Turn Off Automatically Assigning Web Clients to Pathways
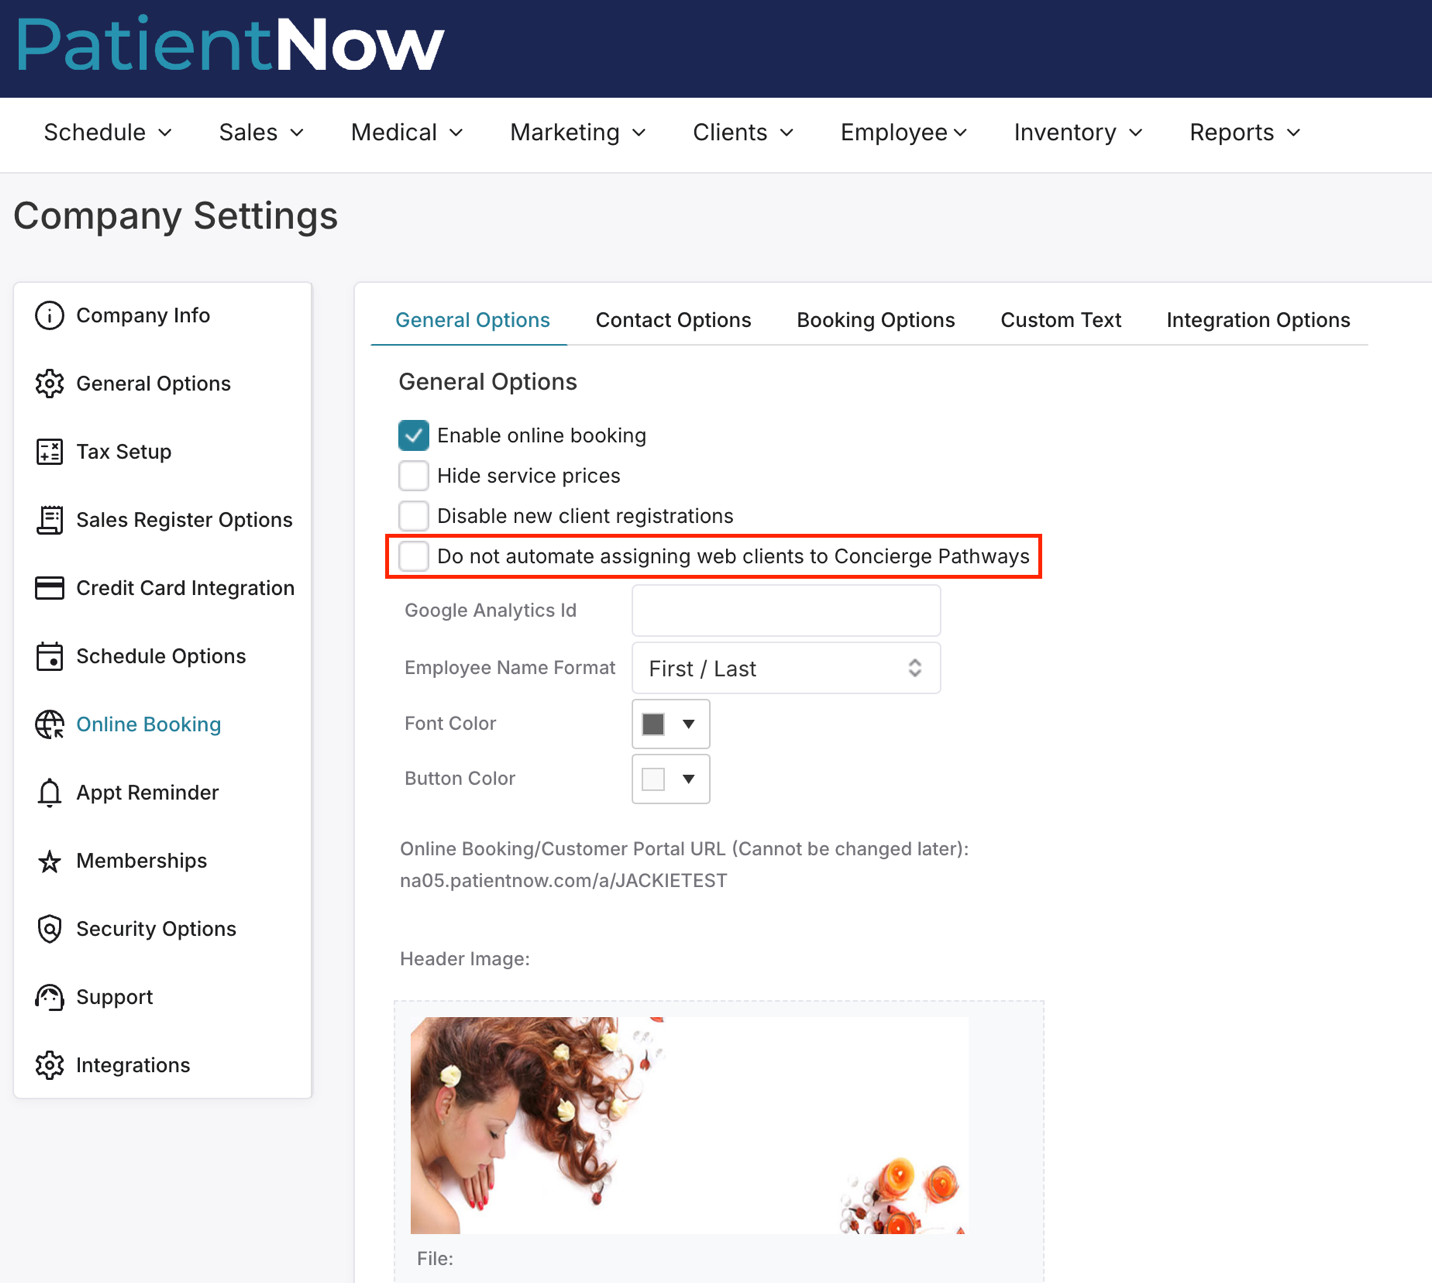
If you are using the Lead Form on your website but do not want lead submissions that become new clients in PatientNow Essentials to be automatically assigned to pathways, you can turn this functionality off.
- Navigate to Company Settings > Online Booking > General Options.
- Check the box “Do not automate assigning web clients to Concierge Pathways”
Booking Appointments Automatically Places Clients on a Pathway
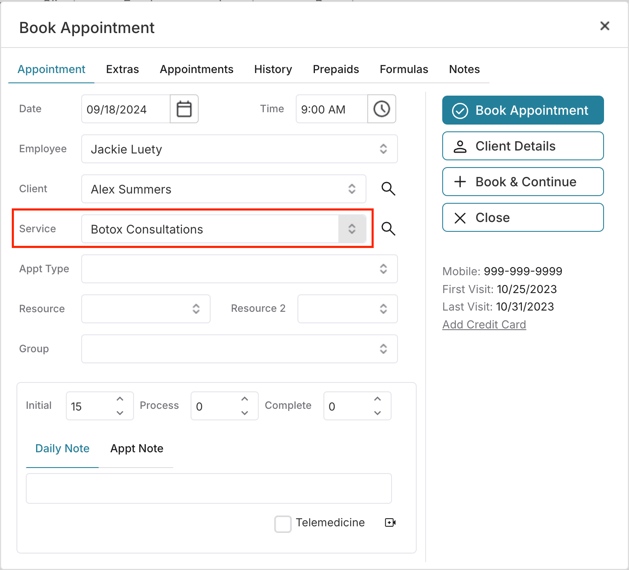
Clients that book appointments using Online Booking may be automatically added to a pathway, along with those that are booked directly onto the schedule. If the Service on the appointment has a Service Type which is also assigned to an active pathway, then the client will be automatically assigned to the pathway when a consultation or appointment is scheduled using online booking or directly on the schedule.
For example, if a client has an appointment scheduled with the service “Botox Consultation” which set up with the Service Type “Botox” and there is an active pathway also assigned to the Service Type “Botox”, then the client will be automatically set on the Botox pathway, at the Inquiry stage. It works the same way for online booking appointments.


Pro Tip: If a client is already assigned to a pathway with the same service type, the client will not be assigned to the pathway again. The automatic assignment request will be ignored.
Turn off automated assignment to pathways with scheduling/booking
If you are using Concierge but do not want to have your clients automatically assigned to a pathway when an appointment is booked online or on the schedule that has an associated pathway, you can turn this functionality off.
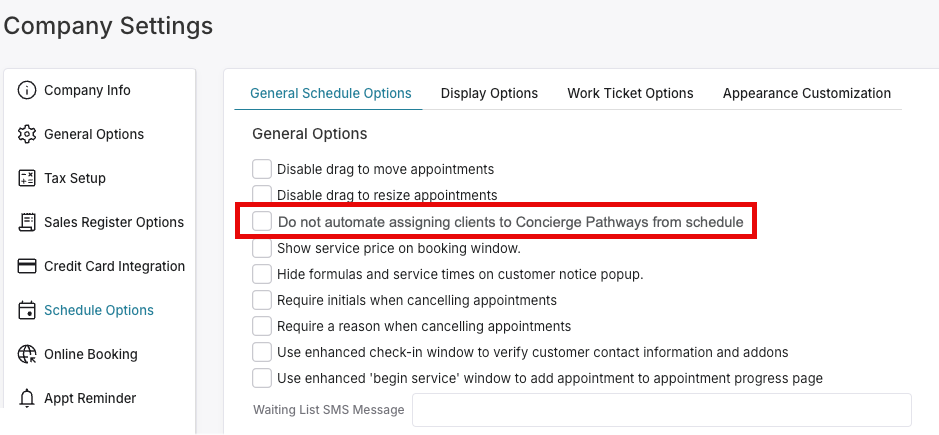
- Navigate to Company Settings > Schedule Options > General Schedule Options > General Options.
- Check the box “Do not automate assigning clients to Concierge Pathways from schedule”.
Assign Clients to Pathways in Bulk
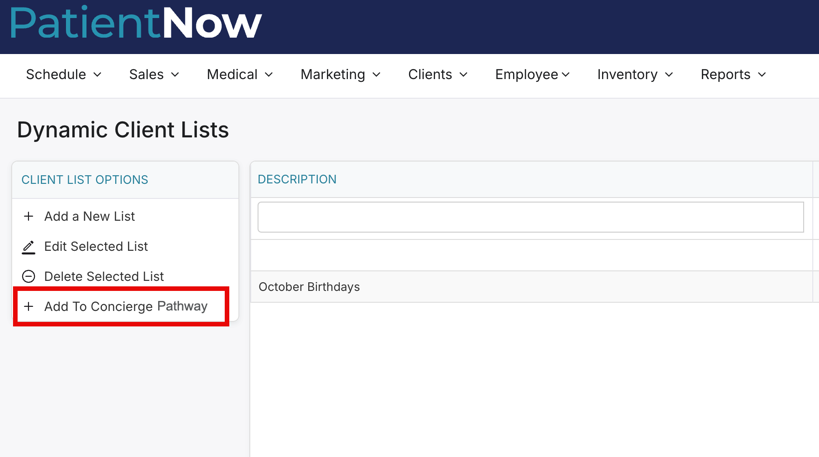
Using Dynamic Client Lists, you can assign clients to a pathway in bulk.
Navigate to Marketing > Dynamic Client Lists.- Either Add a New List or select an existing list.
- Select “+ Add To Concierge Pathway”.
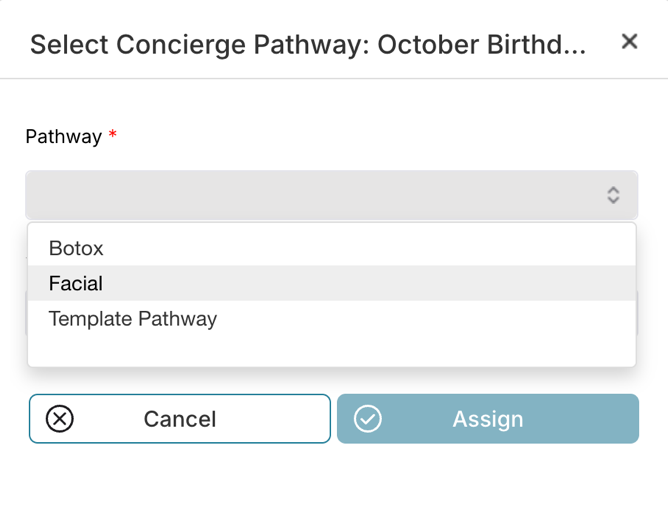
- Select a Pathway.
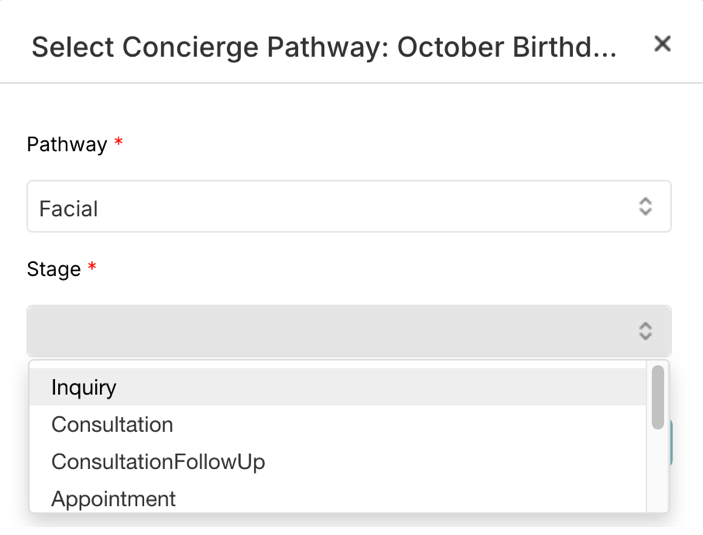
- Select a Stage.
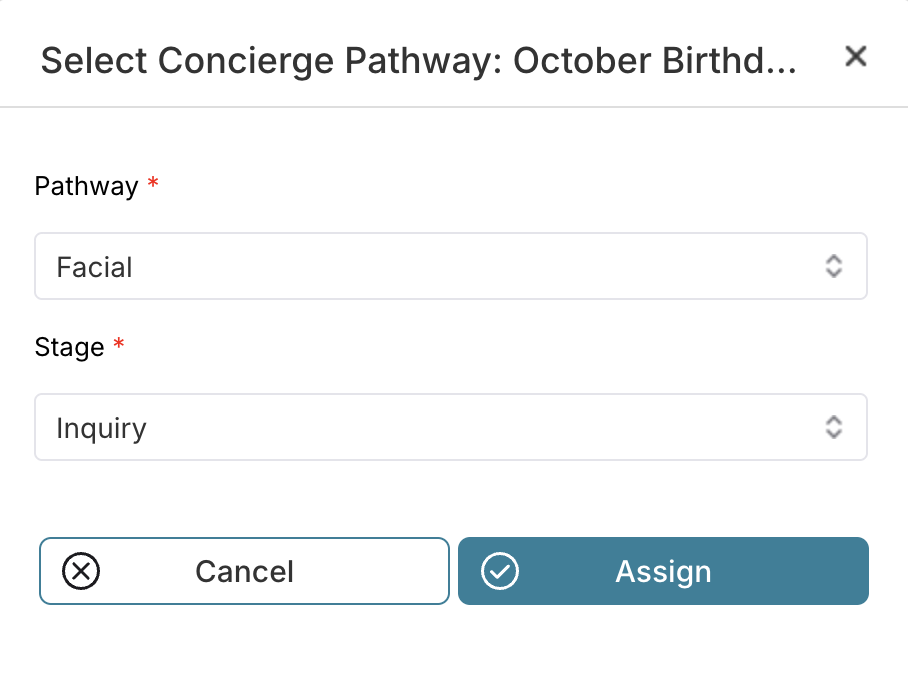
- Click Assign. The clients included in the dynamic client list will be assigned to the pathway selected, at the stage selected and will start at the first step in the stage.
Pro Tip: If a client is already assigned to a pathway with the same service type, the client will not be assigned to the pathway again. The automatic assignment request will be ignored.
Concierge Automation – New Tabs
With the ability to have multiple pathways, inactive pathways and archived pathways, we have added two more tabs to the Concierge Automation page to help sort through the various pathways you may create over time.
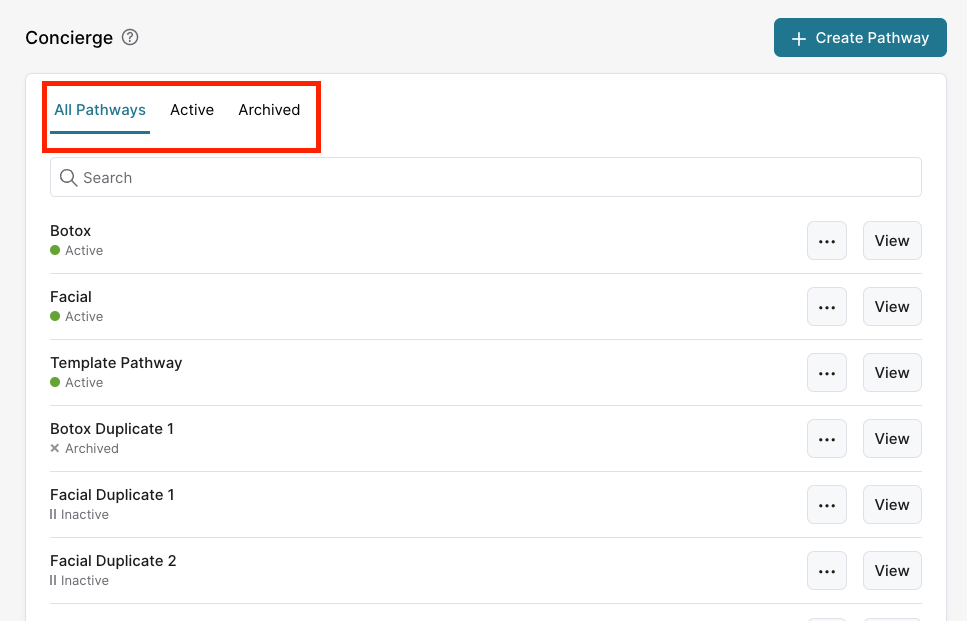
There are three tabs:
- All Pathways – This tab includes Active, Inactive and Archived pathways. Active pathways will always display at the top of the list in alphabetical order.
- Active – This tab only displays the Active pathways, in alphabetical order.
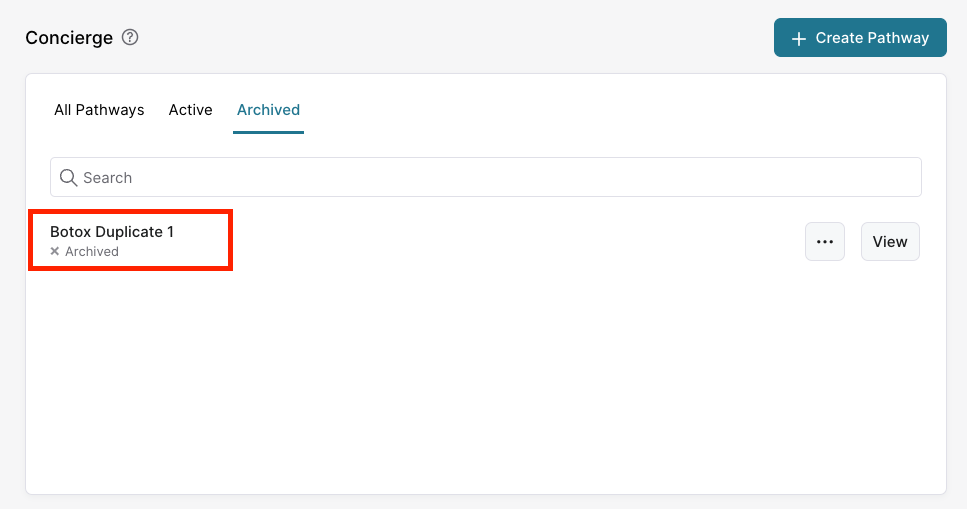
- Archived – This tab only displays the inactive pathways that have been archived.
Duplicate a Pathway
Copy a pathway to create another, similar pathway or to create your own template pathway.
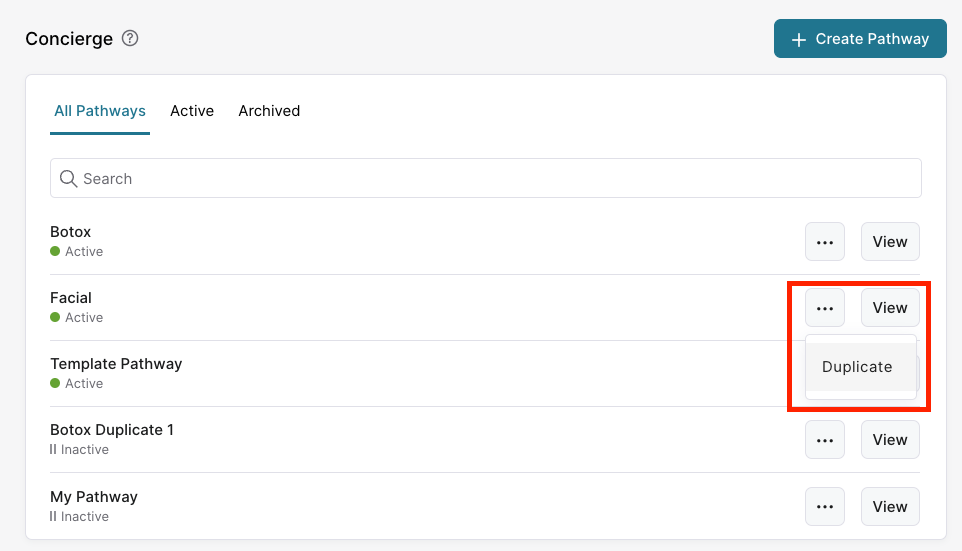
- Navigate to Marketing > Concierge > Concierge Automation
- Click on the ellipsis icon on a pathway you wish to duplicate and select “Duplicate.”
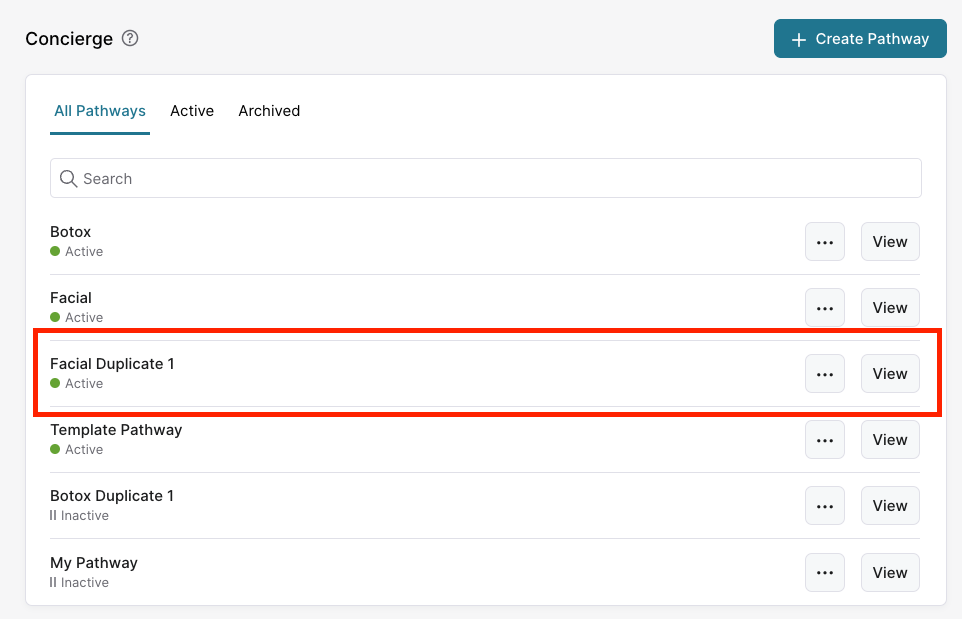
3. A complete duplicate of the original pathway will be created named with “Duplicate X” following the name of the pathway, except for the “Service Type” assigned to the pathway.
4. Click “View” on the duplicated pathway. The original Facial pathway has a Service Type “Facial.” We must select a different Service Type for the duplicate pathway because only one pathway may use a Service Type.
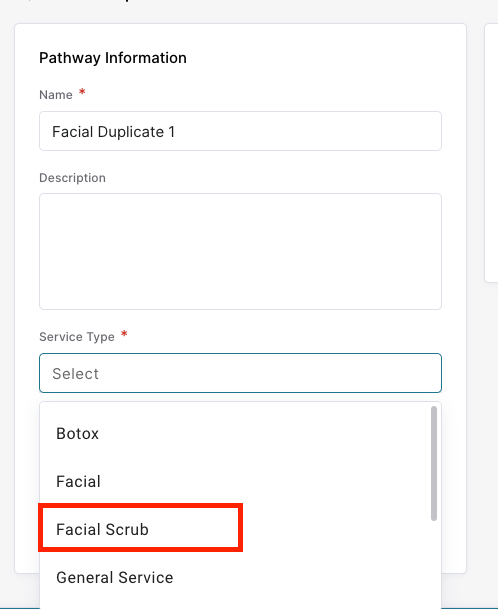
5. Click Save to save your changes.
Archive a Pathway
A pathway must be Inactive to be Archived.
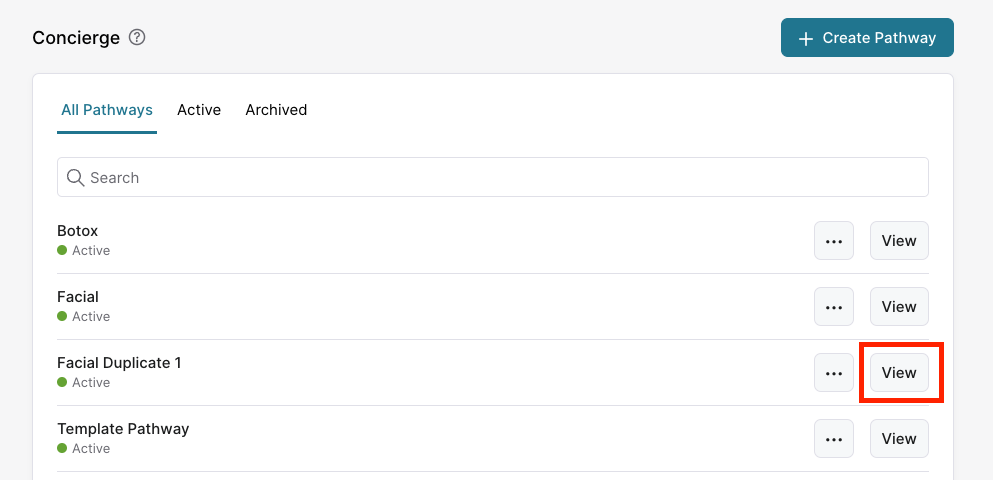
- Navigate to Marketing > Concierge > Concierge Automation
- Click “View” on the pathway you wish to make Inactive.
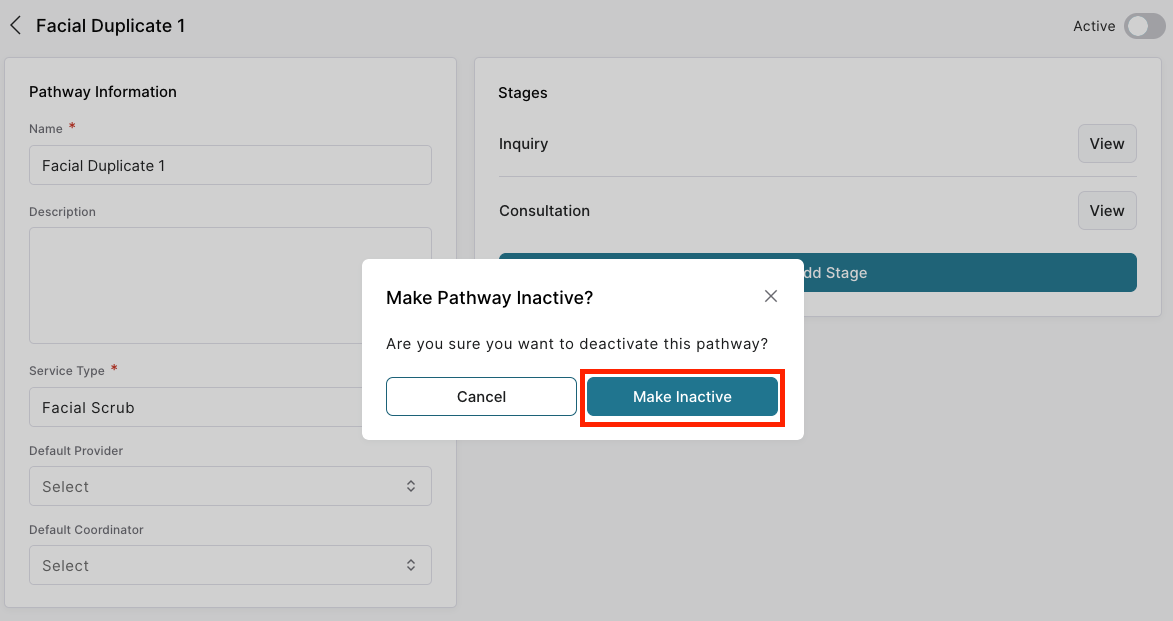
- In the upper right corner, click the toggle to change the pathway from “Active” to “Inactive”.

4. Click “Make Inactive.” This will stop all activity from the pathway. The pathway will display on the “All Pathways” tab with an “Inactive” status. It does not remove the pathway from the client’s Concierge tab.
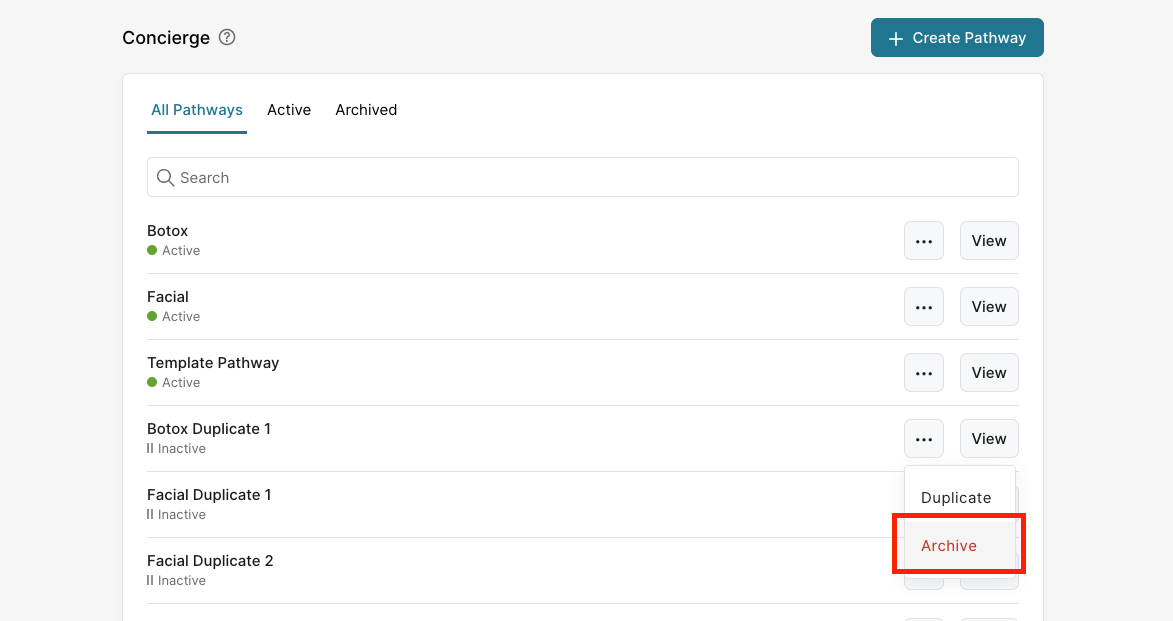
6. The archived pathway will have a status of “Archived” on the “All Pathways” tab and will be displayed on the “Archived” tab.
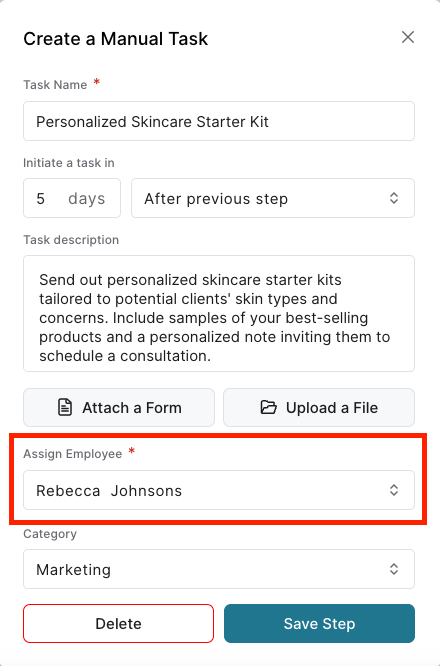
Send a Notification When a Manual Task is Due
We have added the ability to assign a Manual Task to a specific employee and to have that employee receive an email when that Manual Task is due.
- Navigate to Marketing > Concierge > a Pathway > a Stage > a Manual Step
- When creating the Manual Step, assign an employee to the step

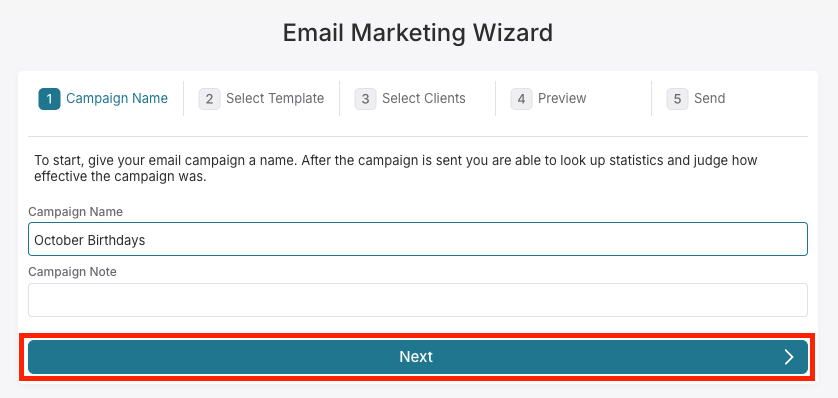
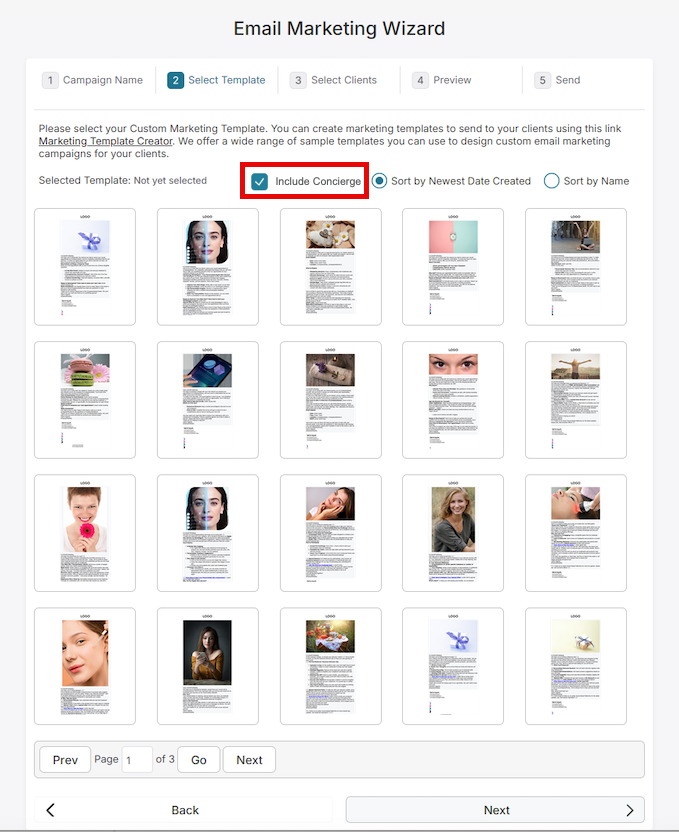
Added a Filter to Select Template page
To aid in selecting templates when creating an email marketing campaign, we added a filter to remove the Concierge templates from the view.
- Navigate to Marketing > Email Marketing Wizard
- Enter a Campaign Name and click Next.
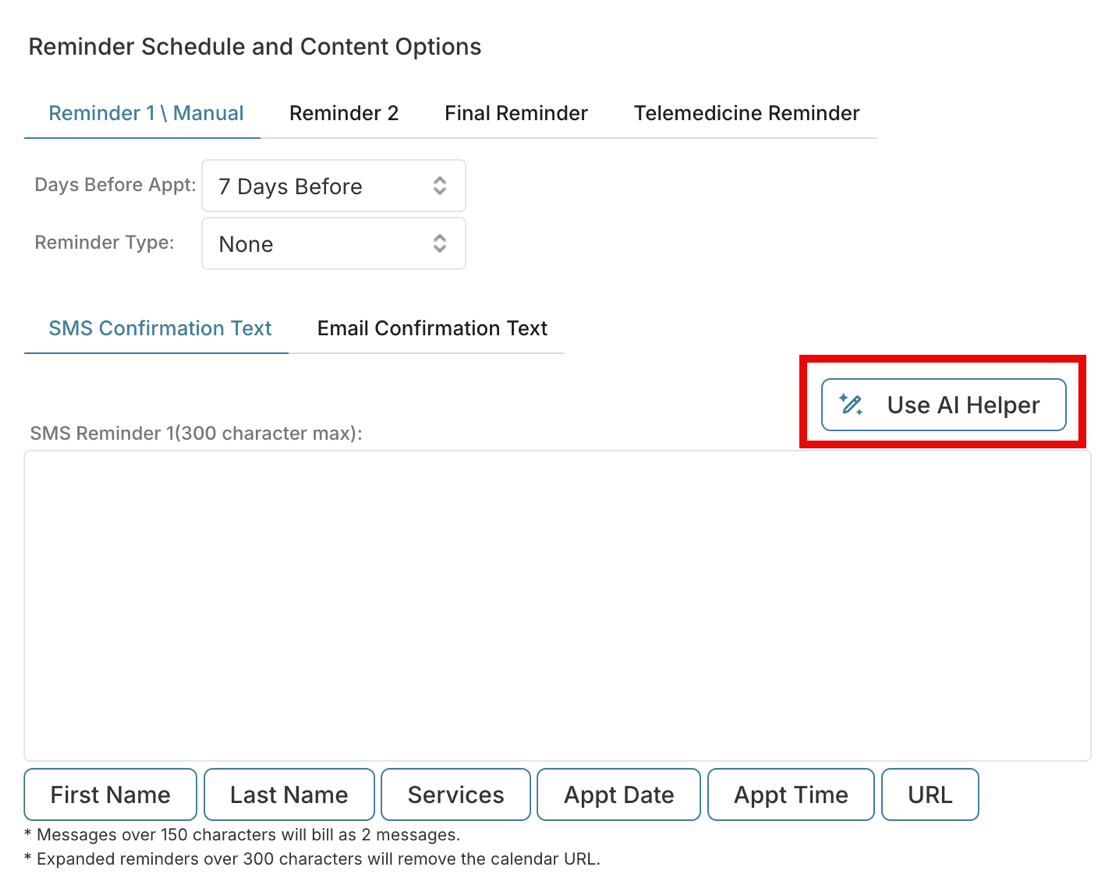
AI Helper in Appt Reminder
To help make creating Appointment Reminders easier, we have added the AI Helper here as well.
- Navigate to Company Settings > Appt Reminder > Reminder Schedule and Content Options.
- On any of the Reminder tabs, click Use AI Helper to get assistance with creating reminder texts or emails.
Concierge is available in Envision
We have made Concierge available for our salon customers who select the Ultimate package. Access to Concierge in Envision will work the same as it did for PatientNow Essentials, requiring contact with PatientNow at the number provided.
Adding an iframe code (the Lead Form) via HTML
- Locate the HTML file for the webpage where you want to add the Lead Form. Open the file using a text editor like Notepad++ or even a simple text editor.
- Find the right spot to insert the iframe code for the Lead Form.
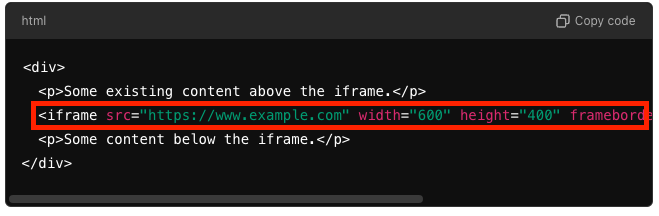
- In the HTML file, identify the place on the webpage where you want the Lead Form to appear. This could be inside a <div> or between existing content.
- Look for markers like <body>, <div> or section where other content exists on the page. If you want it in a specific section of the website, like in the main content area, place the Lead Form there.
- Copy the iframe (Lead Form) code.
- Paste the Lead Form code. Once you have located the right spot, you can paste the copied iframe code directly into the HTML file. For example, you could paste it between two other sections:
- Save the file.
- Preview the changes. View your website to ensure the Lead Form is displaying correctly.
Adding an iframe code (the Lead Form) via CMS (WordPress, Wix, etc.)
- Locate the HTML file for the webpage where you want to add the Lead Form.
- In your CMS, access the page’s HTML through the platform’s editor (e.g. the HTML or “code” view in WordPress).
- Find the right spot to insert the iframe code for the Lead Form.
- In the HTML file, identify the place on the webpage where you want the Lead Form to appear. This could be inside a <div> or between existing content.
- Look for markers like <body>, <div> or section where other content exists on the page. If you want it in a specific section of the website, like in the main content area, place the Lead Form there.
- Copy the iframe (Lead Form) code.
- Paste the Lead Form code. Once you have located the right spot, you can paste the copied iframe code directly into the HTML file. For example, you could paste it between two other sections:
- Update or publish the page.
- Preview the changes. View your website to ensure the Lead Form is displaying correctly.